Primitive Secretary: My DIY Makeover
When I spotted this old, primitive secretary on Facebook Marketplace, I love the plain lines and the open shelves. The paint, though, was not 0my taste at all. We ended up driving about 100 kilometers to pick it up, along with another cabinet that’s in much better condition.
The Before: Bright Blue and Wobbly
Once we got it home and tipped it over, we saw right away how filthy it was. It looked like it had lived in a barn for decades, collecting grime. Before I could think about sanding or painting, I had to begin with a very thorough cleaning.

How to Refinish an Old Secretary
Step 1 – Cleaning
I mixed up some TSP in a bucket of warm water and grabbed a stiff-bristle pad. I scrubbed the whole thing down, especially underneath where all the dirt likes to hide. Gloves help for this part, and good ventilation too. I gave it a good scrubbing using TSP, a bucket of warm water, and a bristle pad. Then I wiped it down with a clean rag and let it dry for a couple of hours in the sun.
Step 2 – Stripping
After the first clean, it was time to tackle that bright blue paint. If you’re in the US, Citrus Strip is great stuff. But I was out, and the strippers up here in Canada just don’t do the trick for me, so I pulled out my heat gun instead.
A heat gun does take more work than a chemical stripper, but it’s worth it. I set mine to medium-high and held it a few inches away from the paint, moving it slowly until I could see the paint bubble up. Once it bubbled, I scraped it off with my paint scraper.
If you try this, work in small patches and keep the heat gun moving so you don’t scorch the wood. It takes time, but I promise it’s worth it. As I went down through the several layers of different paint, I could see that it was solid wood, most likely fir. That made all the effort worth every minute.

Step 3 – Sanding it Smooth
We sanded it down using 80 and then 120 grit sandpaper, almost to bare wood. Seeing that raw wood peeking through was so satisfying, I could appreciate the beautiful, primitive lines and handcrafted craftsmanship. The cabinet is solid wood, with tongue and groove backing.
Once the paint was off, I gave it a good sanding. Starting with 80 grit to quickly remove any leftover paint, and then going over it again with 120 grit to smooth it all out. If you’re sanding an old piece for your home, take your time. It’s amazing what fresh wood hiding under old paint can look like. While sanding, I take a careful look for nicks and decide on the final finish. This piece has too much damage, so I am going to paint it.
Step 4 – A Second Clean
After sanding, I gave it another good wash with TSP. On old, unloved pieces like this, I always suggest washing them twice to get rid of all the dust and any old dirt that loosens up. The rinse water came out almost black, so it definitely needed it.
That extra wash is always worth it because any finish you put on will stick so much better if your surface is really clean. Plus, it gets rid of that icky feeling from whatever was stuck to it before. It’s like giving the piece a fresh start.
Step 5 – Repairs
After letting the cabinet dry well, I filled old holes and cracks with wood filler as best we could. And embraced what I couldn’t fix as part of the aged charm. The cabinet was still pretty wobbly, so I asked Hubs to help. Here is the bottom of the cabinet.

We measured the underside of the cabinet and cut new lumber to size. He drilled holes in the four corners using a spade bit. and we used some wooden spindles for new legs.
We attached them with glue and screws so they stay put. The secretary was quite short, so I suspect it probably had legs once upon a time, but either way, it does now, and that solid wood base gives the piece the structure it needed.

The cabinet had these weird little horn-like bits sticking out of the top. They were original, but honestly, not cute and kind of a safety hazard. To remove them, we clamped a straight board in place to use as a guide and just took turns sawing them off with a handsaw. It took a bit of work, but it made a big difference in how the front looked. We then smoothed it using sandpaper, poof gone!
Step 6 -Staining the Bottom and Legs
I had to try that new look you see everywhere, with the bottom stained a dark contrasting color. I used a dark chocolate Varathane stain for the bottom trim and the new legs. I applied the stain with a small brush to get into all the corners and edges, then wiped off the excess with a lint-free cloth. It took a couple of coats to get the richness I wanted. Once the stain was dry, I went over the legs with a bit of antiquing wax to deepen the tone and help them better match the bottom trim. The wax also gave the legs a soft sheen and a bit of that aged character I love on older pieces.

Step 7 – Priming and Painting
Since I had sanded the paint almost bare wood, to assure good adhesion, I applied a single coat of Zinsser 123 primer. I used a small brush to get into the corners and detailed areas, then switched to a roller for the larger flat surfaces. Once the primer dried, I gave it a quick sanding with 120 grit sandpaper to smooth out any brush or roller marks before applying the paint.

For the finish, I used Fusion Mineral Paint, which is self-leveling and gives a beautiful smooth look with very little effort. I applied two coats for full coverage. One thing to know about Fusion is that it dries quickly, so to avoid streaks, it’s best to paint a section and then move on without going back over it. If you try to rework areas while the paint is already starting to dry, that’s when streaks can happen. I used a good quality brush for the detailed areas and a small roller for the flat sections. The miracle of paint always surprises me — no matter how tired or rough a piece looks at the start, a fresh coat of paint makes it feel like new again.
Step 8 – Final Additions
I loved how this antique cabinet was coming together, so I took a little extra time to finish off a few details. First, I cleaned up the old hinges by stripping off the paint with a wire brush, then gave them a fresh look using Rub’n Buff in antique gold. To add rub n buff, you just paint it on, give it 10 -15 minutes to dry, and buff it with a soft cloth to bring out its shine.
These small changes made such a difference.

We also picked out a new shelf pull to replace the old one, and Hubs kindly installed all the hardware for me.
I wanted to add a bit more charm to the front, so I ordered a decorative wooden cutout from Temu. I gave it a quick coat of primer and paint, then attached it with E6000 glue and a couple of small nails to hold it firmly in place. It was just the right touch this cabinet needed to make it more feminine.

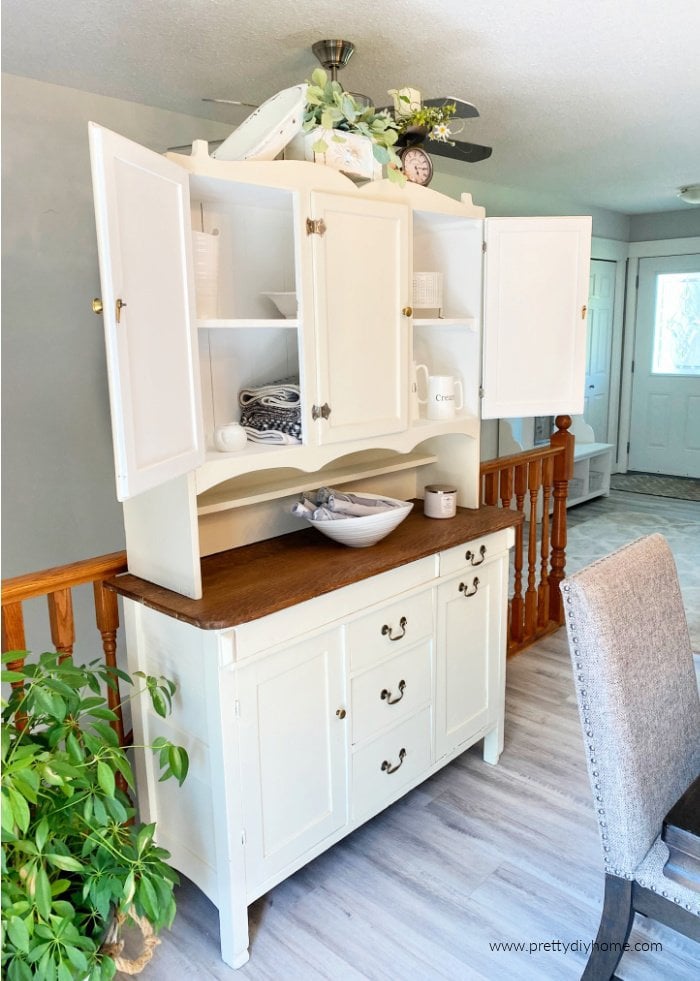
Step 9 – Adding Antique Wax
To help blend the dark-stained bottom with the cream upper section, I lightly brushed on some antiquing wax and rubbed most of it off using a large wax brush. I especially love how it settled into the texture and grooves of the wooden cutout on the front. It added just the right amount of depth and helped tie everything together without overpowering the paint color.


This is the first of several DIY furniture projects I am currently working on. I needed some inexpensive vintage ideas to give my home a more cozy feel while giving me more display areas for collectables and decor items.
Thank you for joining me.
Here are some other makeovers to check out.
Other Furniture Makeovers
Vintage Hoosier Makeover
Here is another before and after furniture makeover we did on a very rustic Hoosier cabinet. It now shares the dining room with our new secretary.

Colorful Craft Room Secretary DIY
This DIY secretary furniture makeover was done in bright, cheerful, feminine colors for my craft room. It didn’t require the structural repairs the other two projects required, just veneer repair, sand, and paint.