
DIY Birch Twig Wreath with a Small Christmas Sign
Today’s DIY birch twig wreath can be made using any purchased Christmas sign you like or already have on hand. I used a small sign from Michaels I found for $5, but a cute Dollar Tree or Dollar Store sign would work just as well.
For me, the problem with commercial signs is often their size. They are cute, but usually quite small. By adding the birch branches, I enlarged mine to approximately 22 by 13 inches, turning the little sign into a nice full-sized Christmas wreath.
My metal Christmas plaque is an arrow for Santa, so I placed it on the fireplace hearth for fun to point him toward the exit. You can use the same idea to turn almost any small Christmas sign or decorative plaque into a wreath for the holidays.
How to Make a Birch Twig Wreath Using a Christmas Sign
Supplies
You don’t need many supplies for this project, and the birch branches can be gathered for free. Here is what I used:
- Five birch branches
- Small Christmas sign or decorative plaque
- Faux evergreen branches
- Christmas ribbon
- Red berries or other small Christmas embellishments
- Twine
- Florist wire
- Hot glue and glue gun
Note: I live up north, where winter temperatures can reach 40 below C, so insects are not much of a concern by Christmas. I simply brush the branches clean before bringing them indoors. If you live in a warmer climate, check the branches carefully for insects or egg sacs and let them dry in a garage, shed, or covered outdoor area for several days before using them.
Step 1. Clean and Prepare the Birch Branches
Brush the birch branches clean and remove any loose bark, dirt, or small twigs you do not want on the finished wreath.
For my wreath, I cut two long branches to 22 inches and three shorter branches to 13 inches. The two long branches form the top and bottom of the wreath, while the three shorter branches are used for the sides and center brace.
Step 2. Arrange the Birch Twig Frame
Lay the two long branches across the top and bottom, then place two of the shorter branches along the sides to form a rectangle. Place the third short branch vertically across the center.
The center branch will be hidden behind the Christmas sign; it gives you a sturdy place to attach the sign and helps brace the two sides of the rectangular wreath together.
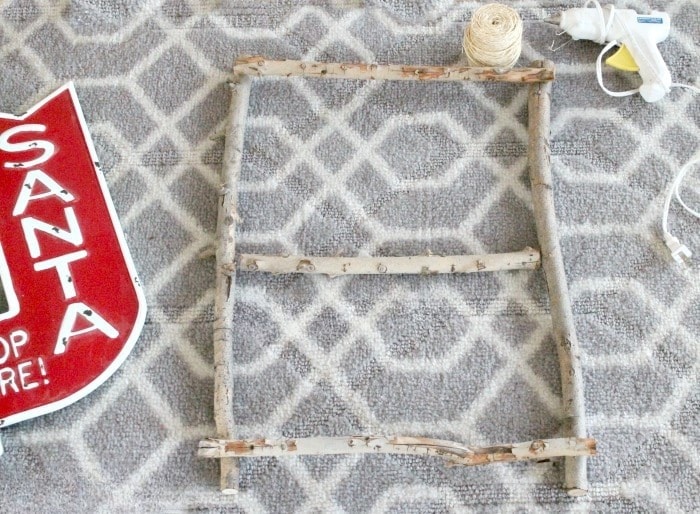
I love that this wreath isn’t round. The rectangular shape makes it a little more unique and works especially well for framing an arrow-shaped sign.
Step 3. Glue and Tie the Corners
Now that you have your branches cleaned, cut, and arranged into the wreath shape, you can start securing the frame together.
Starting at one corner, add a little hot glue where the two branches overlap. You could add a stronger adhesive along with the hot glue, but I preferred to permanently secure the corners using twine. It adds a rustic handmade touch while also providing a strong structural hold.
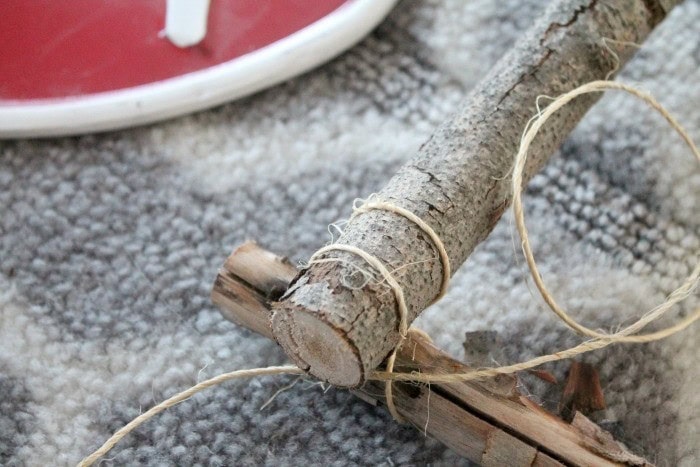
Wrap the twine tightly around both branches several times, pulling it snug as you go. I found it helpful to wrap the twine in opposite directions around the branches before tying the knot. This helps pull the corner together securely.
Tie the twine together at the back of the wreath, add a small dab of hot glue to the knot, and trim away the excess.
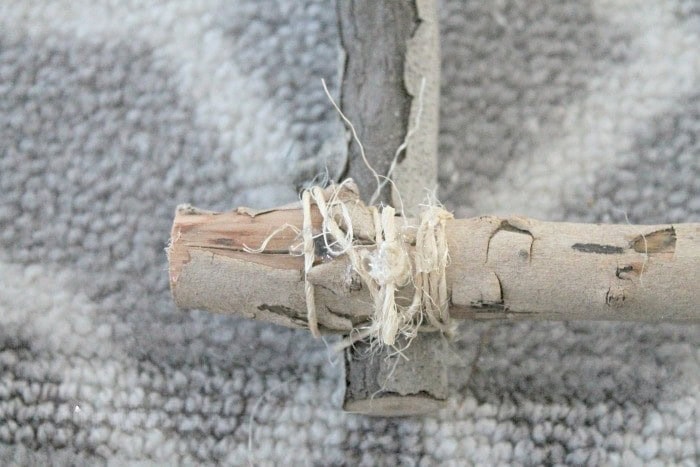
Step 4. Secure the Center Brace
Attach the center branch to both sides of the wreath frame using the same hot glue and twine method. Make sure it is snug because this branch helps brace the rectangular frame and gives you a sturdy place to attach the Christmas sign.
Once everything is tied together, turn the wreath over and add a little extra hot glue to the back of any joints that need reinforcing. Let the glue cool completely before decorating the wreath.
Step 5. Add the Evergreen Branches
Keep the faux greenery fairly sparse so the white birch branches remain visible.
Take two long pieces of faux spruce and attach them near the middle of one side of the wreath. Work the greenery across the top and partway down the opposite side, securing it to the branches with twine or florist wire as needed.
Add a little extra greenery where you plan to place the ribbon so the bow has a fuller backdrop.
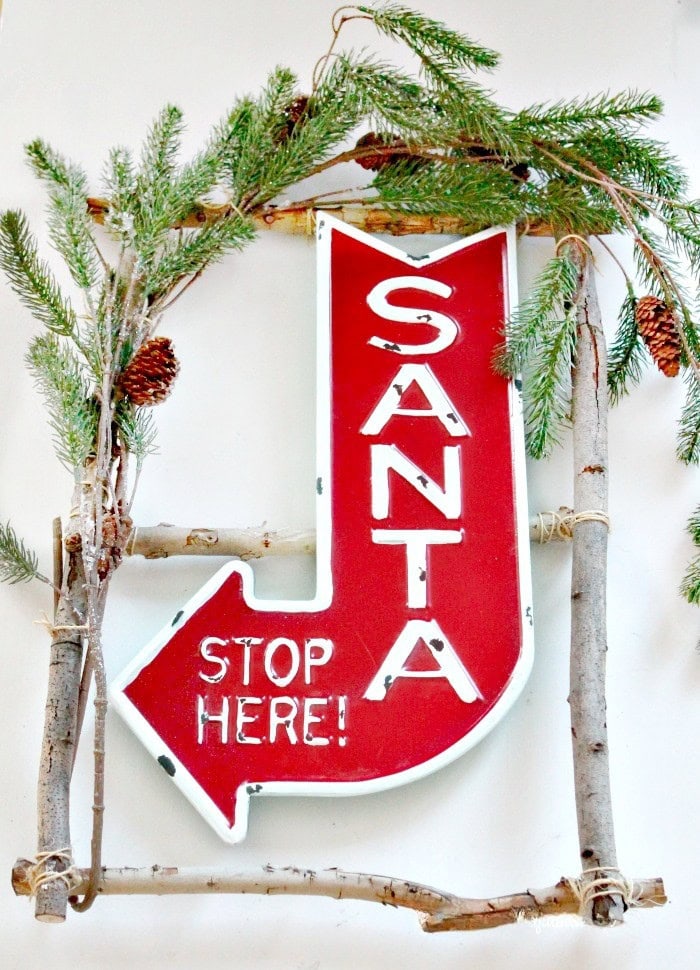
Step 6. Attach the Christmas Sign
Position the Christmas sign inside the birch frame and adjust it until you are happy with the placement.
Secure the sign to the center branch using hot glue, florist wire, or twine, depending on the type of sign you are using. The center branch will be hidden behind the sign, giving you a sturdy attachment point without showing in the finished wreath.
Step 7. Add the Ribbon and Christmas Embellishments
Choose where you want to place the ribbon, then add a little extra greenery in that area to give the bow a fuller backdrop.
I used black and white buffalo check ribbon on this wreath because I already had some on hand. I would have preferred a softer cream buffalo check, but either works well with the rustic branches and greenery.
Tuck in red berries, pinecones, or any other small Christmas embellishments you like, securing them with hot glue, florist wire, or twine as needed.
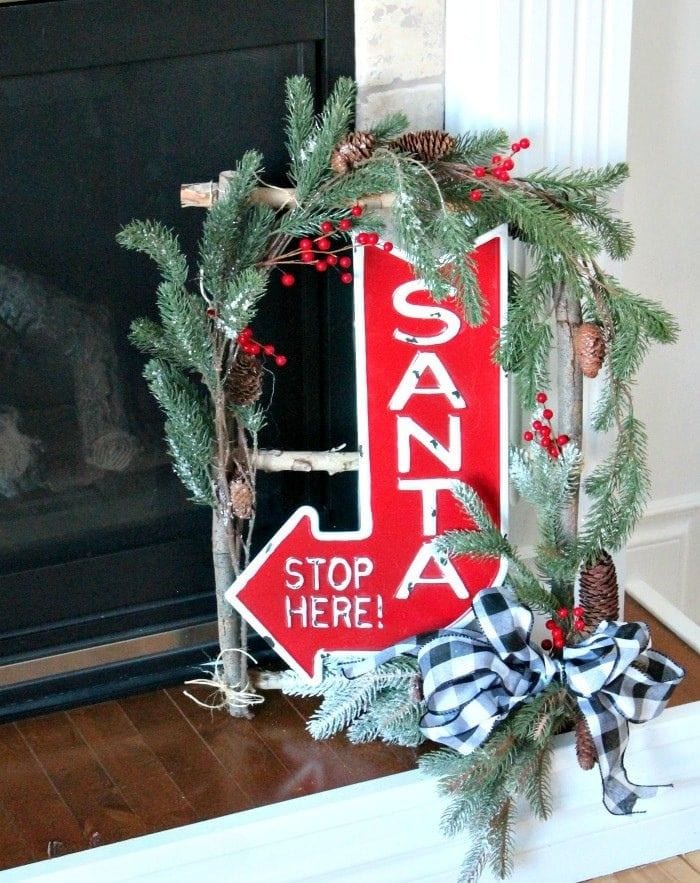
This birch twig wreath is such a simple way to give a small Christmas sign more presence. I especially like that the rectangular twig frame can be made to fit whatever sign you already have, while the natural branches, greenery, and pinecones keep the finished wreath rustic and inexpensive.
Pin this DIY birch twig wreath for later. It is a simple rustic Christmas wreath idea that uses natural branches to turn a small Christmas sign into a larger holiday decoration.
More Christmas Wreath Ideas

Simple Greenery Wreath with Bells
If you enjoy making simple Christmas wreaths, you may also like my Simple Christmas Wreath with Bells, made with greenery, a metal ring, and rustic bells.

27 Christmas Decorations on a Budget
For more inexpensive holiday decorating ideas, take a look at my 27 Charming Christmas Decorations on a Budget. It is filled with simple Christmas projects you can make using affordable supplies and things you may already have on hand.
I love a square wreath, and this one is amazing! I love the Santa sign. Pinning!
Wreaths are something I don’t make often. But that little sign needed something and wreaths are great backgrounds. Thank you for commenting.
What a cute wreath! Rustic is my favorite kind of Christmas decor!
Thank you Cherryl. I like to use naturals for fall and Christmas decor, and it really helps to keep the cost under control.
You sure are the master of using up what you already have and turning it into a masterpiece!! Love that your sweet wreath is not a traditional round shape too! Brilliant!!
Thank you Sam, that skill comes from decades of raising munchkins alone with no money. Funny how that teaches us how to get creative and make something out of nothing. lol
I love that you used what you had on hand. And I love that Santa Stop Here sign!
Thank you, I know you have the same habit.
Awwwww Leanna, I love, love, love your wreath. So unusual. I’m not big into wreaths, it’s not really a thing here in South Africa, but this one is so special. And that Santa sign is perfect
Glad you like it, I would love to hear more about South Africas Christmas traditions.
I love the rustic charm and the unique shape! #12DaysofChristmas2018
What a unique wreath! I love that it’s rectangular, made out of birch branches and the Santa sign just tops it all off. So cute!
The wreath is so pretty and compliments your Christmas theme so nicely. I love the addition of the sign. It is a nice touch.
I have everything needed to make this unique holiday wreath on hand. Love the rustic charm, Leanna! pinned 🙂
What a great idea to make a frame with the branches. The santa stops here sign is perfect! Its’ beautiful! #12daysofchristmas