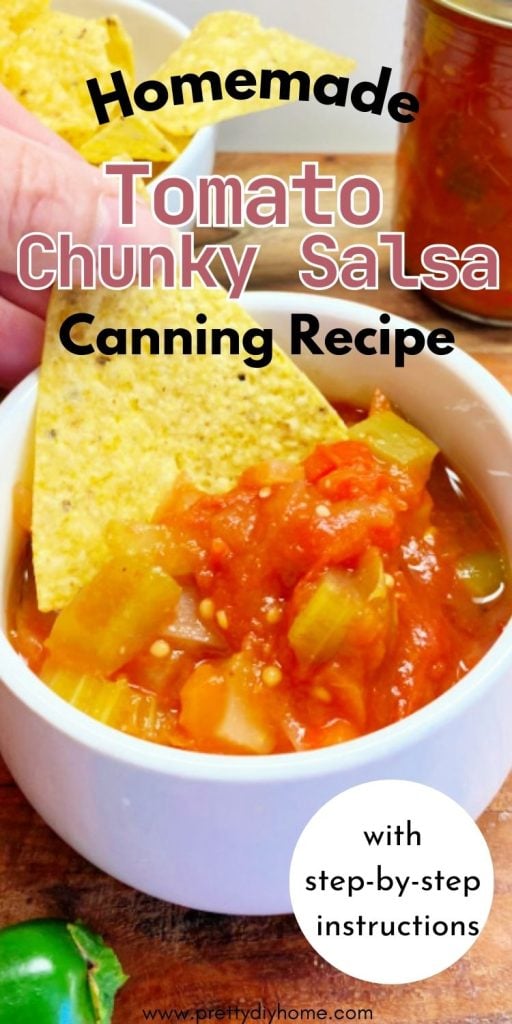
Homemade Chunky Tomato Salsa Recipe for Canning
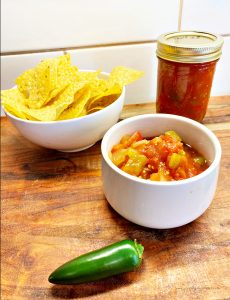
Preserve the flavor of fresh tomatoes with this chunky tomato salsa recipe for canning. Homemade salsa is one of those pantry staples that is always worth the effort, whether you are using garden tomatoes or picking up ripe produce from a local market. If you grow tomatoes like we do, this recipe is a great way to use up the harvest and enjoy it later in the year. A jar of homemade salsa paired with tortilla chips also makes a thoughtful holiday gift.
This is Hub’s chunky tomato salsa recipe, and it has been my favorite for years. It has the right balance of sweet, salty, and heat, with a fresh, homemade flavor that really shines when made with garden-ripened tomatoes, bell peppers, jalapeños, onions, and garlic. This is a large recipe and makes a generous amount of salsa, which is perfect for stocking the pantry.
The most time-consuming part of this recipe is chopping the vegetables into chunky, bite-sized pieces. To make it manageable, the process is spread over two days, with chopping done on the first day and cooking and canning on the second.
If you are new to canning, this is a straightforward recipe to start with. I am sharing the step-by-step water bath canning process so you can work through it with confidence.
Ingredients
- 10 lbs ripe tomatoes
- 4 large yellow onions
- 3 yellow peppers
- 3 green peppers
- 1 small bunch celery
- 4 large jalapeno peppers
- fresh cilantro (optional)
- 2 tsp black pepper (optional)
- 1/3 cup pickling salt (not table salt)
- tbsp baking soda
- 1 cup sugar
- 3 tsp cayenne pepper
- 2 tbsp yellow mustard seed
- 1 1/2 cups pickling vinegar (not regular vinegar or apple cider)
- 2 – 5.5 oz cans of tomato paste
How to Make Chunky Tomato Salsa for Canning
Step 1: Source Fresh Vegetables
In the Canadian climate, tomatoes ripen at the end of August or early September. If you don’t grow tomatoes, that’s the time of year I would spend a morning at the market garden or farmers market, grabbing all the fresh ingredients you can locate.
The best tomatoes for salsa are Roma tomatoes or beefsteak tomatoes because they have more pulp and less juice than other varieties. These varieties of tomatoes are usually readily available and easy to locate for purchase.
Step 2: Prepare the Tomatoes
This recipe uses 14 cups of diced tomatoes or approximately 10 pounds of ripe tomatoes. The tomatoes have a thin skin that needs to be removed first.
To remove the skins, bring a large pot of water to a boil. Place the tomatoes into the boiling water for about two minutes. You will notice the skins beginning to split. Remove the tomatoes with a slotted spoon and transfer them to a sink or bowl of ice-cold water. Allow them to cool slightly so they are safe to handle.
If any skins have not separated, make a small cut at the blossom end of the tomato and peel the skin away. Set the peeled tomatoes aside and repeat until all tomatoes are prepared.
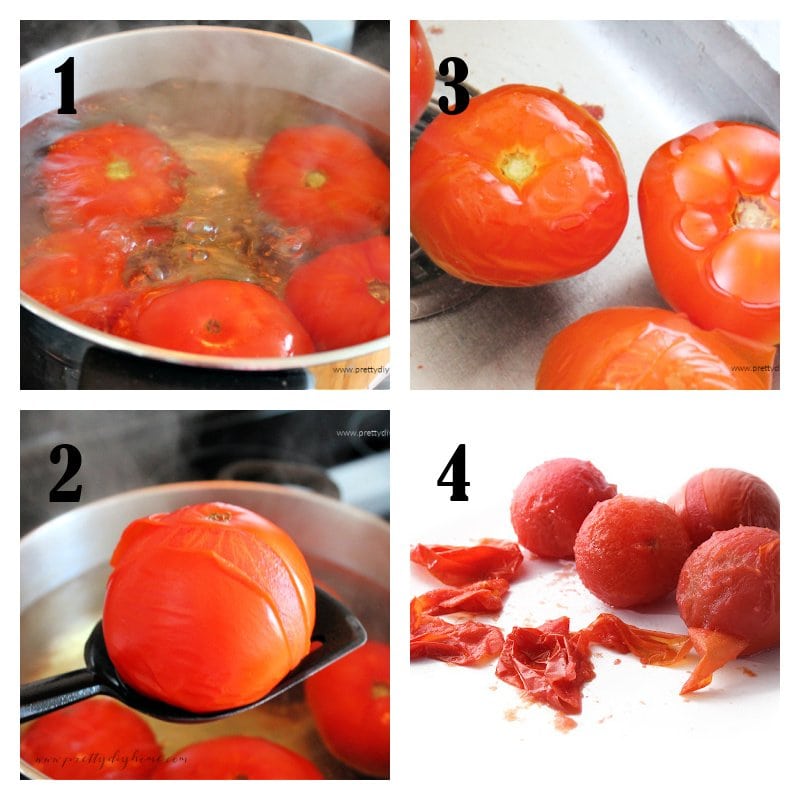
Once peeled, slice the tomatoes into wedges, remove the core, and scoop out the seeds and juices. This can be done over a small bowl using a spoon or your thumb. Dice the tomatoes and place them into a very large bowl. As the remaining vegetables are prepared, they will be added to this same bowl.
Step 3: Prepare the Remaining Vegetables
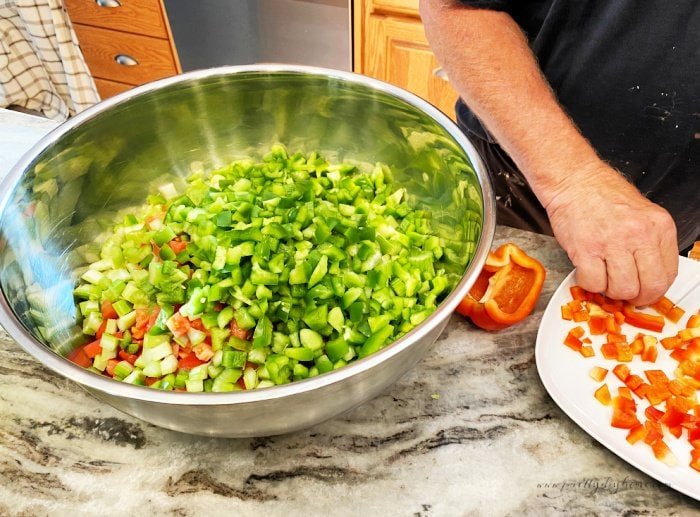
For a chunky salsa, use a knife to rough chop all of the vegetables. A food processor is not recommended, as it chops the vegetables too finely for this recipe.
Yellow Onions – Peel and then dice 4 large yellow onions (6 cups chopped).
Peppers – Wash, core, and remove the seeds from 3 yellow (3 cups )and 3 green peppers (3 cups).
Celery – 1 bunch of celery – Wash, slice, then chop into small pieces until you have 4 cups.
Jalapeno peppers – be careful doing any type of hot peppers, wear gloves, and do not put your hands near your eyes. If you do, you won’t do it twice. (Don’t ask me how I know.)
You will need 4 large jalapenos, washed, seeded, and cored. This depends on taste. Once your mixture is done, you can taste it for heat and add more if you like
Fresh Cilantro – I love cilantro; you can chop up a cup of cilantro now and add it to your mixture. Or just add a bit to some of the jars you want to have cilantro in, before sealing them for canning.
Black Pepper – 2 teaspoons (optional)
Step 4: Mix and Rest the Salsa (Day One)
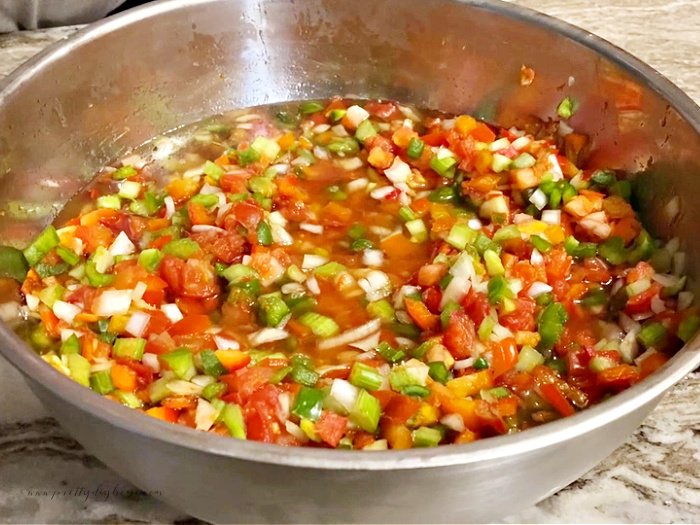
Once all of the vegetables are chopped and placed in the large bowl, add 1/3 cup pickling salt and 1 tablespoon of baking soda. The baking soda helps reduce some of the acidity before the vinegar is added later.
Mix everything together thoroughly until well combined. Cover the bowl with plastic wrap and place it in the refrigerator. Allow the mixture to rest overnight.
This resting time helps draw out excess liquid and allows the flavors to begin blending before cooking on the second day.
Step 5: Drain and Cook the Salsa (Day Two)
Remove the salsa mixture from the refrigerator. Prepare your canning jars as outlined in the following steps.
Using a fine mesh sieve, drain the excess liquid from the salsa. Because this is a large recipe, work in batches that comfortably fit inside the sieve. Allow each batch to drain for a couple of minutes, removing as much liquid as possible without pressing or mashing the vegetables.
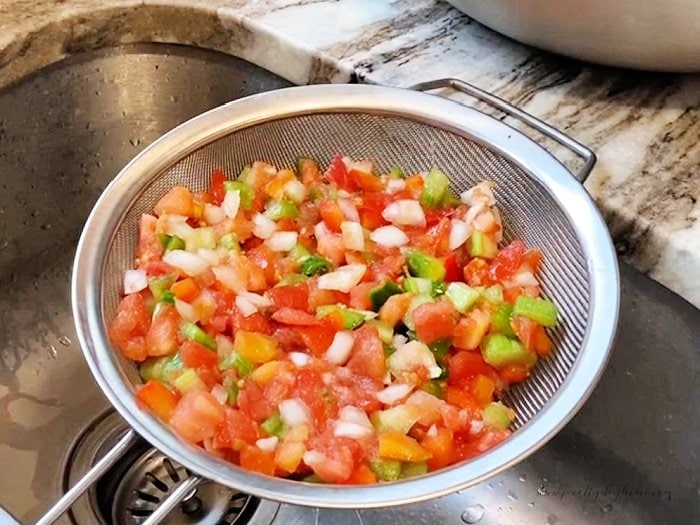
Transfer the drained salsa to a very large cooking pot. Continue until all of the salsa has been drained and added to the pot.
Garlic – Peel and mince 1/4 cup garlic (about 10 cloves, depending on size).
Add the Remaining Ingredients
Stir in the following:
- 1 cup sugar
- 3 teaspoons cayenne pepper
- 2 tablespoons yellow mustard seed
- 1 1/2 cups pickling vinegar (not regular vinegar or apple cider)
- 2 – (5.5 oz( cans of tomato paste
Mix thoroughly. Place the pot on the stove and heat over medium heat, stirring occasionally, until the salsa reaches a gentle simmer. Allow it to cook for 5 minutes, then taste and adjust seasoning if needed.
Step 6: Prepare Jars for Canning
Our original recipe did not use a water bath. We followed a hot-pack method and waited for the lids to seal as the jars cooled. Over time, recommendations have changed, and I now use a water bath canning process for this salsa.
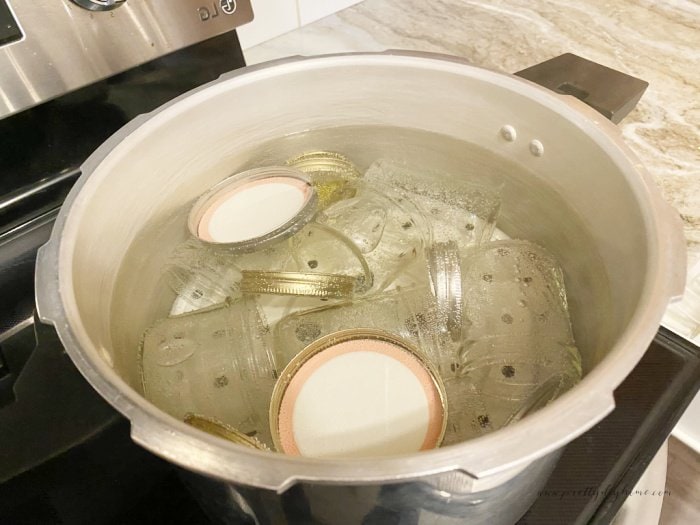
Inspect and wash 10 pint (500 ml) jars or 20 half-pint (250 ml) jars, along with the lids and rings, in hot soapy water. Rinse well. Fill a very large pot with hot (not boiling) water and place the jars open-side up into the pot. Add enough water to cover the jars by at least one inch. If there is room, place the rings and lids in the same pot. If not, use a second pot to heat them.
Bring the water to a boil and boil for ten minutes. Reduce the heat to a simmer and keep the jars hot in the water while you finish cooking the salsa.
Step 7: Fill the Jars
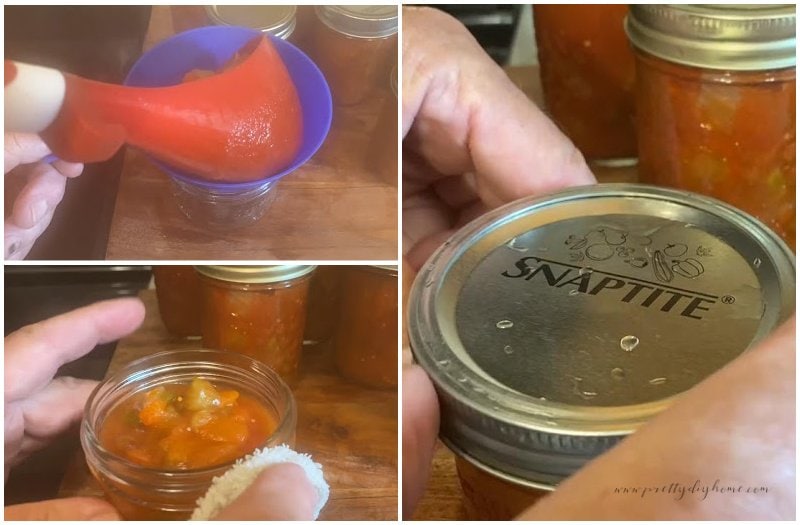
Using a funnel and ladle, fill the hot jars with the cooked salsa, leaving one inch of headspace at the top of each jar. Gently tap the jars on the counter to release any air bubbles, then wipe the rims with a damp paper towel to ensure a clean seal.
Using a jar lifter, remove a lid and ring from the hot water. Place the lid on the jar and screw the ring on finger-tight. Do not over-tighten. Repeat with the remaining jars until all are filled.
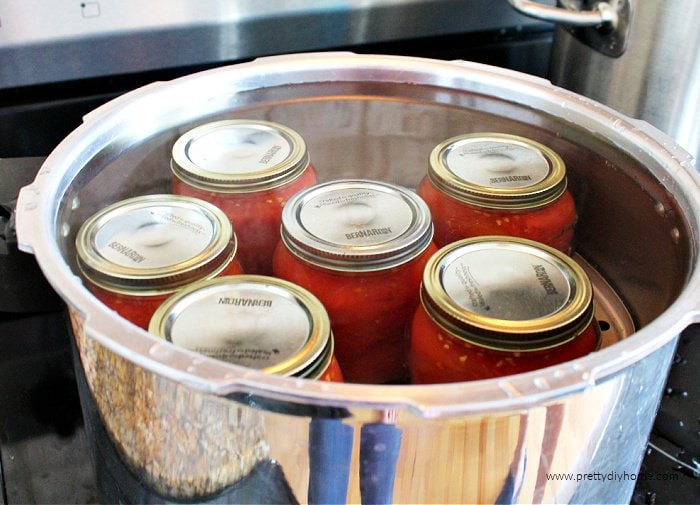
Step 8: Water Bath Process the Salsa
Place the filled jars into the hot water bath, making sure none of the jars are touching. Once all the jars are added, top up the water canner with hot water so that there is at least one inch of hot water above the jars.
Start timing the canning from when the water reaches a full boil. Process in the boiling water bath for 15 minutes.
Once the 15 minutes are up, use the jar lifter to take out the hot jars. Place them on the counter that’s protected with a cutting board and a towel. The jars of salsa are very hot. Allow the jars to sit without disturbing until they are at room temperature.
You should hear the jars of salsa “pop” as they seal. If any of the jars don’t seal, place them in the fridge and eat within a couple of days.
Canning Safety Resource
A very good resource for all types of canning is the National Center for Home Food Preservation. It’s a trusted resource with all sorts of information on canning safely.
Storage and Use
Once sealed and cooled, store the jars of salsa in a cool, dark place such as a pantry or cellar. Properly sealed jars can be stored for up to 12–18 months.
Any jar that does not seal should be refrigerated and used within a few days.
Before using, always check that the lid is sealed and discard any jars that show signs of spoilage.
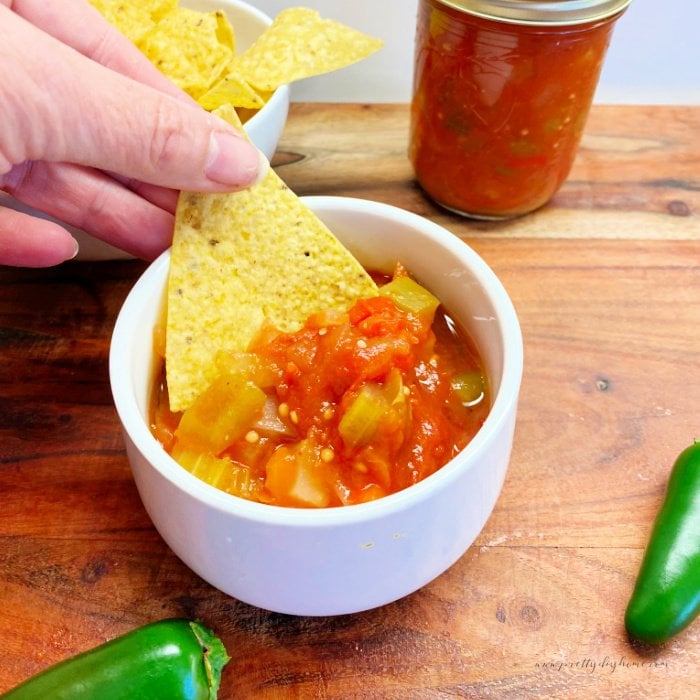
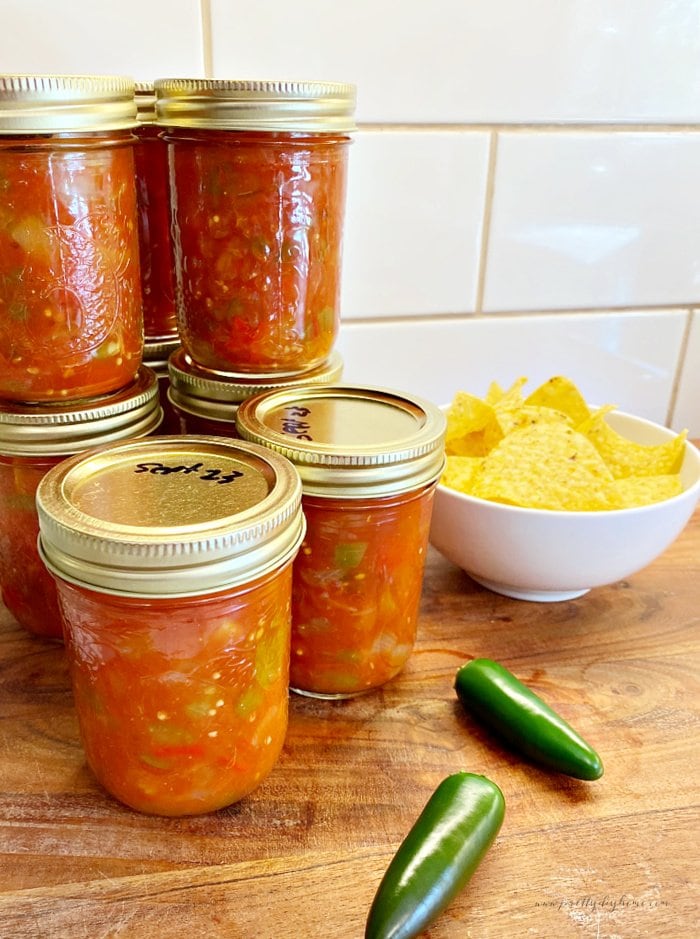
This salsa can be eaten right away, but the flavor improves after a few weeks in the jar. Serve it with tortilla chips, spoon it over tacos or grilled meats, or use it as a topping for eggs and baked potatoes.
Homemade Chunky Tomato Salsa for Canning
Ingredients
- 10 lbs ripe tomatoes
- 4 large yellow onions
- 3 yellow bell peppers
- 3 green bell peppers
- 1 small bunch celery
- 4 large jalapeno peppers
- ⅓ cup pickling salt not table salt
- tbsp baking soda
Added on Day Two
- ¼ cup garlic, minced (about 10 cloves depending on size)
- 1 cup granulated sugar
- 3 tsp cayenne pepper
- 2 tbsp yellow mustard seed
- 1 ½ cups pickling vinegar not regular vinegar or apple cider
- 2 – 5.5 oz cans of tomato paste
Optional
- 2 tsp black pepper optional
- fresh cilantro to taste and optional
Instructions
Step 1: Prepare the Tomatoes
- Peel the tomatoes by placing them in boiling water for about two minutes until the skins split. Transfer them to cold water and peel away the skins. Core the tomatoes, remove the seeds and excess juice, then dice and place them into a very large bowl.
Step 2: Prepare the Remaining Vegetables
- Roughly chop the onions, peppers, celery, and jalapeños into chunky, bite-sized pieces. Add the chopped vegetables to the bowl with the tomatoes. If using cilantro and black pepper, add them now.
- Sprinkle the vegetables with the pickling salt and baking soda. Mix well, cover, and refrigerate overnight.
Step 3: Drain the Salsa
- On the second day, remove the vegetable mixture from the refrigerator. Working in batches, drain the excess liquid using a fine mesh sieve. Transfer the drained salsa to a very large pot.
Step 4: Cook the Salsa
- Add the garlic, sugar, cayenne pepper, mustard seed, pickling vinegar, and tomato paste to the pot. Stir well to combine. Bring the salsa to a simmer over medium heat and cook for 5 minutes, stirring occasionally. Taste and adjust seasoning if needed.
Step 5: Prepare Jars for Canning
- Wash and inspect 10 pint jars or 20 half-pint jars, along with lids and rings. Place the jars in hot water and bring to a boil for 10 minutes. Reduce the heat to a simmer and keep the jars hot until ready to fill.
Step 6: Fill the Jars
- Ladle the hot salsa into the hot jars, leaving 1 inch of headspace. Remove air bubbles, wipe the jar rims clean, and apply lids and rings finger-tight.
Step 7: Water Bath Process the Salsa
- Place the filled jars into a boiling water bath, ensuring the jars are covered by at least 1 inch of water. Once the water returns to a full boil, process for 15 minutes.
Step 8: Cool and Store
- Remove the jars from the canner and place them on a towel-lined surface. Allow them to cool undisturbed until sealed. Refrigerate any jars that do not seal and use within a few days.
Storage & Serving Notes
- Once sealed and cooled, store the jars of salsa in a cool, dark place such as a pantry or cellar. Properly sealed jars can be stored for up to 12–18 months.
- This salsa can be eaten right away, but the flavor improves after a few weeks. Serve with tortilla chips, spoon over tacos or grilled meats, or use as a topping for eggs or baked potatoes.
If you love preserving garden tomatoes, save this homemade chunky tomato salsa recipe for canning for later. It’s a reliable, two-day canning recipe with clear steps and a classic, fresh flavor that works just as well for everyday meals as it does for stocking the pantry.
Other Canning Recipes to Try
How to Can Fresh Tomatoes at Home
A step-by-step tutorial on canning tomatoes. It includes a video of us making them.
Homemade Sweet Pickle Relish
This recipe for old-fashioned sweet pickle relish is very good, and one of my most popular posts. This is another one of those tried and true recipes from decades ago.