DIY Wood Craft for Valentine’s Day Decor
Neutral Valentine’s Day Wood Banner
Valentine’s Day is a great time to enjoy some simple DIY wood crafts. You can either make heart-shaped banner wood pieces from scrap wood, buy them at the dollar store, or refurbish vintage treasures from the thrift store.
Simple DIY projects are the perfect gift for Valentine’s Day, but I am keeping this particular Valentine’s banner for my own Valentine’s Day decor. Using wood is especially nice for gift giving, as wood hearts are more durable than paper hearts are. I hope you like this fun Valentine’s Day craft idea as much as I do. I made mine in soft neutral colors like sage, cream, white, and even a little bit of grey this year. Then I added some lace and shabby chic touches.
I grabbed this vintage wood Valentine banner at the thrift store for $2 and then challenged myself to redo it as cheaply as possible. I knew I wanted a rustic look, with a little shabby chic.

My original plan was to paint it cream with sage green colored grain stripes in various angles, but then I saw a pack of gorgeous neutral green scrap paper and went with that instead. The entire pack of paper cost me $7 for 12 sheets. I used one, and everything else came from my stash. So the cost is between $3 and $9, depending on your math. I think that’s the perfect budget for a Valentine’s gift, especially when you add some time and love into it.
How to Make a DIY Wood Valentine’s Banner
Craft Supplies
You will need some inexpensive craft supplies.
- 7 Wood heart forms (Cut from scrap wood pieces, thrift store, or Dollar Tree)
- Electric drill
- 120-grit sandpaper
- White or cream craft paint
- 1 or 2 sheets of cardstock
- Pencil and scissors
- Green ink pad (optional)
- Wood glue or Mod Podge
- Foam brush or small artist brush
- Hot glue
- Cut up scrap pieces of fabric, muslin, lace, etc.
- Buttons
- Dollar Tree raffia, twine, and cord
- Small free Valentine printables (optional)
- Thin strong twine
- Large-eyed needle
Choosing your craft supplies. If you follow Pretty DIY Home, you know I often talk about the price of craft supplies. If you’re going to buy something inexpensive to fix up, I think it’s important to be cautious with your craft supply budget too.
For ribbon, fabric, lace, and buttons, check out Dollar Tree. They typically have small rolls of fabric and ribbon that work well for projects like this.
For the cardstock, I splurged because I loved my pack and spent $7. You could do it more affordably by buying a single sheet of cardstock or by looking online and downloading and printing something instead.
Step 1 – Prepare Wood Valentine’s Shapes
Here is my before picture. Because of the bright blue, I suspect my wood hearts were originally from the 1980s.

If your Valentine’s heart doesn’t have holes, drill a small hole on each side of the heart. The number of Valentine’s wood craft pieces you need depends on how long you want your Valentine’s banner to be. It doesn’t matter how many Valentine wood craft pieces you use, but I suggest an odd number. This Valentine’s banner came with seven wood pieces.
Note: I have included a step-by-step video tutorial that shows me making, embellishing, stringing, and hanging the Valentine’s decor banner. If you need more specific instructions, you will find the video further down in the blog post.
Whatever Valentine’s heart shape you have, start by sanding it smooth. Hubs sanded mine right down to bare wood so that none of the bright blue paint would show through.

As my first plan was to paint my hearts, mine are completely repainted. I suggest just painting the sides and edges instead. Let dry.
Step 2 – Add the Paper Hearts
Using a pencil, trace your wooden hearts onto the cardstock paper. You can use one or two different patterns of craft paper. I chose a sage green and a grey paper with adorable dragonflies on it.
We want a little bit of the white painted wood heart to show as a border, so cut your paper hearts a little bit smaller than the pencil outline.
Once you have the paper Valentines cut out, run the edge of your scissors along the edge to scruff the paper up a bit. For the grey dragonfly cardstock, I dabbed the edge with some green ink to add a little color.

You can use Mod Podge or plain white glue and either a paintbrush or a sponge brush to attach the paper heart to the wood heart. Let dry.
Step 3 – Add Valentine’s Day Embellishments
Designing the wood craft Valentine’s banner meant choosing various shabby chic neutral supplies I already had on hand. Hubs laughed at the mess I created while searching and digging out what I already had. To be honest, I didn’t have much, but I worked with what I could find.

Begin by adding your largest background embellishment first. Mine was the raffia. Attach it at the back with a dab of hot glue. Then wrap the raffia around to the front and glue the other end on the back. If a piece is too short, grab another piece. Do not glue it on the front.
Next, I cut strips of various fabrics and ribbon bits into lengths about 12 inches long. I pushed them beneath the raffia and tied them in a very tight knot around the raffia. Let the length of the ribbon dangle. Repeat for all the wood Valentines.
Decide on what other embellishments you have on hand to make your handmade pieces one of a kind. I cut out the dragonflies from the leftover cardstock I had, used some buttons, and added some dollar store paper flowers. Other ideas include Valentine’s stickers, cupids, rolled ribbon flowers, and tiny white flowers.

I did four wooden Valentines in green with cream and white ribbons. For the three grey wood Valentines, I added more green in the embellishments. I did not want them to be identical, but rather similar and cohesive.
Step 4 – Stringing the Wood Valentine Craft Together
The length of your Valentine’s banner will depend on where you plan to hang it. I made some errors by making my banner longer than it needed to be. Now I would say to measure the distance between where you are going to hang it for Valentine decor, add six inches for swag, and add 12 inches at each end for size adjustment.
Using a large-eyed needle, make sure that the holes in the wood hearts are open and not covered with paper or filled in with glue.

Thread your needle with the twine and place it through each wood Valentine, starting from the front to back. That will keep the long bit of twine across the back of the Valentine. String all the Valentines onto your twine and tie both ends with a large knot. Then adjust for placement.
To Make the Banner Craft Hangers
Fold the end of the twine into a U-shape, and using a bundle of ribbons about a foot long, tie a knot around the twine. Make sure the ribbon is tied very tightly so the knot will not pull through. This allows you to pull the end and adjust the length of your hanging twine.
Repeat on the other end.
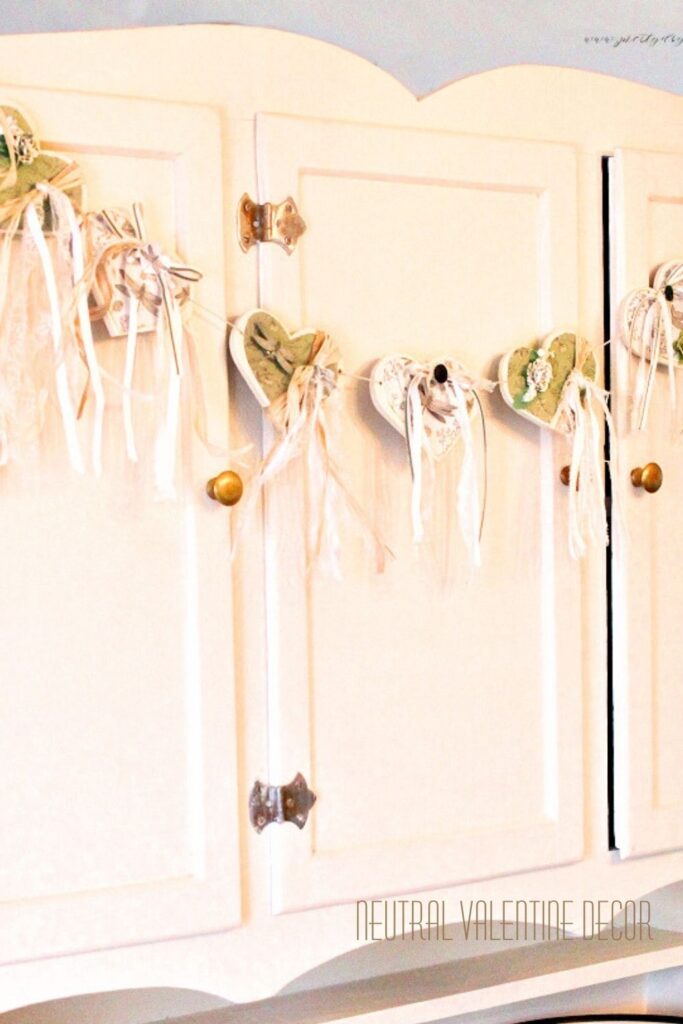
Hanging Your New Wood Craft Valentine Decor
Once your Valentine banner is hung, make any final adjustments you like. Shorten the twine to adjust the swag depth and trim the ribbon on each Valentine to the length you like. Separate the Valentines so they are an equal distance apart, and finally curl or straighten the ribbon as you like. I use a hair straightener, or a curling iron works well for this too.
Step-by-Step Valentine’s Day Decor Banner Tutorial Video
I used buttons, ripped fabric, cut-out bits of fabric, and assorted things I had on hand. If you want to watch the tutorial, I have included a video below with more details.
Pin this DIY wood Valentine’s Day decor idea so you can come back to it when you’re ready to decorate. This neutral wood banner is easy to adapt using various thrifted pieces and simple craft supplies, making it perfect for a cozy Valentine’s decorating project.
Other Wood Crafts for Valentine’s Day Ideas
Wood crafts keep better than paper crafts do, and have a more mature look to them. Whenever you’re at a garage sale or thrift store, keep an eye out for things you can upcycle. Here are some other wood crafts for Valentine’s Day.
DIY Wood Craft Riser Perfect for Valentine’s Day
This easy-to-make Valentine’s wood craft is made with a larger wood heart and then decorated for Valentine’s Day. The neutral colors make it usable any time of year.
Easy DIY Wood Valentine’s Day Gift
This wood heart can be made with thrift store or dollar tree supplies. I share how to mold the little hanger as well. It’s an adorable Valentine’s Day gift idea.