Dollar Tree Christmas Kitchen Decor
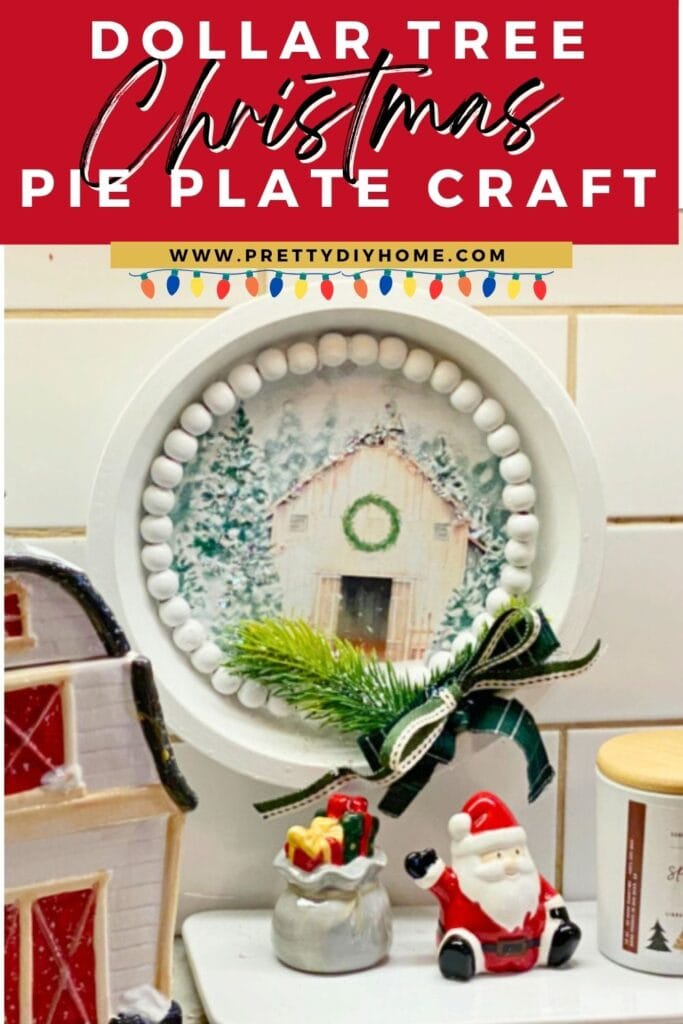
After months of painting our large orange oak kitchen a crisp white, I couldn’t wait to decorate it for Christmas. To celebrate, I started with a simple Dollar Tree Christmas Craft DIY that turned two pie plates into festive wall art for the kitchen. One sign has a snowy farmhouse barn design and the other a vintage candy cane bakery look. Both are pretty, affordable, and easy to make.
Using a pie plate as the base for Christmas decor is a fun way to tie holiday style into your kitchen. It adds color and character without taking up counter space, and you can make both signs with basic supplies from the dollar store. To make things even easier, I created four free Christmas kitchen printables with two featuring cozy barns and two with vintage cocoa shop designs so you can pick whichever style fits your home best.
Project Inspiration
The gingerbread sign was inspired by a Wayfair Christmas wall art piece I spotted online. I found a similar look on Pinterest and decided to make my own version using Dollar Tree supplies and a free printable. My taste is usually very neutral, but I loved the nostalgic feel of the vintage design, so I decided to recreate it as part of this Dollar Tree Christmas Craft DIY. It fits perfectly with my kitchen’s cozy Christmas theme and costs only a few dollars to make.
Supplies for Dollar Tree Christmas Craft DIY
This entire project costs about four dollars if you have to buy everything, and even less if you already have some supplies on hand. It is one of those easy and homey projects that proves you do not need to visit an expensive craft store to make something special for the holidays. Everything you need can be found at the dollar store.
- Dollar tree pie plate
- Free Christmas kitchen sign printable
- Dollar Tree Mod Podge
- Chalk paint or Fusion Mineral Paint
- 7-inch wire wreath form (optional)
- Hot glue
- Dollar tree embellishments like faux snow, fabric, greenery, and wood beads
Prepping the Pie Plate
I started by spray painting my pie plates with white chalk paint, but I didn’t love the glossy finish. To fix that, I brushed on two coats of Fusion Mineral Paint in white over the front of each pie plate and left the backs as they were since no one will see them.
Let the paint dry completely before moving on. I left mine overnight to make sure the surface was fully cured. Taking your time here helps keep the printable clean and prevents any stray paint marks later.
The Christmas Sign Printables
For the first design, I created a Candy Cane Bakery printable inspired by a retro Pinterest pin. I changed the colors to a mix of red and green for a more traditional holiday look. The other two designs feature a sparkly white barn without wording, perfect for a farmhouse-style Christmas kitchen.
All four designs are included as free printables so you can choose whichever fits your home best, two vintage candy cane bakery signs and two snowy barn scenes.

Applying the Sign Printables
Print your chosen design on regular printer paper or canvas paper using standard print quality. Each printable was designed to fit Dollar Tree pie plates, so all you need to do is cut the circle out with scissors.

I like to use a glue stick to attach the printable first since it helps reduce wrinkling once the Mod Podge goes on. Apply the glue evenly to the back center of the painted pie plate, then press the printable into place. Smooth it gently with your hand, then use a scraper to remove any air bubbles.

Next, brush on a coat of matte Mod Podge using a small paintbrush or sponge. Let it dry completely. I used one coat since mine are just for this season, but if you plan to reuse your sign next year, apply two or three coats for extra durability.
Decorating the Christmas Sign
This is the fun part where you can make each sign your own. I used Dollar Tree embellishments like white and cream beads, small pieces of greenery, twine, faux snow, and green plaid ribbon since that’s my Christmas theme this year.
To decorate the outer edge of the pie plate, I used a 7-inch wire wreath frame from Dollar Tree. With wire cutters, I removed the two outer rings and kept one to use as a bead ring. I strung the beads onto the wire, trimmed it shorter, tucked both ends into the same bead, and secured it with hot glue.
For the second plate, I used the smaller inner ring from the wreath form. I added one extra bead and glued the wire ends into it to make the circle slightly larger so it fit snugly around the printable.

Dollar Store Christmas Craft Video Tutorial
If you like to see the steps in action, I filmed a quick video tutorial that shows how both pie-plate Christmas signs came together. You’ll see the painting, Mod Podge process, and decorating details from start to finish.
The latest on Youtube:
These Dollar Tree Christmas Craft DIY signs were such a joy to make. They add instant Christmas charm to my newly white kitchen and remind me that beautiful decor doesn’t have to be expensive. I love creating seasonal pieces like this on a small budget because it leaves more room in the Christmas budget for the fun things like gifts, baking, and cozy touches around the house.

Love this idea? Save it for later!
Pin this Dollar Tree Christmas craft DIY to your Christmas decorating or holiday craft board so you can find it again when you’re ready to start creating.
Happy Christmas Crafting
Leanna.
f you enjoy Dollar Tree Christmas ideas, you might also like my Dollar Tree Christmas Ornaments idea, here are a couple that are simple, pretty anod easy to make.

Dollar Tree Christmas Ball Bowl Fillers
These simple to do Dollar Tree Christmas Balls worked as bowl filler in our dining room sitting on our vintage hoosier cabinet, and I hung some more on the Christmas tree. I appreciate how quaint and timeless this Christmas craft turned out and hope you find it inspiring as well.

Christmas Candles in the Window
This post contains several different ideas for using Dollar Store supplies and thrift store supplies for creating elegant candle in the window Christmas decor.
One Comment