How to Make a Wire Hamper Liner
DIY Wired Hamper Liner
Do you love those gorgeous fancy wire laundry hampers with wheels, but not the hefty price? Me too, so I decided to make my DIY laundry hamper. I was excited about how it turned out! But those gorgeous online images of the wire hampers, skipped one major thing, the dirty laundry. let’s be real—no matter how stylish a wire hamper is, a pile of dirty laundry isn’t exactly a décor element. So, I whipped up a simple yet chic hamper liner to keep things looking neat and put together.
e

Laundry Hamper Liner Supplies
For this large hamper, you’ll need.
- 3 1/2 meters of muslin
- 1/2 meter of interfacing
- 76 ” by 8″ strip of coordinating fabric.
- Thread, pen, chalk, and pins.
Step One – Measure and Cut Fabric
Start by measuring the size of your basket and add four inches for seam allowances.
Cut your fabric to size. My wire hamper has a 72″ circumference and the basket height is 23″.
I chose muslin because it is inexpensive, and can be tossed in the washer. I considered drop cloth but didn’t want to take the extra step of bleaching it, so I used muslin instead. The color is lighter as well, I haven’t found a way to get drop cloth white.
I cut the muslin 76″ wide and 28 ” tall, so I had plenty of seam allowance, and the accent fabric is 76″ wide by 8″ tall.
Since both sides of the hamper liner will be visible, I ditched my usual zig-zag seam finish and went for something cleaner.
Since both the inside and outside of the liner are visible, I switched things up from my usual zig-zag seam finish.
Instead, finish the the edges of the fabric with a simple rolled seam. It keeps everything looking neat and polished, and you don’t need to go back and finish the seam edges afterward.
How to Sew the Seams
If you have not done rolled seams before, they are a simple 1/4-inch hem finished with a zig-zag sewing stitch. Here’s my example.

Attach your coordinating fabric to the muslin. Place the rolled seams on top of each other, and sew both the top and the bottom of the seam. Your finished seam will look like this on the inside of your basket.

Sewing both edges makes the seam flat and closed. Sew as close to the edge of the seam as possible.
Now that you have the coordinating fabric attached to the muslin. Fold your fabric in half good side together and sew the side seam creating a tube. Set aside.
Make the Circle Bottom
Lay out a double layer of muslin and using a thread and chalk draw a circle the size of your base.
Drawing a Circle with Thread and Chalk
Measure the diameter of your base, and divide it in half to get the radius.
Find center, this is where you will anchor the thread.
To secure the center point with a pin, or have someone hold it with a pen.
Measure a piece of thread the length of your radius and tie chalk at the other end.
Keeping the thread taut, move the chalk around the center point to create the circle.
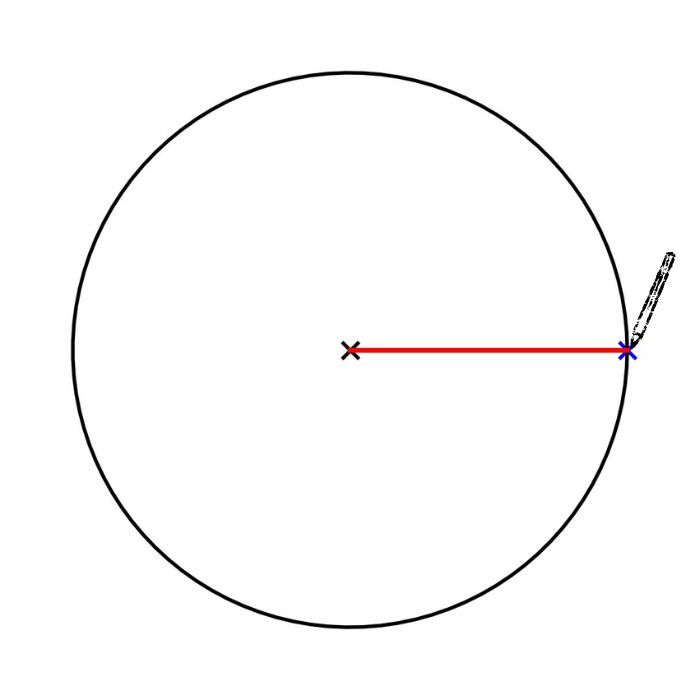
Cut the material an inch outside the chalk mark.
Remove the back of the interfacing and lay it between the two layers of muslin. Trim the outside edges and iron. The double layers and the interfacing will add needed weight to the bottom of your hamper liner. Finish the outside of your circle with a zig-zag stitch.

f
Fold your circle into fourths and mark with chalk. This will help you light the bottom up with the walls of the hamper liner.
Attaching the Hamper Bottom to the Walls
The most important thing about making a basket liner is ensuring that the liner is long enough, and this is even more important when using a wire basket. Making the liner a bit longer will distribute the weight of laundry to the bottom of the liner instead of applying pressure to the top.

Take this measurement and add two inches and that will be the distance from the seam where the coordinating fabric and the muslin meet to the bottom. I hope you can see in the above picture, how there is slack on the side of the walls, so the weight is distributed to the bottom.

Mark the quarter points on your walls, just like you did on the bottom.
Fold both seams upwards so that the seam is on the inside of the liner. Line up and start pinning at the four-quarter marks. Then add more pins. Once you are sure everything is lined up (there is very little gathering.) sew the two pieces together in a circle.
Place your liner into the hamper good side out, fold over the coordinating fabric so it hangs over the sides and holds the liner in place.

I did consider adding some twill tape ribbon to the top of the liner where the coordinating fabric and liner meet so that it can be tied to hold it in place. I don’t think it’s necessary but you could add some if you think your liner may slide down.
Enjoy your weekend!

DIY Wire Hamper
Here is the tutorial on how to make the DIY Wire Hamper. using a wood round (old coffee table) and wire mesh.
DIY Ironing Board Hanger
Here is how to make a matching Ironing Board Hanger to match the DIY hamper liner.
This is really thinking outside the box! Love it.. Thanks