Vintage Rabbit Art – Draw with Cricut
Where to Find and Use a Vintage Rabbit Illustration
This Vintage Rabbit Illustration for the mantel is labour of love. I wanted a vintage hare for the mantel for at least two years. I never saw one locally and shipping from the USA market is really expensive. This bunny art should be easy for you to replicate because I did most of the heavy lifting figuring out how to make it and getting a clean template. Now it is a Spring craft adults can enjoy making, I am very excited with mine.
Finding Free Images On Line
The first step is to find a free public-domain image to use for bunny art. If you’re making one just for yourself and not going to share it on social media etc, you don’t need to be as careful with copyright as I do, but it’s still something to consider, so let’s start there first.
There are all sorts of Public Domain archives of vintage images that don’t have copyrights. The public domain consists of all the creative to which no exclusive intellectual property rights apply, often these images are old and were not covered by copyright because the art existed before copyright laws did.
You can find free vintage art online but you need to sift through the free offers that are hooks to buying a membership. However there are a few libraries of vintage art and webpages that do offer actual free images, here are some of my go-to sites.
The Graphics Fairy has over 7000 free downloadable vintage images and is one of my favorites.
Artvee A library of Classical and Modern Art downloadable images.
RawPixel Public Domain Images -This is the link to their public domain images, there are other links there for purchasing.
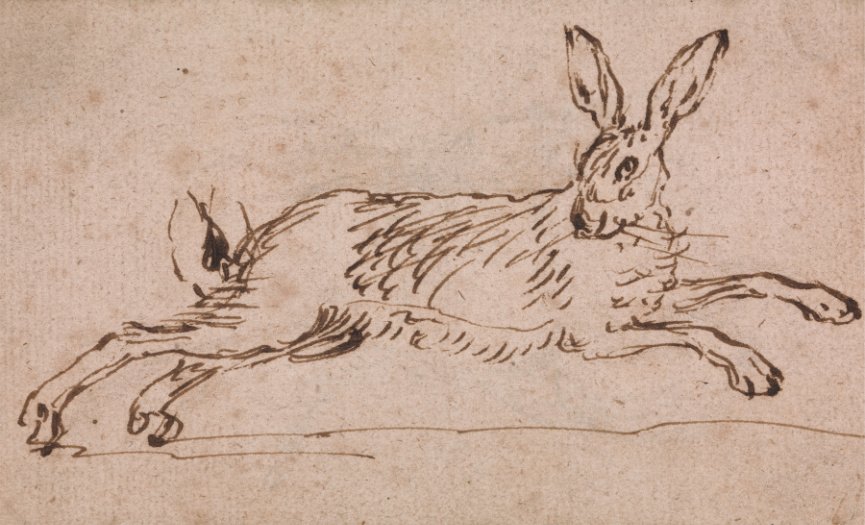
The original image I used is titled A Hare Running, with Ears Pricked James Seymour (English, 1697 -1752)

If you’re wanting to find an image for a bunny, a Valentine etc. Start by searching for public domain libraries.
Time flys, it’s already a month since I last joined in with the Creative Craft Blog Hop that’s hosted each month by Sara from Birdz of a Feather. The other craft ideas will be added at the end of my post. If you are visiting from Life as a Leo Wife welcome! At the end of my post, I will direct you to the next blogger, and list all the other fun ideas from the rest of the bloggers in our creative craft blog hop.
Spring Bunny Mantel Decoration Supplies
If you’re short on time I suggest having this printed out for you as large as you like on poster paper, then frame it. I did that for this Spring art idea. Here is what I used to make the Spring bunny or vintage hare.
Cleaned Up Bunny Template
Cricut Design Space/Cricut
12 by 24 inch Cricut Mat (Fabric or regular)
Black or Brown Cricut Pen
12 by 24 inch piece of muslin fabric
12 by 24-inch iron-on interfacing (one side)
Brown felt pen (I used Tombow brand)
Double-sided tape (optional)
Frame (optional
The first time I did the print was on 12 by 24 inch cardstock and it turned out well. This time I did the bunny on fabric for a shabby look. If you’re going to do your bunny print on cardstock there is no prep needed. Writing on fabric with does require a little bit of preparation.

Preparing the Fabric Background
Cut both the muslin fabric and the interfacing in a 12 by 24-inch piece. Iron glued (shiny) side of the interfacing to the wrong side of the fabric. Let cool.
Making the Spring Bunny in Cricut Design Space
This is where the labour part came in. I am new to working with Cricut and found many hurdles to work around with hacks mostly because the vintage rabbit image was too large. I won’t bother you with the whining details, but provided you with a pre weeded bunny image to make the process hours easier. If your wanting to use a different image you can make it work, but the cleaning up process can be intense depending on the image.
Outline of Spring Bunny How to in Cricut
- Open Cricut design space.
- New project, then upload the image from your hard drive.
- Once the image uploads, under Select image type – Choose Simple – Continue
- Remove background – Once done Apply and Continue
- Select the Cut Image choice, Print and Cut file is too large for the printer.
- You will see the bunny image is uploaded. Select the image and then Add to Canvas.
- Resize the image to 10.5 inches H.
- Highlight the entire image. Then change the operation from Basic Cut to Pen in the drop down. Then click Make it.
- The image will show on the 12 by 24 inch mat. Because we are using the entire mat area we have to adjust Cricut’s placement of the file. The simplest way is to just center it by eye.
- Browse all materials, and choose whatever you need. Cardstock or muslin.
Colouring the Vintage Rabbit Bunny Art
Once you have the vintage rabbit illustration template printed on either cardstock or fabric, just fill in the open areas. As I said in the video I tried everything to create a lined image to have the Cricut pen fill it in, but always got a file is too large error. Thats the bad part, the good part is it only takes about 20 minutes to colour in. My only tip is to start from the inside and work outwards. I used a chocolate tombow pen I had on hand, but any felt marker should work well.
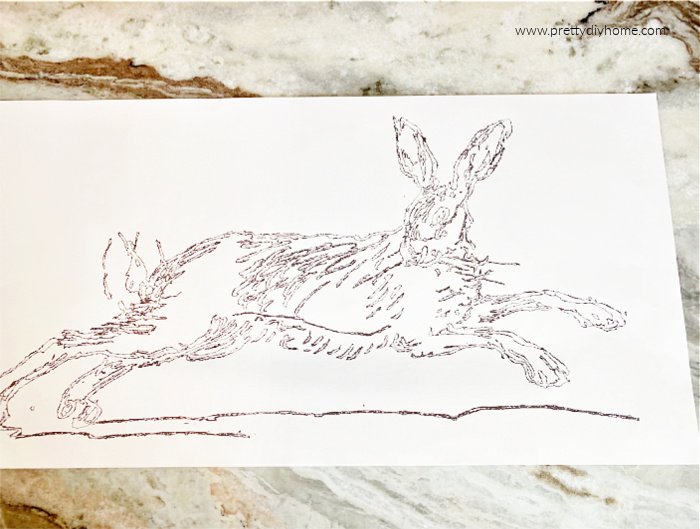
The Spring Bunny Art Drawing Before Colouring
This is what the vintage rabbit looked like printed on the cardstock and not coloured in.

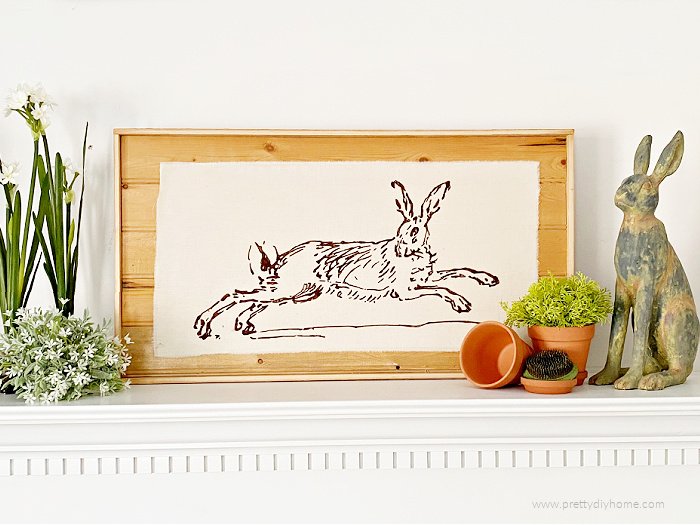
The Vintage Rabbit Illustration Drawing After Filling In
The same drawing but done on fabric muslin this time and coloured in with the brown Tombow felt pen.

Framing the Vintage Rabbit Illustration
Hubs built me a quick backdrop using leftover shiplap we bought at Habitat for Humanity eons ago, and then sliced a two by four to make the frame. It was the cheapest way we could frame my little Easter bunny. I would have loved to put it in a white frame instead. Any way you frame him I hope you find this as vintage, unique, and fabulous as I do.

Feeling Inspired and Want to Make this? Pin it for Later!

Creative Craft Blog Hop

The next craft is DIY Riser from Patina and Paint
When you’re done, please remember to checkout some of the Spring ideas below.
Bluesky at Home | Cute DIY Planters for St. Patrick’s Day
My Thrift Store Addiction | Mini Mushroom Garden Sign Makeover
Decorate and More with Tip | DIY Texture Bunny Wall Plaque
Purple Hues and Me | Flower Leaf Cord Wrapped Basket
Southern Sunflowers | Easter Photo Frame Craft with Bunnies
The Painted Apron | Spring Bunny & Ribbon Carrot
Modern on Montecello | Tile Marbled Magnets using Nail Polish
Birdz of a Feather | How to Remove Rust From Metal
Life as a Leo Wife | St. Patrick’s Day Garland
Patina and Paint | DIY Riser
Thank you for checking out my Spring rabbit. I appreciate you stopping in.

Leanna thank you so much for sharing at my weekly link party!! I’m happy to be featuring you this week!
Have a great day!
Right on, that makes my morning. I really appreciate the feature. I will pop by right away and see it.
LOVE that you printed this on fabric! We will be featuring you starting Wednesday at the Creative Crafts Linky Party! Pinned and shared
Creatively, Beth
Thank you so very much for the feature. I didn’t do link parties for awhile and am really glad I started it again.
I’ve wanted to get myself a Cricut for the longest time and keep on putting it off because they’re quite expensive here in South Africa. Yours is the first image I’ve seen, which is quite complex, and I’m really impressed with how it turned out. Pinned for the day when I do get mine.
Thank you Michelle. It took me awhile in Picmonkey to tweek the image for Cricut. But I love how it turned out. Thank you my artsy friend.
Just pinned this Leanna! It’s so cute and perfect for this time of year. I had no idea muslin would be that easy to work with but I love how unique and unexpected it is. Especially, with your fabulous frame. You totally nailed it! The whole thing is fantastic. Hugs, CoCo
Leanna that bunny picture is adorable!!! So cute! I would love to invite you to come share and link up over at my weekly link party for a chance to be featured!
Glad you liked it.
Hi Leanna, This is fabulous, I would like to share on my round up this Saturday. Please let me know if that is ok. Thank you,
Wendy
Absolutely, thank you for reaching out and I am happy you like it enough to share.
Your bunny artwork looks so good and it’s very unique! I love the natural look and how it takes center stage in your pretty spring mantel decor.
Thank you Allyson. I am working on keeping my colour palettes simple so that I have less stuff and can reuse it in different ways. I appreciate the positive feedback.
Leanna, I love my Cricut, too, but I’ve not done a project like this. Thank you so much for the instructions and inspiration. It’s such a cute sign for spring and Easter.
Thank you Carol. I really wanted some hare art, and just couldn’t find any in Canada. Its funny how we will think of a new way to get something done lol. Thanks for commenting.
Very pretty Leanna, and I appreciate all the info you shared about free graphics and images. I love the unique way you framed the bunny print too, love the shiplap!
Thank you Jenna. That shiplap is at least 4 years old, and we carted it when we moved towns. Hubs didn’t even stain it as it was the colour I wanted. Thank you for commenting.
This looks so good! I absolutely love it and the frame. I think it looks perfect for the farmhouse aesthetic, but you could paint the shiplap white if you really wanted a white frame. Can your hubby build me a shiplap frame, lol? It’s so great! Pinned. This is a project I’m definitely going to try!!
Thats great Niki. I just kept seeing all those lovely hare pictures online and non were available up here in the frozen hinterland of Canada. I am happy with how this turned out.
Leanna, your bunny sign is just perfect on your pretty mantel! Pinned! Blessings, Cecilia @My Thrift Store Addiction
Thank you very much. I love your blog and enjoy all the vintage finds.
This is so cute Leanna. I love the bunny and how you applied it to a frame. Great piece to add to your Easter decorations.
Thank you Terrie. Seasonal art is one of my favorite things. Glad you like it.
Your spring bunny turned out just perfect, Leanna! And the shiplap frame without a doubt compliments the vintage design! I love that you used muslin instead of paper, too! It helps to enhance the entire spring bunny look! Great job!
Thank you Gail. I am trying to add more creams and soft wood tones to our decor. I appreciate the comment very much.
This is fantastic Leanna; it’s so different from how you’d traditionally use a Cricut! My Cricut is still sitting in a box from Christmas and I’m so inspired now to crack it open now.
Oh my Sara. Crack that cricut box open. I had a silhouette and rarely used it as it was always going sideways. The cricut so far pretty much cuts and prints exactly like it is suppose to, making it fun to play with.