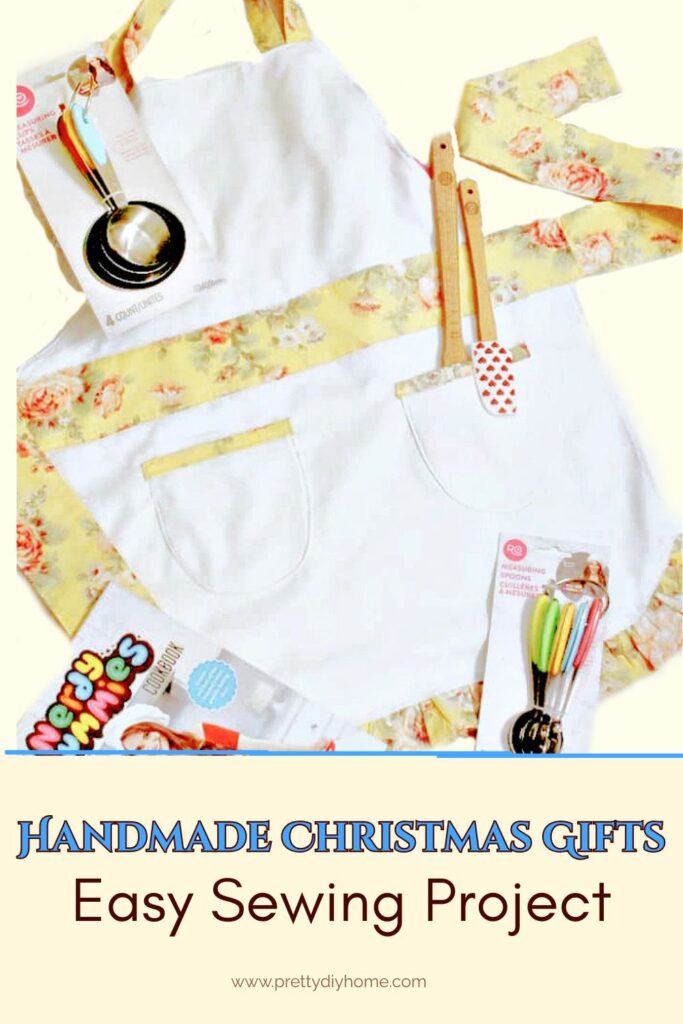
Handmade Kids Apron – Easy Sewing Gift Idea
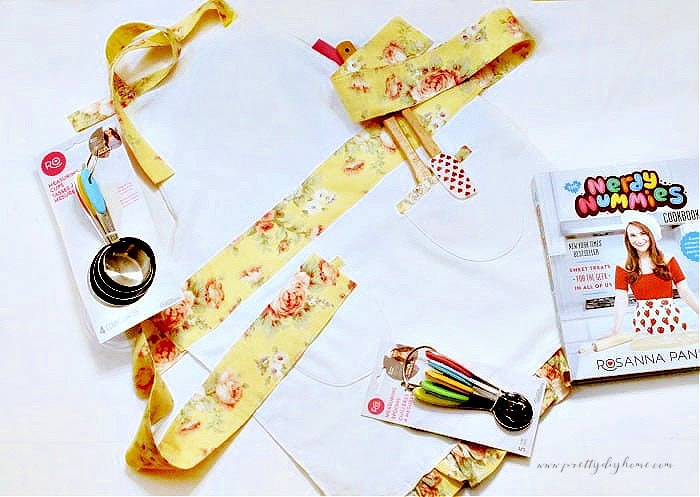
Playing dress up never really goes out of style. As little ones grow past the princess phase, they still love pretending, helping, and creating. This year, instead of another store-bought toy, make them something handmade, a sweet little children’s apron. It is a simple sewing project that turns into a thoughtful Christmas gift when paired with a children’s cookbook and some colorful baking tools.
If you enjoy making gifts for kids, this DIY apron is a quick beginner-friendly sewing project you can finish in an afternoon. I made mine in soft white fabric with pale yellow trim for the ties and pockets, but you can choose any color combination to match your child’s style or your holiday theme.
Materials for a DIY Children’s Apron
You don’t need much fabric to make this child’s apron, and most of the other supplies you likely already have on hand.
Supplies Needed:
- ½ yard (metre) of main fabric
- ½ yard (metre) of coordinating fabric for ties, pockets, and ruffle
- Matching thread
- Iron and ironing board
- Sewing pins or fabric clips
- Free printable apron pattern
- ½ yard (metre) of main fabric
- ½ yard (metre) of coordinating fabric for ties, pockets, and ruffle
- Matching thread
- Iron and ironing board
- Sewing pins or fabric clips
Cutting the Fabric for a DIY Children’s Apron
Before you begin sewing, make sure your fabric is pressed and smooth. Ironing may feel like an extra step, but it helps the fabric lie flat so your pattern pieces cut evenly and your finished apron looks crisp.
Print out the apron pattern. There should be four pieces in total. Depending on the height of your child, you may want to remove the piece marked number three to shorten the apron.
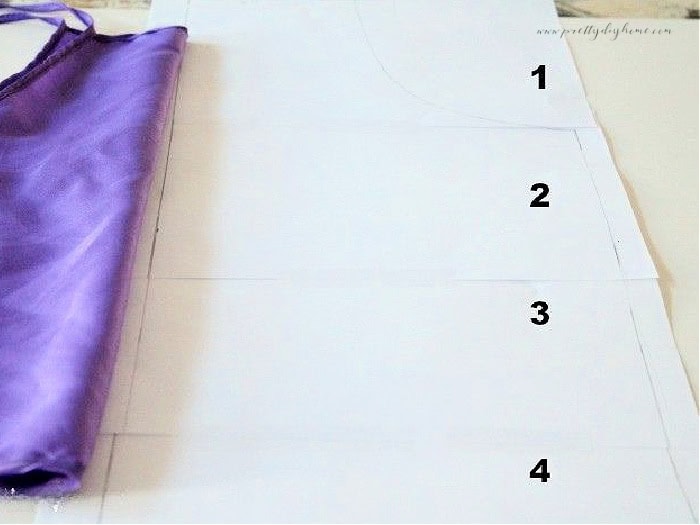
Sizing Notes
The finished apron body (not including ties) measures about 18 inches tall and 14 inches wide at the widest point. This size fits most children ages four to eight. If you are sewing for a taller child, simply add one to two inches of length to the bottom edge of the pattern before cutting. The ties make the fit adjustable, so there is no need to alter the width unless you are making one for a much older child.
Lay your fabric on a flat surface and fold it in half, good sides together. Place the long edge of the pattern along the fold of your main fabric. Pin it in place and cut out two apron body pieces.
Cut out four pocket shapes.
From the coordinating fabric, cut the following pieces:
- One piece, 3 inches by 27 inches for the ruffle
- Four pieces, 2 inches by 16 inches for the neck ties
- Four pieces, 3 inches by 21 inches for the waist ties
- One piece, 3 inches by 20 inches for the front sash
- Two pieces, 1 1/2 inches by 6 inches for the pocket tops
Press all of your pieces one more time after cutting. Ironing as you go makes sewing easier and gives your project a polished look in the end.
Make the Apron Ties
Starting with the ties helps keep everything organized and makes the apron easy to assemble later.
Lay your neck and waist tie pieces flat and give them a quick press so they are smooth. Fold each long edge over about ¼ inch and press again to hold the fold in place.
Place two strips with their good sides together and sew across one short end to join them. This will form one long tie. Repeat with the remaining neck and waist ties.
Open the joined pieces and press the seams flat. Fold the ties back together, good sides facing out, and sew a narrow 1/4 inch seam down each long side. This step adds a neat topstitch and saves you from having to turn long, thin tubes right side out.
When finished, give all your ties one more quick press so they are flat and even.

Repeat for the remaining ties.
Sew the Apron Pockets
Pockets make the apron extra sweet and useful, and they are quick to sew.
Start by finishing the outer edges of each pocket piece with a zigzag stitch or a serger to prevent fraying. Place two pocket pieces good sides together, and sew around the outside with a ¼ inch seam, leaving the top open.
Turn the pockets right side out and press so the edges are crisp.
Take the small 1 1/2 by 6-inch coordinating strips and place one along the top edge of each pocket. Fold the ends of the strip under for a neat finish and sew along the lower edge to attach it. Press once more.
Set the pockets aside until the apron body is assembled.
Make the Ruffle Trim
The ruffle gives the apron a soft, playful finish and is much easier to make than it looks.
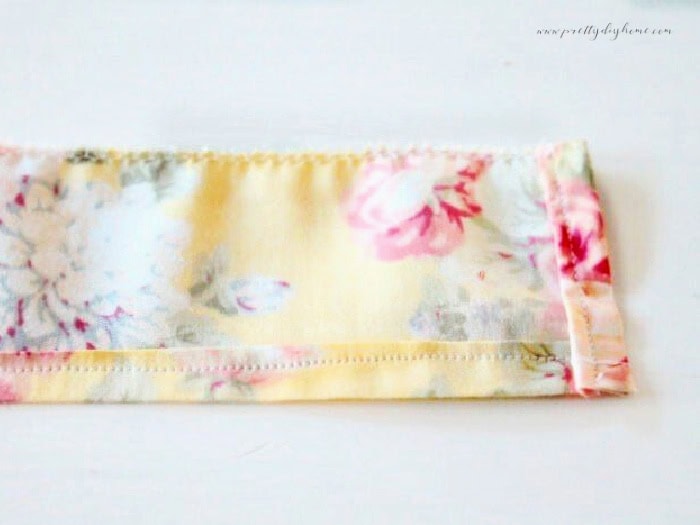
Take your 3 by 27 inch strip of coordinating fabric and press it flat. Along one long edge, fold the fabric over about ¼ inch and press, then fold it over once more and press again. Sew close to the inner fold to make a clean, narrow hem along the bottom edge.
Finish the top edge of the ruffle with either a zigzag stitch or a serger to prevent fraying.
Thread a needle with a long length of matching thread. Sew a line of loose running stitches about ¼ inch from the top edge. Do not knot the thread ends. Gently pull on the thread to gather the fabric, creating even ruffles until the piece measures the same width as the bottom of your apron. Leave the thread tails long and set the ruffle aside for now.
Assembling the DIY Child’s Apron
Once all the pieces are ready, it is time to put everything together.
Finish the raw edges of your two apron body pieces with a zigzag stitch or serger. Place one piece good side up on your work surface. Position the neck and waist ties where you want them, making sure the unfinished ends line up with the outer edge of the apron. Pin each one in place so they will stay secure while sewing.
Lay the second apron body piece on top, good side down, sandwiching the ties between the two layers. Pin all around the edges, leaving the bottom open. Sew a narrow 1/4 inch seam around the outside edge.
Turn the apron right side out and press carefully, making sure the seams are crisp and the ties are facing outward.

Add the Ruffle Trim
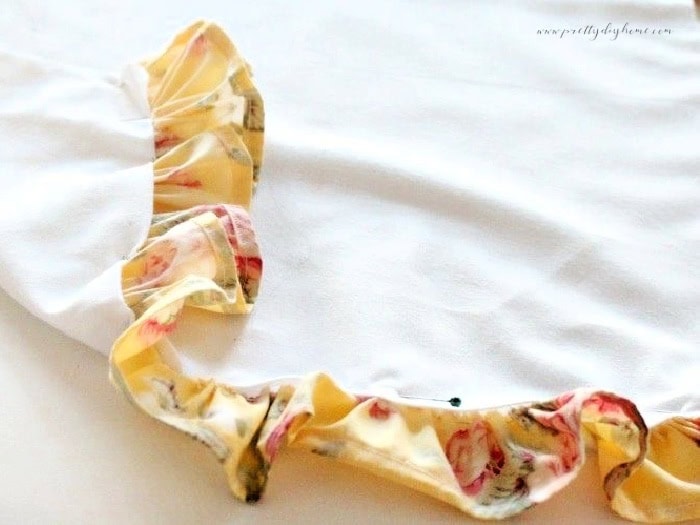
To attach the ruffle, start by folding the bottom edge of the apron up about ¼ inch and pressing it flat. This small fold hides the raw edge and gives a neat finish. Do this on both sides of the apron so the bottom looks tidy from either direction.
Slide the gathered ruffle between the two folded edges along the bottom of the apron. Adjust the gathers so they are even, then pin the ruffle securely in place. Take your time here, spreading out the ruffles gently until the spacing feels balanced.
Sew along the bottom edge of the apron to attach the ruffle, removing the pins as you go. Once done, give the entire bottom edge a good press to set the stitches and help the ruffle fall softly.
Assemble the Apron
Once all the pieces are ready, it is time to put everything together.
Finish the raw edges of your two apron body pieces with a zigzag stitch or serger. Place one piece good side up on your work surface. Position the neck and waist ties where you want them, making sure the unfinished ends line up with the outer edge of the apron. Pin each one in place so they will stay secure while sewing.
Next, cover the pinned ties with the second apron piece, placing it good side down on top of the first layer. Pin carefully all around the outer edges. Sew around the entire apron with a narrow 1/3 inch seam, leaving about six inches unsewn along the bottom edge. This opening allows you to turn the apron right side out once the seams are complete.
Turn the apron right side out and press carefully, making sure the seams are crisp and the ties are facing outward. Keep your iron close by and press each seam as you finish for the neatest results.
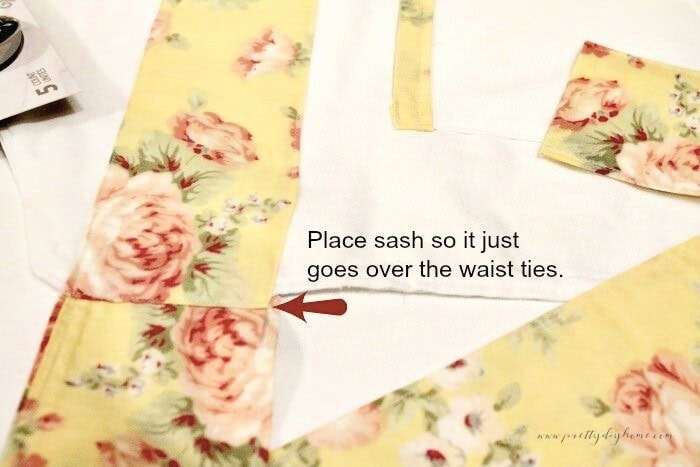
Finishing Touches
Iron the entire apron so all the seams lie flat. A well-pressed apron always looks more professional, and it helps your topstitching turn out straight.
Pin the sash across the front of the apron, lining it up with the waist ties. Sew around the edges of the sash with a narrow topstitch to secure it.
Sew a topstitch about 1/4 inch from the edge around the entire apron. This reinforces the seams and adds a nice finished look.
Place the two pockets where you want them and pin them in place. Sew around the sides and bottom of each pocket, keeping the top edge open. If you are making more than one apron, measure from the waist down to keep the placement consistent.
You can personalize the apron by sewing on a small fabric name label or appliqué for an extra special touch.
Give your apron one last press and trim any loose threads.

Chef’s Hat and Gift Idea
Every little baker needs a chef’s hat to go with their new apron. I made matching hats for my granddaughters using the Adjustable Chef Hat Tutorial by Ikatbag. It is a clever design that fits beautifully and can be loosened or tightened as children grow. I did not photograph that part of the project, but it is such a good pattern that it deserves a mention.
Once your apron is finished, you can turn it into a charming handmade Christmas gift. Pair it with a children’s cookbook and a few colourful baking tools to make a cheerful baking set. Wrap everything together in tissue and place it inside a mixing bowl or small basket. It is a simple, handmade gift that encourages creativity and time together in the kitchen.
If you enjoy sewing handmade gifts, you might also like my Tartan Hand Warmers Tutorial and my Farmhouse Teddy Bear Pajama Bag. Both are cozy sewing projects that make wonderful Christmas presents and fit right in with this sweet children’s apron.
Aww this is too sweet!! This will be a perfect gift to my niece who loves bakinggg!!!
Thank you, I am excited to give it to them.
This is just the sweetest gift idea ever!! The fabric is just gorgeous and I have a little niece who would LOVE this cute apron to bits! Thank you for the inspiration!
I may try and make another with lettering. We could do one that says, I’m sweeter than cookie dough! That would be very much raggedy bits style.
What a sweet gift idea. I always admire sewing projects because that’s a skill I’ve never had. This would be perfect for a little helper in the kitchen.
I only sew simple things Bev. I am just patient or rich enough to make clothes etc. But for little projects I enjoy sewing them.
This is just adorable! My girls love to cook and would love their own little aprons!
They sew together really easily, once I figured out how I wanted the ruffle, and of course I insisted on having one.
Can you please be my Ouma Leanna? I would have loved something like this as a child. Maybe I would have enjoyed cooking too. How lovely
Thank you Michelle, I hope they enjoy them
Perfect for the future baker/kitchen helper. My kids have outgrown their aprons, but they loved having them to wear.
I have to finish a chef hat that matches there little aprons, I just didn’t have time to finish it yet.
Now what little girl wouldn’t love to receive an apron like that!
That compliment coming from you means lots to me. I actually had to do some thinking to get the ruffle the way I wanted it. I appreciate your feedback. Leanna
You are just the best Grandma, Leanna! Your granddaughters, who I know bake with you, will be thrilled with their “made with love” aprons! Pinned 🙂 P.S. I can’t wait to spend time baking with my little Everly one day.
Thank you Marie. It feels so special to bake with them, because like Grama, they really love doing it.
This is so cute. It would be fun to make one for Mommy also for a Mommy and me look.