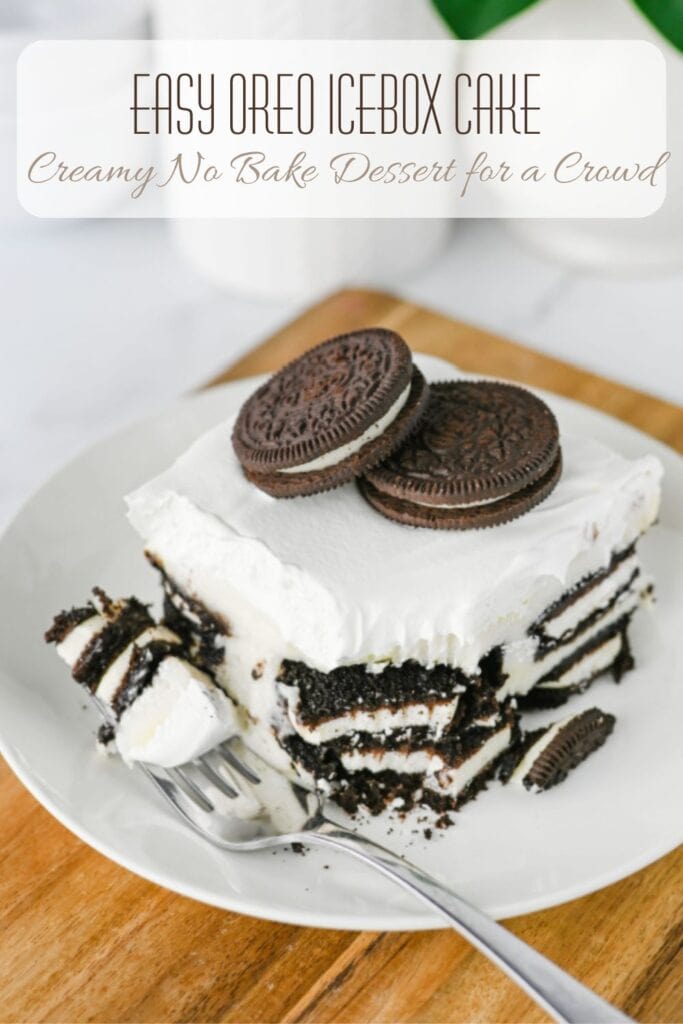
Oreo Icebox Cake
If you’re anything like me, you may have assumed no bake desserts were a relatively new idea. Surprisingly, icebox cakes have been around since the 1920s. They got their name from the old fashioned iceboxes people used before refrigerators became common in homes. These simple desserts were made by layering cookies with whipped cream and then chilling them overnight. As the dessert rested, the cookies softened into a cake-like texture, creating an easy no bake treat that families have been enjoying for generations.
This Oreo Icebox Cake puts a modern twist on that classic idea. Made with layers of Oreo cookies and a creamy filling, it’s an easy make ahead dessert that’s perfect for summer gatherings, potlucks, holidays, or anytime you need a simple no bake dessert.

Oreo Icebox Cake Recipe
This Oreo Icebox Cake makes a large 9 x 13-inch dessert, making it perfect for potlucks, family gatherings, holiday celebrations, and summer get togethers. If you’re serving a crowd, this recipe provides about 15 generous servings.
Ingredients
For the Oreo Icebox Cake
- 3 packages Double Stuf Oreo cookies (family size)
- 3 cups heavy whipping cream
- 1/4 cup icing sugar
- 2 teaspoons vanilla extract
- 4 ounces cream cheese, softened
Optional Toppings
- Whole Oreo cookies
- Crushed Oreo cookies
- Mini chocolate chips
Quick Tip: Perfect Whipped Cream
For the best whipped cream, I like to chill a metal mixing bowl and beaters in the freezer for about 15 minutes before whipping, especially during the summer months. The colder equipment helps the cream whip up faster and hold its shape better.
Whip the cream until stiff peaks form, being careful not to overwhip, or you’ll end up making butter instead.
How to Make Oreo Icebox Cake
Step 1: Prepare the Filling
Beat the softened cream cheese until smooth and creamy. In a separate chilled bowl, whip the whipping cream, icing sugar, and vanilla until stiff peaks form. Gently fold the cream cheese into the whipped cream until fully combined.

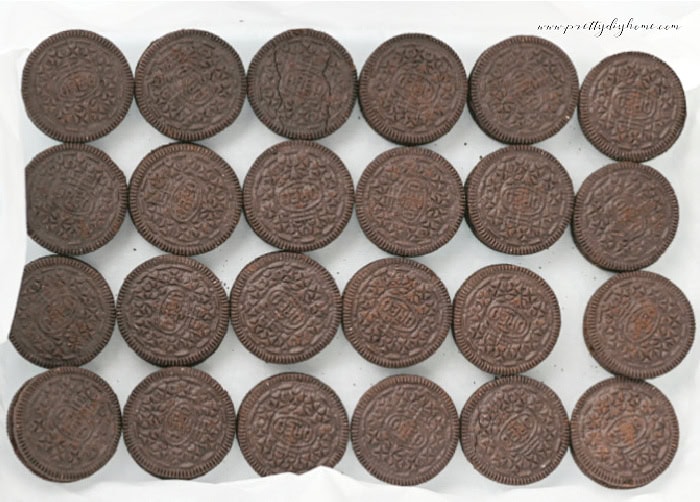
Step 2: Layer the Oreo Icebox Cake
Arrange a single layer of Oreo cookies in the bottom of a 9 x 13-inch baking dish. You may need to break a few cookies in half to fill in the ends and corners.
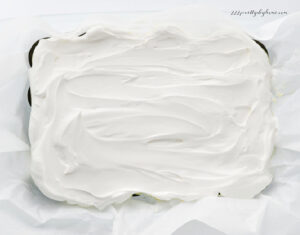
Spread one-third of the whipped cream mixture evenly over the cookies.
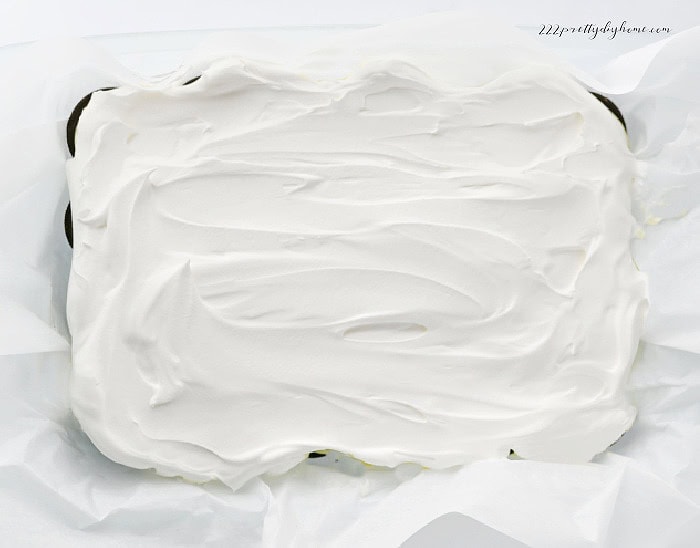
Repeat the layers two more times, ending with the remaining whipped cream mixture on top.
Step 3: Chill the Icebox Cake
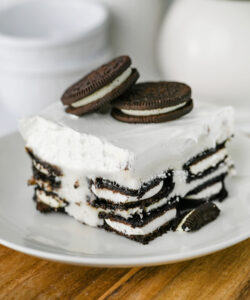
Cover the baking dish with plastic wrap and refrigerate for at least 8 hours, or overnight. During that time, the Oreo cookies absorb moisture from the filling and soften into a cake-like consistency.
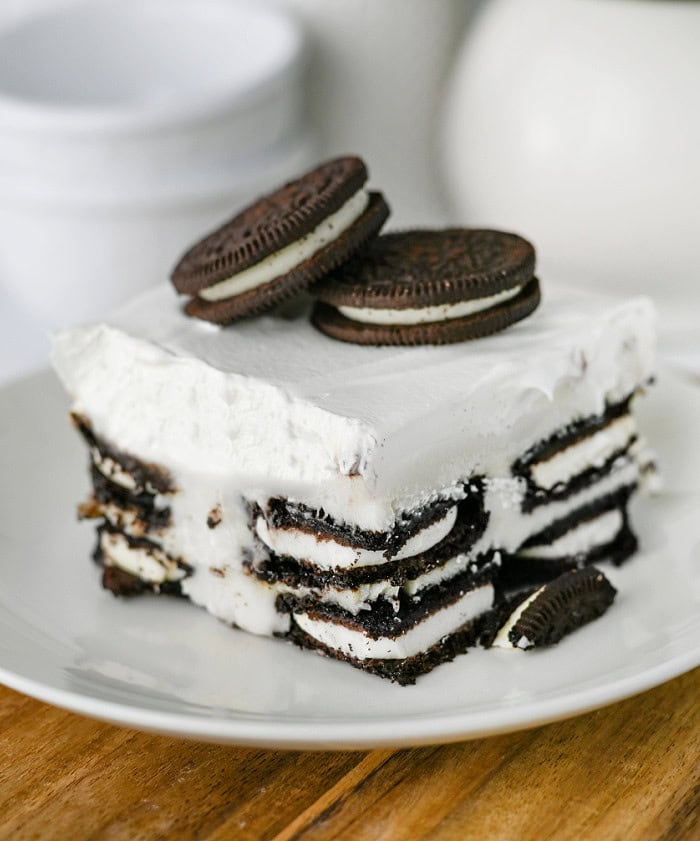
Step 4: Top and Serve
To serve, top each piece with a whole Oreo cookie. For an extra special touch, you can sprinkle crushed Oreo cookies over the top or add a few mini chocolate chips just before serving.
Keep and Store Oreo Icebox Cake
While the Oreo Icebox Cake can be served after 8 hours, I think it tastes even better when made the day before. The extra chilling time gives the cookies more time to soften completely and create the cake-like texture icebox cakes are known for.
Leftover Oreo Icebox Cake can be stored covered in the refrigerator for up to 4 days. As it sits, the Oreo cookies will continue to absorb moisture from the filling and soften even further.
I do not recommend freezing leftovers, as the whipped cream filling can become grainy once thawed.
Enjoyed this Oreo Icebox Cake recipe? Save it to Pinterest so you can find it again when you’re ready to serve an easy no bake dessert.

Oreo Icebox Cake
Ingredients
- 3 packages Double Stuf Oreo cookies
- 3 cups heavy whipping cream
- ¼ cup icing sugar
- 2 teaspoons vanilla extract
- 4 ounces cream cheese softened
Optional Toppings
- Whole Oreo cookies
- Crushed Oreo cookies
- Mini chocolate chips
Instructions
Step 1: Prepare the Filling
- Beat the softened cream cheese until smooth and creamy. In a separate chilled bowl, whip the whipping cream, icing sugar, and vanilla until stiff peaks form. Gently fold the cream cheese into the whipped cream until fully combined.


Step 2: Layer the Oreo Icebox Cake
- Arrange a single layer of Oreo cookies in the bottom of a 9 x 13-inch baking dish. You may need to break a few cookies in half to fill in the ends and corners.

- Spread one-third of the whipped cream mixture evenly over the cookies.

- Repeat the layers two more times, ending with the remaining whipped cream mixture on top.


Step 3: Chill the Icebox Cake
- Cover the baking dish with plastic wrap and refrigerate for at least 8 hours, or overnight. During that time, the Oreo cookies absorb moisture from the filling and soften into a cake-like consistency.
- While the Oreo Icebox Cake can be served after 8 hours, I think it tastes even better when made the day before. The extra chilling time allows the cookies to soften completely and take on that classic cake-like texture.
Step 4: Top and Serve
- To serve, top each piece with a whole Oreo cookie. For an extra special touch, you can sprinkle crushed Oreo cookies over the top or add a few mini chocolate chips just before serving.

Notes
Easy Summer Desserts
If you’re planning a summer get together, here are two more desserts that are ideal for feeding a larger group.

Strawberry Shortcake Charcuterie Board
Summer is berry season, and this Strawberry Shortcake Dessert Board celebrates the bounty of summer. Starting with classic sweet biscuits surrounded by fresh berries and homemade whipped cream, it creates an easy-to-serve dessert that’s perfect for summer.

Blueberry Cream Cheese Pie Recipe
Looking for another easy summer dessert? This Blueberry Cream Cheese Pie combines a creamy filling with a homemade blueberry topping for a refreshing berry dessert.
Oreo Icebox Cake
Ingredients
- 3 packages Double Stuf Oreo cookies
- 3 cups heavy whipping cream
- ¼ cup icing sugar
- 2 teaspoons vanilla extract
- 4 ounces cream cheese softened
Optional Toppings
- Whole Oreo cookies
- Crushed Oreo cookies
- Mini chocolate chips
Instructions
Step 1: Prepare the Filling
- Beat the softened cream cheese until smooth and creamy. In a separate chilled bowl, whip the whipping cream, icing sugar, and vanilla until stiff peaks form. Gently fold the cream cheese into the whipped cream until fully combined.
Step 2: Layer the Oreo Icebox Cake
- Arrange a single layer of Oreo cookies in the bottom of a 9 x 13-inch baking dish. You may need to break a few cookies in half to fill in the ends and corners.
- Spread one-third of the whipped cream mixture evenly over the cookies.
- Repeat the layers two more times, ending with the remaining whipped cream mixture on top.
Step 3: Chill the Icebox Cake
- Cover the baking dish with plastic wrap and refrigerate for at least 8 hours, or overnight. During that time, the Oreo cookies absorb moisture from the filling and soften into a cake-like consistency.
- While the Oreo Icebox Cake can be served after 8 hours, I think it tastes even better when made the day before. The extra chilling time allows the cookies to soften completely and take on that classic cake-like texture.
Step 4: Top and Serve
- To serve, top each piece with a whole Oreo cookie. For an extra special touch, you can sprinkle crushed Oreo cookies over the top or add a few mini chocolate chips just before serving.