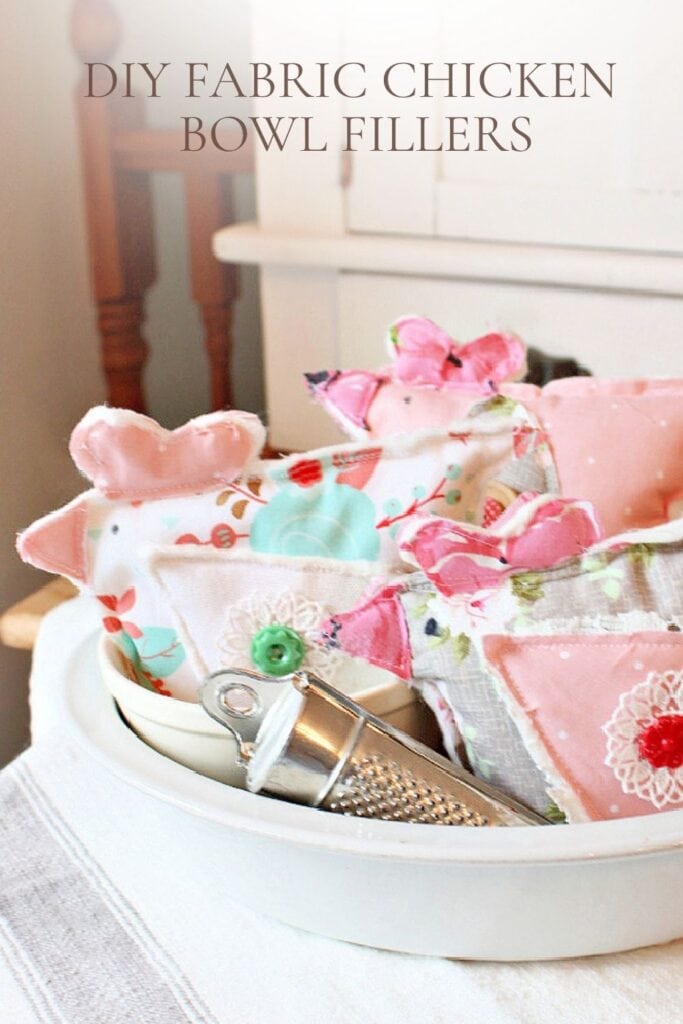
DIY Fabric Chicken Bowl Fillers
These DIY fabric chicken bowl fillers were inspired by my collection of vintage ironstone bowls. I wanted a simple sewing project that would add a cheerful pop of color while using up some of the fabric scraps I already had on hand.
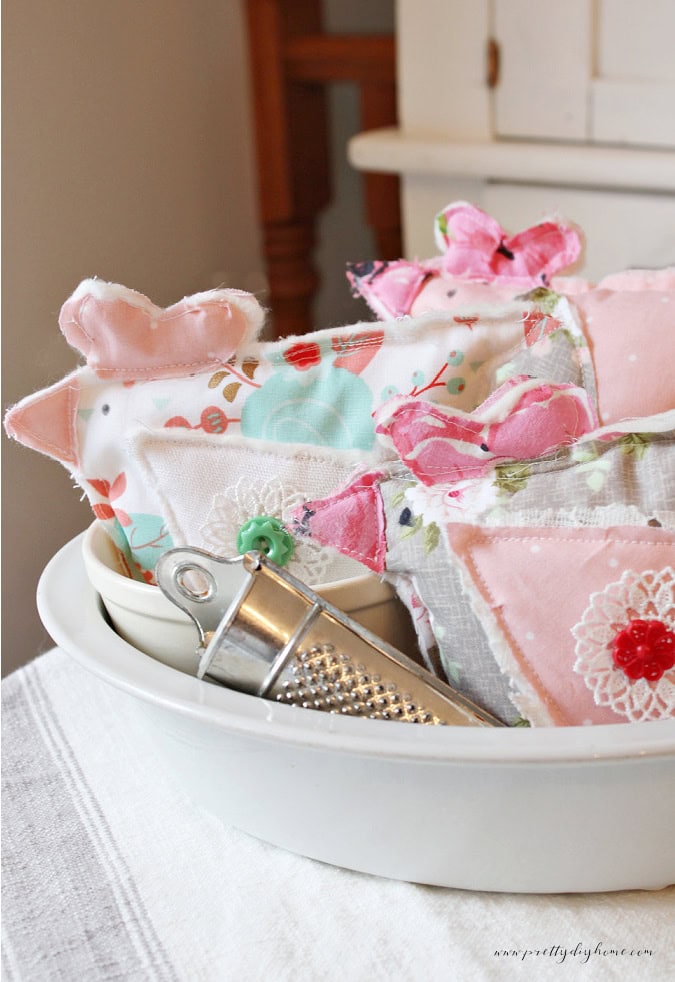
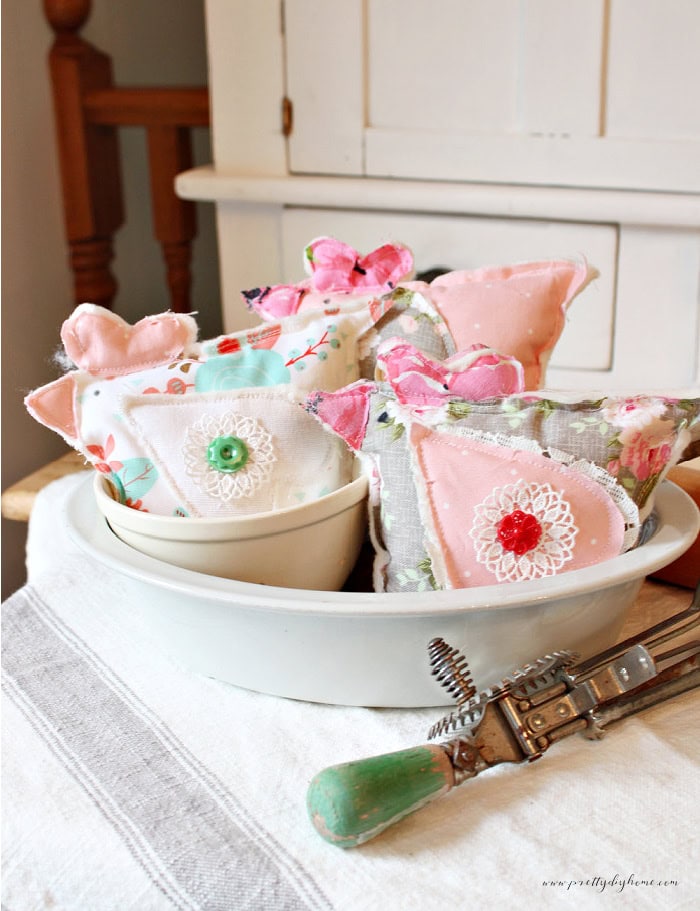
The finished chickens added exactly the colorful touch I wanted. Tucked into a vintage bowl, they brought a bit of springtime charm to my kitchen while using up some unwanted scrap fabrics.
This beginner-friendly sewing project uses small pieces of fabric, quilt batting, and simple embellishments such as lace, buttons, and ribbon. The chickens are quick to make, easy to customize, and make cute bowl fillers, shelf sitters, or seasonal farmhouse decor.
Whether you use fabric scraps, fabric quarters, vintage linens, or primitive-style fabrics, each chicken develops its own personality, making this a fun project to create and display.
How to Make DIY Fabric Chicken Bowl Fillers
One of my favorite things about these fabric chickens is that they are meant to be whimsical and imperfect. This is not the type of sewing project where you need to worry about perfectly straight stitch lines, matching seams, or flawless sewing.
In fact, part of their charm comes from their handmade appearance. The slightly wonky shape, soft curves, and individual embellishments give each chicken its own personality.
I intentionally kept this pattern simple. The pieces are not finished with zigzag stitching, there is no interfacing to fuss with, and the construction is straightforward enough for beginners. Once you start sewing and assembling them, the chickens naturally develop the relaxed, casual look they are meant to have.
These little chickens are the kind of project you can sit down and enjoy without overthinking every detail. Just have fun with the fabrics, add a few embellishments if you like, and let each chicken turn out a little different from the next.
Supplies Needed
- Fabric scraps or fabric quarters
- Fabric chicken pattern
- Quilt batting
- Polyester stuffing
- Sewing machine and thread
- Scissors and straight pins
- Embellishments of your choice
Optional Embellishments
These fabric chickens are easy to customize. I decorated mine with lace and vintage buttons, but you can use whatever embellishments you have on hand. Small bows, fabric flowers, vintage trims, moss, twigs, twine, or even old jewelry findings can all be used to give each chicken its own personality. There is no right or wrong way to decorate them, which is part of what makes these little fabric chickens so much fun to create.
Customize Your Fabric Chickens
This is a great project for using fabrics you already have on hand. Small leftover pieces work just as well as coordinating fabric quarters, making it an inexpensive way to create seasonal decor. The bright red combs on my chickens were cut from a piece of vintage fabric I found at a garage sale, proving that even small pieces of older fabric can find new life in a project like this.
As with many of my sewing projects, don’t overlook old tablecloths, curtains, linens, or other vintage textiles that may have worn areas. Often, there is still plenty of usable fabric that can be repurposed into small projects like bowl fillers.
The fabric choices can completely change the look of the finished chickens. Bright florals create a cheerful cottage style look, while ticking stripes, homespun fabrics, and muted prints can give them a more primitive or farmhouse feel. The pattern stays the same, but the fabric combinations make each flock unique.
Free Fabric Chicken Pattern
These whimsical fabric chickens were inspired by a chicken design created by Linda from Linda’s DIY Design. I loved the playful shape and used it as inspiration when creating my own version for bowl fillers and seasonal decorating.
My chickens were made using quilt batting, decorative wings, embellishments, and fabric combinations that suited my own style and available materials. One of the things I enjoy most about this design is how easily it can be customized by simply changing the fabrics and decorative details.
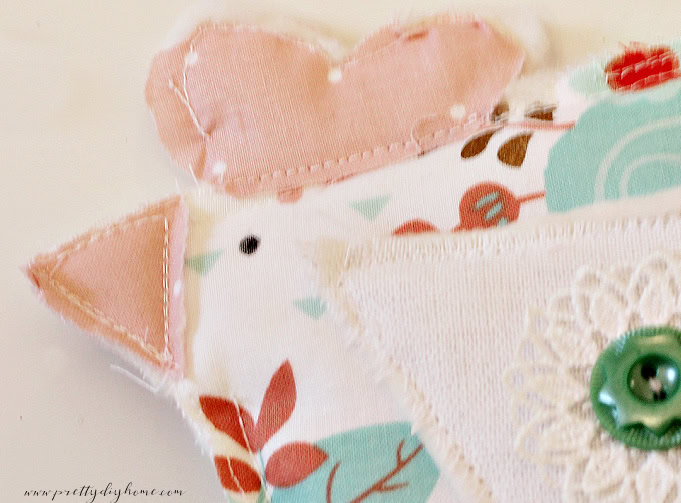
Print the pattern at 100% scale and cut out the individual pattern pieces before getting started. You will need the body, wing, comb, and beak pattern pieces for each chicken.

How to Sew Fabric Chicken Bowl Fillers
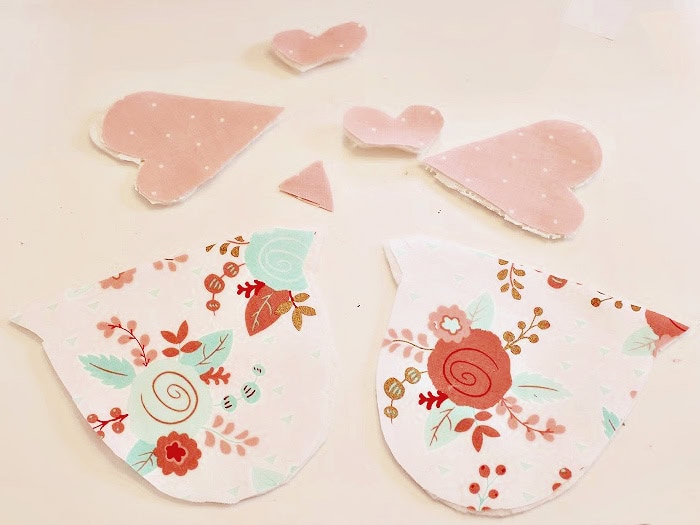
Step 1: Cut the Fabric and Batting
Start by cutting out all of the pattern pieces. For each chicken, you will need two body pieces, two wing pieces, two comb pieces, and two beak pieces cut from fabric.
Next, cut two body pieces, two wing pieces, and two comb pieces from quilt batting. The beak does not require batting.
To save time, place the wrong sides of the fabric together, pin the pattern pieces in place, and cut both layers at once. I found it easiest to cut the batting one piece at a time.
Once everything is cut out, pair each fabric piece with its matching batting piece, making sure the fabric fronts are mirrored so the finished chicken will look the same on both sides.
There is no need to finish the edges with zigzag stitching. The simple construction and soft unfinished edges help give these fabric chickens their shabby chic, vintage-inspired handmade style..
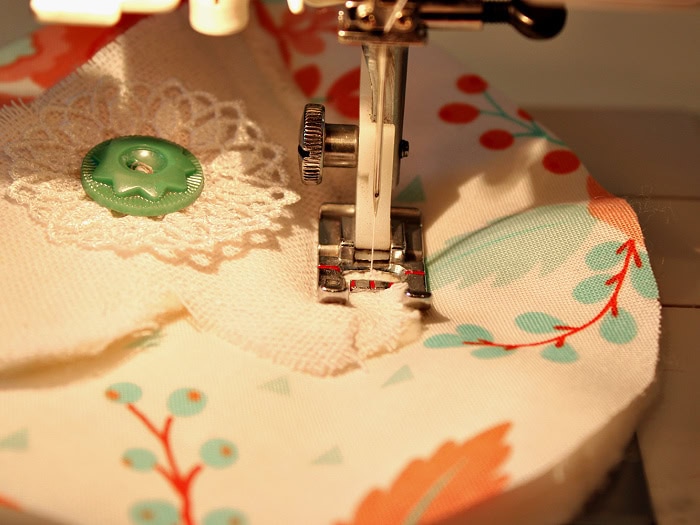
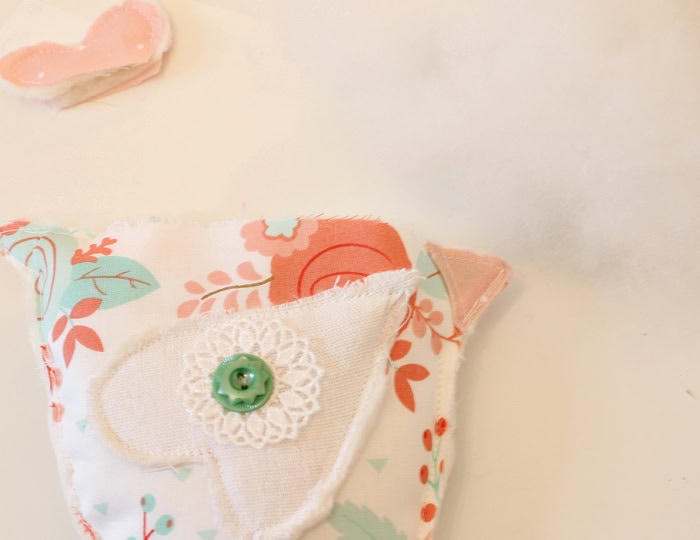
Step 2: Decorate and Attach the Wings
I suggest decorating the wings before attaching them to the chicken body. By doing it now, any stitching used to attach the lace, buttons, or other embellishments will be hidden behind the wing and covered once the wing is sewn to the body.
I chose a small piece of lace and a vintage button. Bows, fabric flowers, or other handmade decorative details will work here as well. I think baker’s twine would be very fun to use as an embellishment on these little chickens.
Sew the embellishments through each wing first to hold all the layers together.
Next, place the wings on the chicken body pieces and position them so they are identical. Use the first wing as a guide so both wings are placed in the same location on each side of the finished chicken.
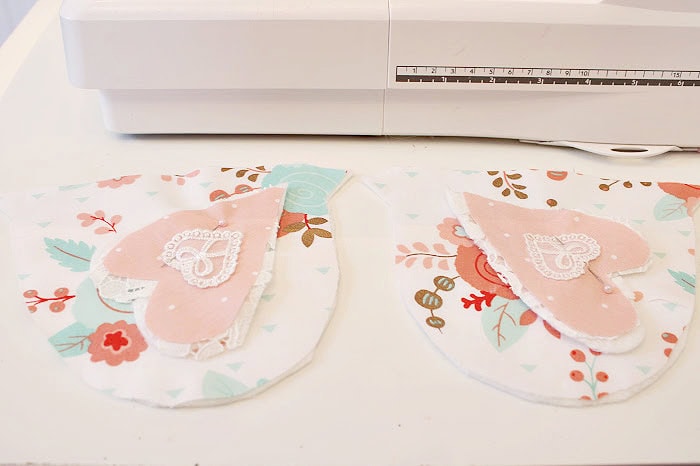
Once you are happy with the placement, sew around the outside edge of both wings to attach them to the body pieces.
Once both wings are attached, set the body pieces aside while you make the comb.
Step 3: Sew the Comb
To make the comb, sandwich the two pieces of quilt batting between the two fabric comb pieces and pin them together.
Starting about 1/4 inch from the bottom edge, sew around the curved top portion of the comb, following the shape of the pattern. Stop sewing about 1/4 inch from the opposite bottom edge, leaving both ends unsewn. The bottom edge should remain completely open.
Leaving the bottom open allows the comb to be attached to the chicken after the body has been sewn and stuffed.
Step 4: Attach the Beak
With the comb set aside, it’s time to attach the beak.
This is the fussiest part of the project, but taking a few extra minutes here will help ensure the beak looks the same on both sides of the finished chicken. This is also the first time the two chicken body pieces are brought together, making it easier to check that the beak placement matches on both sides.
Begin by making sure the two beak pieces are aligned the same way. Place one beak piece across the front corner of a chicken body piece where the beak will be attached. Repeat on the second body piece, positioning the beak in the same location.
Hold the two body pieces together and check the beak placement from both sides. Once you are happy with the alignment, sew the first small seam to hold the beak in place. I checked the alignment one more time before sewing the remaining two seams.
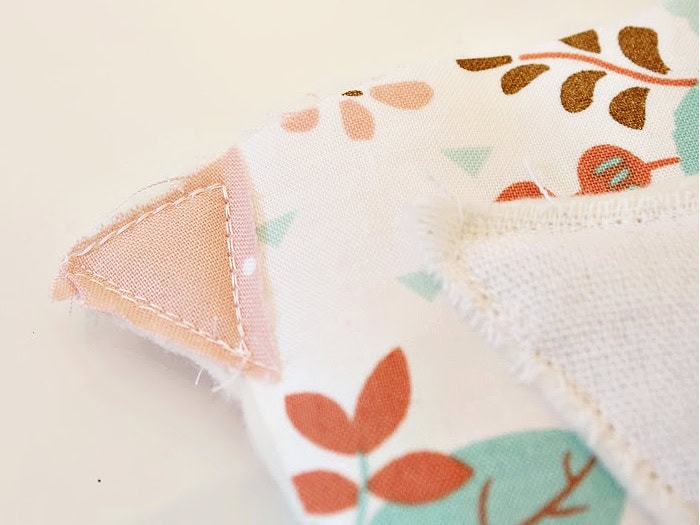
Once the beak is attached, pin the body pieces together and prepare to sew the chicken body.
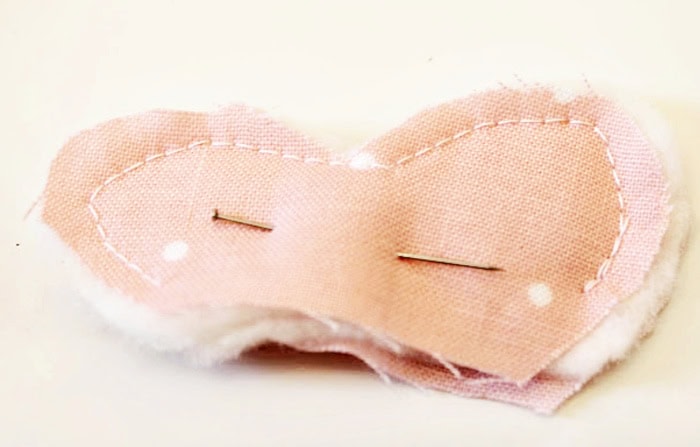
Step 5: Sew the Chicken Body
With the beak attached to the tip of your chicken body, it’s time to finish the body with a simple seam around the outside edge.
The two body pieces should already be aligned from the beak placement step. Before sewing, check that the remaining edges are lined up properly and adjust any pins if needed.
Sew around the outside of the chicken using a seam allowance between 1/4 and 1/2 inch. Leave a 2-inch opening along the bottom edge for stuffing.
Because the beak has already been sewn in place, there is no need to sew around the outside of it again. Instead, I tucked the seam underneath the seam allowance of the beak and continued sewing around the chicken’s body.
If the fabric begins to gather around any of the curves, stop with the needle down, lift the presser foot, smooth the fabric with your fingers, and continue sewing.
At this stage, your chicken should be fully assembled except for the stuffing opening.
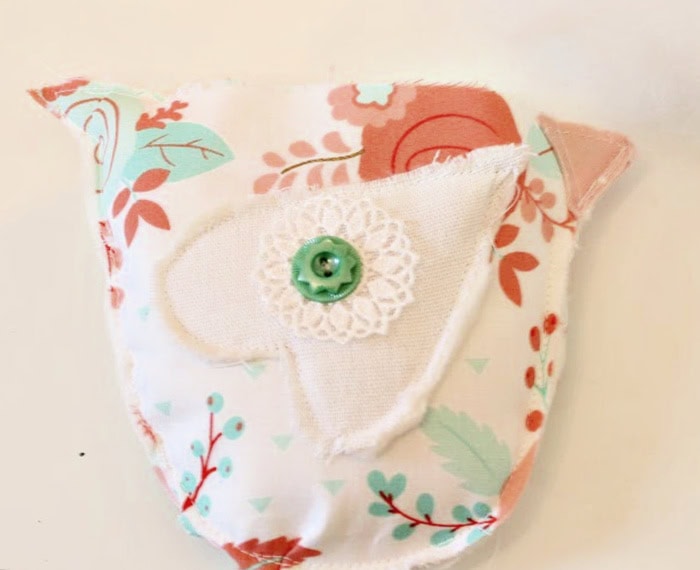
Step 6: Stuff the Chicken and Attach the Comb
Lightly stuff the chicken through the opening left along the bottom edge. I used approximately one cup of polyester stuffing before gently packing it into shape. You want the chicken to be soft and full, but not overstuffed.
Once you are happy with the shape, sew the opening closed using a simple straight stitch.
To attach the comb, open the bottom edge of the comb and place it at the top of the chicken next to the beak. Position the larger bump of the comb towards the front of the chicken and sandwich the chicken body between the two open sides of the comb.
Sew through all the layers to secure the comb in place.
Step 7: Add the Finishing Details
With the comb attached, all that is left are a few finishing touches.
To create the eye, I used a pencil and placed a small dot between the beak and the point of the wing, approximately 1/2 inch below the comb. A simple pencil dot was all that was needed to give each chicken a little personality.
Once the eye was added, I gave the entire chicken a quick inspection and trimmed away any loose threads, uneven batting, or stray fibers with a pair of sharp scissors.

Don’t worry about making the edges perfectly neat. A few soft, frayed edges help give these fabric chickens their vintage shabby chic style.
I made my little fabric hens to sit in an ironstone bowl for color, but they would be equally adorable on a tiered tray or tucked inside a basket. They would also make charming additions to a spring vignette, Easter display, or farmhouse centerpiece.
Because they use such small pieces of fabric, they are a wonderful way to use up scraps while creating something unique and handmade. Best of all, each chicken develops its own personality, making every little flock one of a kind.
More Easy Sewing Ideas

Pretty DIY Tea Towel for Spring
This spring tea towel tutorial uses similar shabby chic colors and includes a very easy way to make prairie points. They are a fun embellishment for tea towels and can be added to many other fabric projects as well.
Repurposed Vintage Linen Hanger Covers
If you enjoy sewing with repurposed fabrics, you may also like my vintage linen hanger covers. They are another easy sewing project that gives new life to old embroidered linens and vintage textiles.