Best Air Buns (Rolls) Recipe made with Yeast
Light and Fluffy Buns Recipe
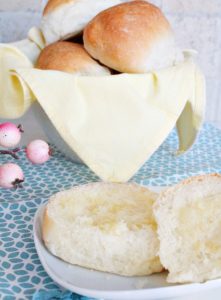
The light and airy air buns are so much better than any bun you can purchase at the grocery store. They are a fantastic addition to any special meal or large gathering. If you’re intimidated to make a buns recipe with year you’re at the right place. This post is a bit long, but I have included a step-by-step air buns recipe with yeast tutorial that shows you every step for making fresh homemade.
This is my recipe and I have been making this bun recipe for 40 years or so. You don’t use a bread machine, kitchen aid stand mixer, or a dough hook attachment for this recipe. You’ll need a large bowl, a wooden spoon, and some baking pans. It’s one of those great recipes that’s been around for generations. Although this recipe is made by hand please don’t be put off making them. Baking your own fluffy dinner rolls is not time-consuming, the actual prep time is about an hour. But, allowing the yeast dough to rise, takes some time; so you need to bake your air buns on a day you are going to be home.
Difference between Rolls and Buns
Rolls and buns are pretty much synonymous, both are made from a yeast bread dough, the difference is in the shape. In the USA, they call them rolls, in Canada (like Britain) we call them buns because they are round. A roll refers to a miniature loaf of bread, that’s often oval (think hoagie, hero, poorboy).
Buns are a loved treat that cost pennies to make and dollars to purchase. If this is the first time you’re thinking of making homemade rolls, I hope you give this air bun recipe a try. Once you make homemade buns the first time, it will seem quite simple the second time.

Homemade Air Buns Recipe
Rolls Recipe Ingredients
This recipe uses a few simple ingredients, added to the bowl at different stages. I’ve already separated the measurements for you.
- 1 pkg active dry yeast (traditional, not instant yeast)
- 1/2 cup lukewarm water
- 1 tsp white sugar
- 1/2 cup lard
- 1/2 cup white sugar
- 1 tsp salt
- 3 1/2 cups lukewarm water
- 1 tbsp vinegar
- 9- 10 cups all-purpose flour
Directions for Homemade Air Buns
The first step to making this air bun recipe is to clean a counter off very well, as you will be kneading the dough directly on the counter, you want the surface very clean.
Warm Water
Bread and bun recipes call for warm water which isn’t descriptive enough. What I mean as warm water, is the water’s temperature should be comfortable on your skin as it comes from the tap, I like to define it as the temperature of a baby’s bath water. (115 degrees)
Softening the Yeast
Traditional yeast needs to be softened in warm water. Take out a large mixing bowl. Make sure the bowl is a nice warm room temperature. My steel bowls tend to be cold, if your bowl is cool, swirl it with hot water, because a cold bowl could decrease the temperature of the water and yeast mixture.
In the large mixing bowl add 1/2 cup lukewarm water, and mix in 1 teaspoon of sugar. Then sprinkle the yeast overtop. Sprinkle with the yeast. Let soak for 10 minutes until the yeast is soft and foamy.

Mixing the Yeast Dough
In a warm large bowl, add lukewarm water, lard, sugar, and salt. Stir together using a large wooden spoon until the lard melts.
Add to the softened yeast, then add the vinegar. Stir.
Add the all-purpose flour two cups at a time, stirring the mixture with the heavy wooden spoon after each addition. Make sure your flour measurement is accurate, I smooth off the top of my measuring cup with a knife.
Once you have added 8 cups of flour, add one more cup of flour to the dough. By now your dough is getting pretty thick. It’s likely too heavy to continue with a wooden spoon. It is time to start working it with your hands.


Wash your hands, sprinkle a little bit of flour on top of the dough, put your clean hand under the dough, and fold it over into the middle. Turn your bowl 1/4 turn, and fold the dough over again.
Repeat the process until most of the flour has worked its way into the dough.

Kneading the Bun Dough
Once all the flour in the dough recipe has been incorporated, sprinkle a 1/2 cup of flour onto a clean counter. Keep another half cup of flour nearby for dusting the dough, or adding to the counter if the counter gets sticky. Lightly spread the flour around to create a lightly floured surface. Place your bun dough onto the floured counter, and begin kneading the dough. Pull your dough over from the underside. (my pics have one hand as the other one had the camera but the process is the same)

Then push the dough over on itself. Once it’s folded over, push down and forward with the palm of your hands.

Turning the dough 1/4 turn, repeat this process for approximately 8 to 10 minutes. Occasionally take some of the set aside flour, and sprinkle it on top of the bun dough. Pick up your dough in one hand and re-spread the flour on the counter before continuing.
Signs to Look for When Kneading Yeast Doughs
It’s rather hard to explain but the dough will tell you when it’s been kneaded enough. I am certain the pictures will illustrate, but here are some old lady tips. As you knead your dough, it will become less sticky. The gluten will develop making your dough less like a heavy lump and more smooth and elastic. Most of the flour will incorporate itself into your dough from the counter.
Eventually, when you fold the dough over, it will no longer stick to the ball of dough. You will also notice most of the flour you spread on the counter has been incorporated into the dough. This is when I quit kneading.
Letting the Dough Rise
Clean the large dough bowl and your dough-covered hands. Grease the inside sides of the bowl with butter, using a bit of plastic wrap or wax paper. Place the bun dough in the greased with the smooth surface at the top.
Check out the picture in Figure 4. Notice how much smoother the dough is now than when I began to knead it?

Cover with a clean kitchen towel and place in a warm place free from drafts. You want your room to be warm.
Let it rise for 2 hours. The dough ball will look really light and airy, to check if it’s risen enough, poke the top of the dough softly to see if the top springs back. If it doesn’t its time to punch the dough.

Punch the dough in the middle with your fist. Fold the sides up and over like when you were kneading it. The dough will be even smoother and larger than when you first put it in the bowl.

Second Rise
We need to let the dough rise for the second time.
Like the first time, form the dough into a ball again, make sure the smooth side is on top, and place it back into the greased bowl.
Cover with a clean towel in a warm spot away from any drafts and let rise for about one hour, until it doubles in size.
How to Make Crusty Rolls or Soft Dinner Rolls
Once your dough has risen the second time, it’s time to form and pan the rolls. There are all sorts of ways to form bun dough, but for this roll recipe, I will talk about the two most basic methods, crusty and dinner rolls.
Crusty rolls are made when you form the buns into a small ball, and place them onto a parchment-lined baking sheet, a couple of inches apart so they won’t touch when they rise and are baked. That is how I baked mine.
To make old-fashioned dinner rolls, you will need two 9″ by 13″ pans or 3 cake pans greased well. Place the balls of dough 1 inch apart in the pans. That way when they rise the sides touch and you get the soft sides.
Both buns are formed the same way, so let’s carry on.
How Big Should a Dinner Roll Be?
My family wants their buns big about 3 to four inches across. If you want your buns smaller, squeeze them off in bits about the size of a large egg.
Again make sure to wash your hands. Scoop out a small bit of dough making sure the smooth side is on the top.
Then pinch it with your hand as you see in the picture. Tuck the pinched-off dough inside the bun to form small balls and place it on the baking sheet or baking dish.

Once your buns are shaped and laid out on the pan, let them rise for two hours, or until they double in bulk.

Bake at 400F for 10-15 minutes. They will be golden brown.

Once baked golden brown remove the fresh buns from the oven and place them on a wire rack or clean towels to cool. If you want the tops to be soft, as soon as they come out of the oven brush them with melted butter.
If you like a crusty roll, skip the butter.


Other Yeast Roll Recipes You May Enjoy

Overnight Butterhorn Rolls
Butterhorn rolls are a special treat for mornings and are unbelievably good and warm right out of the oven. I created a butterhorn rolls recipe you can make the night before and then finish and serve in the morning. This is a special recipe and very much appreciated every time I make them.

Hot Cross Buns Recipe
My hot cross buns recipe is classic with a twist. My family doesn’t like peel so this hot cross bun recipe does not include any. Instead, it uses dried fruits and oranges.
Classic Rolls Recipe with Yeast
Ingredients
- 1 pkg yeast
- ½ cup lukewarm water
- 1 tsp sugar
- ½ cup lard soft at room temperature
- ½ cup sugar
- 1 tsp salt
- 3 ½ cups lukewarm water
- 1 tbsp vinegar
- 9-10 cups all purpose flour
Instructions
- Make sure you bowl is warm. If it isn’t warm swirl it with hot water.
- Add 1/2 cup lukewarm water, mix in tsp sugar. Sprinkle with the yeast. Let soak for 10 minutes until the yeast is soft and foamy.

- In a large warm bowl, add lukewarm water, lard, sugar and the salt. Stir together until the lard melts.
- Add the softened year to the lard mixture, then add the vinegar.
- Add the flour two cups at a time, stirring after each addition.

- When you get to 8 cups, add one more cup of flour to the dough, but by now your dough is getting thick. Wash your hands, sprinkle the flour on top of the dough, put your clean hand under the dough and fold it over into the middle.
- Continue folding the dough over around the outside of the bowl.
- Once all the flour is incorporated, place the last cup of flour onto a clean counter. Place your dough onto the flour, and knead the dough, kneading and spinning the dough around. As you knead your dough, it will become less sticky. Eventually when you fold the dough over it will no longer stick to the dough. This is when I quit kneading. Your dough should be a nice round ball.
- Clean the large dough bowl and your dough covered hands. Grease the inside of the bowl with butter. Place the dough in the bowl with the smooth surface at the top. Cover with a clean towel and place in a warm place.
- Let rise until double in size about 2 hours.
- Punch the bread down and let rise again until double in size about an hour.
- Grease and pan the rolls.
- Bake at 400F 10 to 15 minutes, until golden brown.


the written recipe does not say how long to let the dough rise nor what temperature to bake at.
Thank you. I check out the post and that information was missing on the recipe card. I have added it, thank you for letting me know.
Thanks for this tutorial. My Mom used to make air buns and now it is my turn. Her recipe calls for oil instead of lard, otherwise they are identical. So now my children are wanting to make them so this is perfect!
Hi Karen. I am glad to hear from you. Your family will love this recipe, and swap out the lard for the oil in equal amounts. I hope your family loves them as much as mine does.
These buns look delicious.! Great detail in the tutorial as well. Love it!
Great stuff! I am glad to know the tutorial was thorough. When baking especially its often something I am so use to doing that it was hard to decide what is helpful to share.