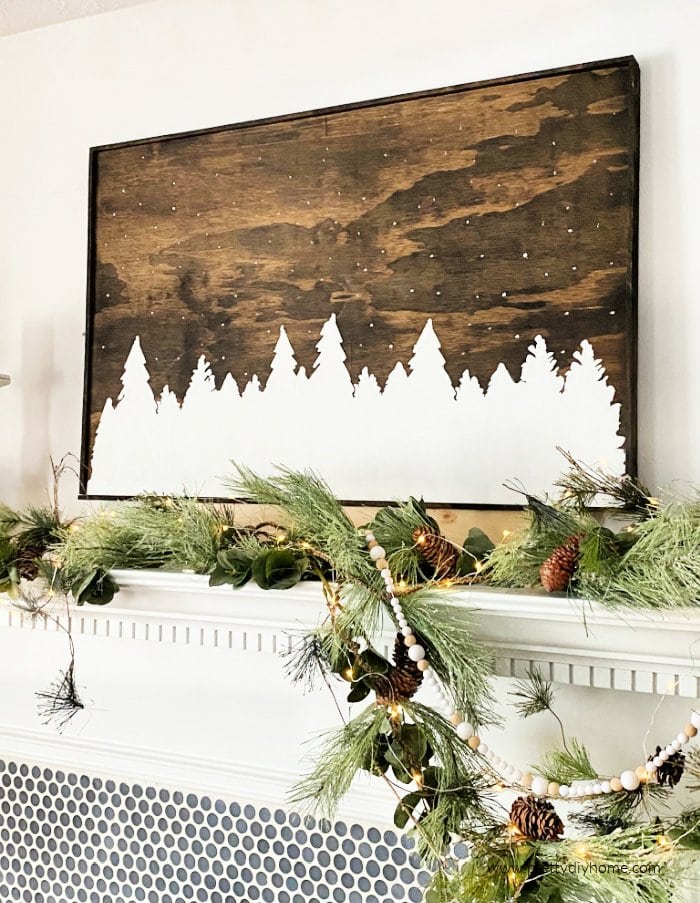
Large Rustic DIY Wood Christmas Sign
This rustic wood Christmas sign is easier to make than you think, it’s a perfect touch to a rustic Christmas living room mantel and it would make a beautiful handmade gift. This rustic Christmas sign reminds me of home. I grew up surrounded by large snow covered forests of trees that would brighten the long winter nights. Although bright, cheerful, and beautiful a Canadian winter forest it was anything but warm. Having this rustic wood sign for Christmas and winter is a special way to add some cozy rustic vibes to your holiday season, and it’s so much warmer than the actual thing. This Christmas or winter sign can easily work for both seasons.
Decorating for Christmas is one of my favorite things to do for the holidays. I love making new DIY projects for the holidays as I love the look of the handmade pieces that I add to the Christmas decor mix every year. It really is the most wonderful time of the year, picking a Christmas theme is too much fun, and it’s so enjoyable watching your theme come together while making your home feel special. This year my home is all about rustic Christmas decor in a brown green and white color scheme, and this rustic sign will inspire all the other Christmas crafts I make this year.
Making this rustic sign is easier than you think, and I will share exactly how you can create one for yourself or as a Christmas gift for a loved one. Handmade signs make wonderful gifts,
DIY Wood Sign Supplies
These are the supplies we used to create this DIY wood sign for Christmas.
- White Forest Template
- 1/2″ thick finished one-side plywood,
(28″ by 36″) - 4 ft length of 2 by 4
- 1 1/4″ brad nails (air nail gun)
- Cricut Explore Cutting Machine (or Silhouette Machine)
- Duck Brand EasyLiner Clear Adhesive Drawer Liner ( or Cricut Smart Vinyl)
- Picket fence white Fusion Mineral Paint
- Table saw
- Mitre saw, skill saw, or handsaw
- Hand sander with 120 grit sandpaper
- Minwax dark walnut stain color
Making the Wood Sign Frame Slats
Instead of having a heavy frame using 1 by 2 for this board, we chose to use a 4-foot length of 2 by 4 and the table saw. Cut the 2 by 4 wood pieces into 1/4 thin strips on the table saw.
Using a miter saw, skill saw or handsaw, then cut them to the length. Cut 2 lengths at 36 1/2″ and 2 lengths at 28″
If you prefer to use 1″ by 2″ and skip the step of slicing the wood for the frame, that works as well, but your frame will be thicker.
Prepping the Wooden Sign Backdrop
Cut a piece of 1/2 inch plywood to 29 by 38 inches using a table saw or with a skill saw and straight edge guide. Otherwise, you can ask the store to cut a piece for you.
Sand with 120-grit sandpaper to make it as smooth as possible. Wipe with a clean cloth.
How much prep you do depends on the grade of plywood you use. Purchasing pre-sanded good one-side plywood costs more, but you don’t need to presand it. If using regular plywood, or older plywood give it a light sand.
I chose the dark brown stain for the background color as it has a rustic look and allows the grain to show through. The grain in the Christmas sign reminds me of a dark sky with clouds in it.
Apply 1 or 2 coats of Minwax in the dark walnut, Apply the Minwax with a paintbrush then wipe it off with a clean dry cloth. This plywood was beautiful after just one coat, your plywood may not absorb the stain the same way, so do one coat first, and then decide if it needs the second coat. Follow the instructions on the can, and we let our wood stain dry overnight before continuing with the wooden sign.
Sand and stain the frame pieces the same way.
Creating the Sign Stencil
There are a few ways to make the forest stencil. The way I used is the cheapest. I will share other methods in italics.
Instead of using vinyl to make this stencil, I chose to use Duck brand clear drawer liner instead. This product has to be cut on a mat, but in Canada, an 18″ by 24′ roll costs $12. In comparison, smart vinyl is $11 for 12″ by 3 feet. For me, the cost savings were worth it and it meant I didn’t care if I made a mistake and had to redo it.
In Cricut design space, I made the stencil in two halves.

Again you have some choices here. If you don’t care if the forest is painted or vinyl and have a Cricut cutting machine, use a single piece of smart permanent vinyl. Set it for no mat, smart permanent vinyl. Cut and then transfer your vinyl to the stained wood backing. Then add your frame.
Cutting the Wooden Sign Stencil
Once designed place the clear drawer liner on the mat. Paper side up. Use the fine point blade, the green mat, and the Duct Tape Sheet for setting, and increase the pressure.
Cut the stencil into two halves. You will notice there are extra parts to the stencil to remove later. The extra bits help to hold it together
On a Cricut maker, once the vinyl is cut. Leave it in the cutting machine. Check and make sure it has cut through like the next image. If not click the play button and recut it again. As long as you don’t remove the vinyl the machine with recut over the original cut.

Weeding the Vinyl
It’s much easier to leave the stencil attached to the mat and pull the excess portion away. Just remember it’s a stencil so you’re weeding away the trees, and leaving the outline pieces.

Repeat for the second portion, Here are the two portions cut and weeded side by side. Keep the arrowed attached parts together.

As I typically use this clear drawer liner as transfer tape, I was able to skip the transfer tape step and instead just attached the stencil directly to the wood.
In the above picture, you notice the areas with the arrows. These are extra parts I left in the design to make the transfer easier. With the paper side Down, line up the two halves of your stencil onto the wood background. Hold the edge in place I used wood instead of painter’s tape.
Pick any corner you like, keeping the stencil in place pull away a small corner of the paper backing leaving the clear vinyl portion. Press the first part of the clear vinyl to the wood. Working along one edge peel the paper and press down the vinyl. Continue until the backing is removed.

Adding Mod Podge
I had never tried using Mod Podge to prevent painting bleeding before, but decided to add the extra step and am so glad I did. I am always very careful when painting a stencil, but sometimes bleeding occurs anyway. For this project, I added the modpodge and had no bleeding. Worth it.
Apply the modpodge like you would paint, starting from the stencil surface and working towards the center. Apply the modpodge along the entire outer line of the stencil, where you expect bleeding could occur. You don’t have to do the entire surface.
Let the mod podge dry and then remove the excess areas of the stencil as shown.

Painting the DIY Wood Sign
I used Picket Fence Fusion Mineral white paint. You can use any good quality white latex paint you like.
Like the Mod Podge start with your brush on the stencil and pull the paint towards the open portion. This minimizes the chances of bleeding.
Apply the first coat and let it dry according to the directions on the can.

Once dry add a second coat and with gloves on remove the stencil right away while the paint is still wet.
Let the paint dry.
The final layer is optional, using an artist’s brush I added a thick layer of paint in different sections to generally resemble the direction of the branches. I have no artistic skill, but it did give the trees a bit more texture. I liked the way it turned out.
The little dot snowflakes are made using the end of my artist brush dipped into the paint. It’s funny how much it looks like falling snow.

Finishing the Wall Art with a Frame
To add the frame, Hubs ran a bit of wood glue along each side of the frame and then placed the frame along the edge of the wood backing.
Once the side of the frame was neat and square he attached the frame using small air gun nails. If you don’t have an air nailer you can use small finishing nails instead.

Hanging Your Rustic Wood Sign
The easiest way to hang this sign is to ensure the top of the frame is securely attached to hold the weight. Then you hang the sign by its frame onto a nail. The best way to hang the large sign is with a large sawtooth hanger. Nail the hanger into the back of the sign making sure the nails don’t come through the front.
Want to make this sign for yourself? Pin it to keep it handy.

I hope you make one of these signs for your holiday home this Christmas. I think its welcoming and adds a calm feeling to our Christmas season.
I hope you make one of these signs for your holiday home this Christmas. I think it’s welcoming and adds a calm cozy feeling to our Christmas season.
Merry Christmas preparations! Leanna
Some other DIY Wood Signs and Projects
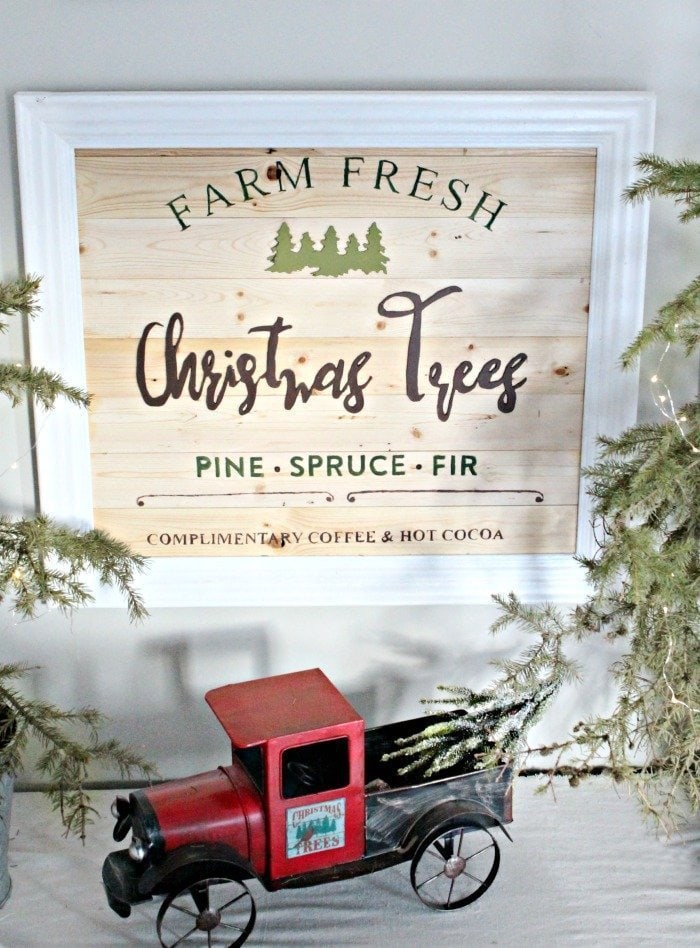
DIY Farmhouse Christmas Tree Sign
This DIY Farmhouse Christmas Tree sign is more elaborate to make, and worth the extra effort. It is a copy of the large expensive shiplap wood signs you find in expensive farmhouse gift shops. The DIY tutorial shows you every step.
One Comment