How to Store and Organize Leftover Paint (with Free Printable Labels!)
If you’re a homeowner, chances are you’ve got a stash of leftover paint and supplies stored away somewhere. Paint has a sneaky way of multiplying, so before you know it, you’re surrounded by cans, jars, brushes, and rollers. After realizing my own paint stash was getting out of hand, I knew it was time to get organized.
In today’s post, I’ll walk you through how to organize and store your leftover paint properly, share some paint storage tips, and offer free printable paint labels to help keep everything neat and easy to find.
Why Store Leftover Paint
Paint is one of the easiest and most affordable ways to update a space, but it’s not as cheap as it used to be. Keeping leftover paint for small repairs and DIY project makes perfect sense, the trick is to be able to find it.
Paint is one of the easiest and most affordable ways to update a space, but it’s not as cheap as it used to be. Keeping leftover paint for small repairs and DIY projects makes perfect sense.
Having a bit of touch-up paint on hand can save you from a lot of hassle. But only if you can identify it later!
Why Labelling Matters – Learning the Hard Way
When we moved into our home, I painted all the bright white trim myself. Months later, at Christmas, I decided to do some touching up, filling in any nicks, painting over smudges, etc. The plan was a quick holiday touch-up. I grabbed what I thought was the right white paint, a nearly full can labeled “Calm.”
Turns out Calm was not the trim color. It looked white in the can but dried to a soft gray. I didn’t realize until the touch-ups were dry… all over the house. I had to leave it like that through Christmas and spend January sanding and repainting everything again. Lesson learned: Label your paint.
Free Printable Paint Labels
You don’t need fancy labels; scribbling with a Sharpie works in a pinch, but I’ve created printable paint labels to help make it even easier.
Each blank label template includes space to record:
- Room/Project
- Date
- Brand
- Color
- Type (sheen + interior/exterior)
There are two versions of the label—one with American spelling and one with Canadian spelling.
Tip: Print a few extra and keep them in your paint stash. Label as you paint so you’re not relying on memory, days (or months) later.
Paint Labels with Canadian Spelling
Paint Labels with American Spelling

They’re formatted to fit Avery 5264 labels, but you can also print them on plain paper and use clear packing tape to attach them.
Paint Storage Ideas
Before we dive into the “how,” let me confess something: I was terrible at handling paint. No brush holders, no elastic bands across cans, and definitely no organized system.
When I start a project, I go all in on the prep: cleaning, patching, sanding. But when it’s finally time to paint, I’m too eager to see that fresh paint coat go on. Paint storage and handling never crossed my mind.
What did that look like in real life? Gummed-up lids, crusty rims, mystery cans with no labels… just a chaotic paint stash hidden in the back of a cupboard. It wasn’t pretty. Eventually, I had to face the mess, and I’m so glad I did.

The Best Ways to Store Paint
There are a few key things to think about when storing paint: where to keep it, how long it lasts, and the conditions it needs to stay usable. Here is my unorganized paint cupboard.

Where to Store Paint
The best spot is a cool and dry designated space where the paint won’t freeze or overheat. If you live in a warmer climate, a cabinet in the garage can work. But if your garage freezes in winter (like ours does), you’ll need to store it indoors, in the basement, in a laundry room cupboard, or in an interior closet.
Ideal Storage Temperature
Make sure to keep your paint away from heat sources like the utility room with a furnace or hot water tank, and if you have kids, keep it up high or locked away for safety
The best temperature for storing paint is between 50°F and 75°F (10°C–24°C). Extreme temperatures can ruin it, freezing can separate the components, and heat can cause it to dry out or spoil.
How Long Does Paint Last?
- Unopened latex paint: up to 10 years
- Unopened oil-based paint: up to 15 years
- Opened cans: Can last several years if stored properly.
Always test old paint before using it; stir it to see if the color disperses again. If the paint blends smoothly and smells normal, it’s probably fine. But if it has a sour or rotten smell, it has been contaminated and should be thrown out.
Bad-smelling paint is likely to still smell on your project. Some say you can bleach dry smelly paint, but personally, I wouldn’t risk it.
You can store leftover extra paint in the original can if you have been careful with the lid and it still seals. Carefully pry open the lid to prevent bending it. Ask your paint provider for a free opener.
Can You Reuse the Original Cans?
Yes, if the lid still seals tightly. Open cans carefully with a proper paint opener or a flat tool to avoid bending the lid.
Keep the paint can rim clean. Transfer your paint from the can to another container before using it, then clean the rings off with a rag or a clean brush. This will prevent the paint from crusting and ruining the seal ridges on the paint can. The Dollar Store has some great hand-held paint containers.
When sealing it back up, use light taps with a rubber mallet or a block of wood. Avoid hammering the paint ring directly, this can dent the rim and ruin the seal.
What to Do With Old or Unwanted Paint
Even empty paint cans shouldn’t go in the regular trash. Check with your city about where to drop them off properly. Most cities have a paint recycling program where you can drop them off. Some even have areas where you can drop off good paint for others to help themselves. It’s a great resource for small paint projects.
Storing Small Amounts of Paint
Deciding on how much paint to keep or how much is worth keeping is a personal decision. We keep most of our paint, I use it for everything from wall touchups to crafts, signs, and furniture makeovers.
If there’s only a small amount of paint left (a cup or two), I don’t bother keeping it in the original gallon can. Instead, I pour it into clear, airtight containers and label it right away.
You don’t need anything fancy, clean food jars work great. I reuse spaghetti sauce jars, jam jars, pickle jars, mason jars, and even baby food jars. As long as the lid seals tightly, it’s good to go.
Clear jars make it easy to see what color’s inside, and they take up way less space. Add a label with the room or project name, color, and finish, and you’ll always know exactly what you’re working with when the next project rolls around.

Storing Other Paint Supplies
I like to keep all the specific paint supplies like drop cloths, painter’s tape, and paint brushes together in a clear plastic container right next to my paint stash. It makes prep and cleanup much easier when the painting supplies are within easy reach.
Unfortunately, we don’t have enough storage space for larger items like paint rollers, extensions, and paint trays, so I keep them together in the storage area of the garage.
Storing Spray Paint
You can label your spray paint cans, but I’ll be honest, I don’t. I rarely use spray paint for touch-ups, and if something needs refreshing, I usually repaint the whole thing.
Instead, I jot down the project name and spray paint color in a little notepad and tuck it in the same bin as the spray cans. It’s a simple trick that works just as well if you need to reference it later.
Organized Paint Cupboard After
Now that my paint stash is organized, it’s so much easier to find exactly what I need. I can quickly take inventory before starting a new project or before buying something I already have. I especially love the clear containers full of smaller items, tapes, etc. They no longer get buried behind my paint collection.
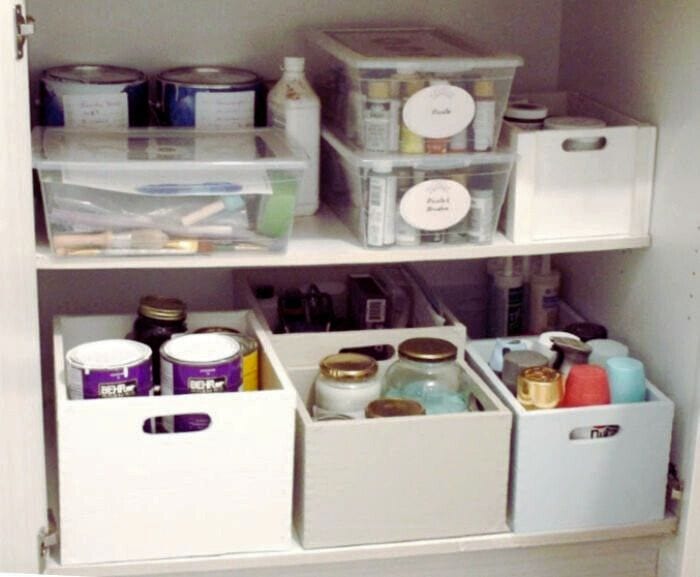
The whole process only took a couple of hours, even with transferring paint into jars and adding those snazzy labels. Using boxes to sort everything by type has made a huge difference. At a glance, I can see what I’ve got and exactly where new supplies should go.
Quick Tips for Organizing and Storing Paint
- Store paint between 50°F–75°F (10°C–24°C).
- Avoid freezing temps or hot spots like furnace rooms or near appliances.
- Label while you paint.
- Don’t wait until cleanup! Use the printable labels and jot down the room, color, finish, and date right away.
- Use clear jars for small leftovers.
- Mason jars or repurposed spaghetti, jam, or pickle jars with tight lids work perfectly for 1–2 cups of paint.
- Save space by downsizing containers.
- No need to keep a giant can for a tiny bit of paint—transfer it to a smaller jar and label it.
- Wipe rims clean before sealing. This keeps lids from sticking, rusting, or drying out—and helps maintain a proper seal.
- Sort by type using bins or boxes. Keep chalk paints, trim paints, wall colors, and spray cans grouped together for easy access.
- Keep touch-up paint handy. Having small, labeled jars on hand means you’re always ready for a quick fix without the fuss.
I hope this inspires you to tackle your own paint stash! A little organization goes a long way. Whether you’re planning a full room refresh or just need to touch up a scuffed baseboard, remember to grab the free printable labels to make the job easier. They are so handy. a And if you have any clever paint storage tips of your own, I’d love to hear them. Drop them in the comments below!
Pin this post to keep it!

Some other Organization Ideas for You

DIY Pantry Labels
Using IKEA jars, vinyl and a cutting machine I organized our baking pantry. Never run out in the middle of baking something, because you thought you had something you were out of.

Organizing a Cleaning Closet
Organizing ALL your cleaning products in one area so you can find it when you need it. No running from cupboard to closet to find who put what cleaner where. Sound good? Let me show you how I fixed that problem.

Spice Organization
Take some dollar store jars, label them, and create a large spice rack in your pantry. So easy to build a floor to ceiling spice rack, with custom dimensions to fit behind a door or in a small area.
This looks great, Leanna. Love the labels, and how helpful they are!
Thank you Julie. They should result in no mismatched painting repairs. What a hassle.