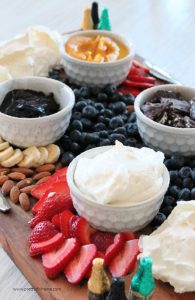
Pavlova Charcuterie Board
I am certainly glad that I am typing out Pavlova Charcuterie Board instead of trying to say it. Hubs birthday is this week and we’re watching what we eat, so instead of creating his favorite black forest cake with double everythings, were going to enjoy much lighter fare.
Pavlova is very similar to meringue except that you don’t leave it to dry out. Its light and airy, and only uses 5 ingredients to make. For a charcuterie board instead of making one large pavlova, were going to make 12 little clouds of sweet goodness.

Pavlova Recipe Ingredients
6 egg whites (3/4 c)
1 1/2 cups super fine (caster sugar)
3 tsp cornstarch
1 tsp vinegar
1/2 tsp vanilla
Note: Do not substitute caster sugar for icing sugar. If your unable to locate caster sugar, you can make your owncaster sugar by grinding regular sugar to make it finer. Or, you can use regular granulated sugar instead, just know ahead of time you may get tiny little granuals of sugar in your pavlova as the large grains of sugar may not dissolve completely.
Preheat oven to 275F.
Prepare your baking pans. I own a silicone mat that has circles drawn out on it already. If you don’t have a mat just use parchment paper and anything round like a small bowl, tart crust cutter, large round cookie cutter, and draw out 12 -3 inch circles on the parchment. Place on a cookie sheet and set aside.
In a stand mixer beat egg whites until soft peaks form.
Continue beating while adding the caster sugar a tbsp at a time. Beat well after each addition to dissolve the sugar granules.
Add the corn starch and beat.
Add the vanilla and vinegar and beat until stiff peaks form. Stiff points stay firm and don’t round over like the the soft peaks do.


Spoon gorgeous half cup size mounds of pavlova onto the middle of each circle. Using the back of a spoon spread it around so that its just inside your circle marks.

Place in the oven and back for 20 minutes. Turn the oven off and let the mini pavlovas cool down for several hours or overnight in the oven. The pavlova will remain white.
The pavlova is light and crispy on the outside and the inside is like a marshmallow.
Once done, store in a large covered container until your ready to create your charcuterie board.
If you have never made a pavlova before I find the smaller pavlova served as a grazing platter is easier to serve than the single large pavlova. You don’t have to worry about cracking, or breaking as you aren’t working with only one 12 inch round.

Charcuterie Board
I have several cutting boards and had to go out and purchase a specific charcuterie board. You can use any style of board you want to, round, or oblong. My only recommendation is to keep it for charcuterie and don’t ever use it as a cutting board. A regular cutting board inevitably has cut marks, and if your really unlucky and have used it for onions, you may just end up with a slight onion flavour to your dessert. If you don’t want to go buy a specific charcuterie board use a large platter instead.
Choose whatever fruit your family loves. Pretty coloured fruits like, blackberries, blueberries, strawberries, raspberries, peaches, mandarin oranges and kiwi are some suggestions.

I also added whipped cream, whole almonds, bits of dark chocolate, chocolate syrup and little bottles of chocolate liqueres which are Hubs favorite.
Arranging the Charcuterie Board
Place your fruit on the tray so that your pavlovas stay dry.
I started by placing four small matching bowls, to divide my board up first, and then placed the pavlovas on the outside edges.
If your wanting to add peaches, canned mandarins, marashino cherries, make sure to arrange anything juicy away from the pavlova. You want the pavlova to stay dry.

Pavlova Charcuterie Board Recipe
Ingredients
- 6 egg whites 3/4 cup
- 1 ½ cups caster sugar (not icing sugar)
- 3 tsp cornstarch
- 1 tsp vinegar
- ½ tsp vanilla
Instructions
- Preheat over to 275F.
- Prepare your baking pans. I own a silicone mat that has circles drawn out on it already. If you don't have a mat just use parchment paper and anything round like a small bowl, tart crust cutter, large round cookie cutter, and draw out 12 3 inch circles on the parchment. Place on a cookie sheet and set aside.
- In a stand mixer beat egg whites until soft peaks form.
- Continue beating while adding the caster sugar a tbsp at a time. Beat well after each addition to dissolve the sugar granules.
- Add the corn starch and beat.
- Add the vanilla and vinegar and beat until stiff peaks form.
- Spoon gorgeous half cup size mounds of pavlova onto the middle of each circle. Using the back of a spoon spread it around so that its just inside your circle marks.
- Place in the oven and back for 20 minutes. Turn the oven off and let the mini pavlovas cool down for several hours or overnight in the oven.
- Once done, store in a large covered container until your ready to create your charcuterie board.
If you love recipes with berries here is one for cream puffs. Cream puffs are harder to make then Pavlova, but I included a step by step tutorial to show you how to make these little bits of heaven.


Wow, this is absolutely delicious! I never considered making a sweet version, I know my children would love this just as much