Vintage Mason Jar Christmas Centerpiece
It’s funny how inspiration strikes. Sometimes it’s a beautiful thrift store find, something sitting on a shelf that makes you smile, or maybe just that quiet need to create something special when the tree and snack trays already take center stage. This little project started out that way for me — with dried oranges on the counter and a wish for a soft, vintage Christmas mason jar centerpiece that felt homemade but elegant.

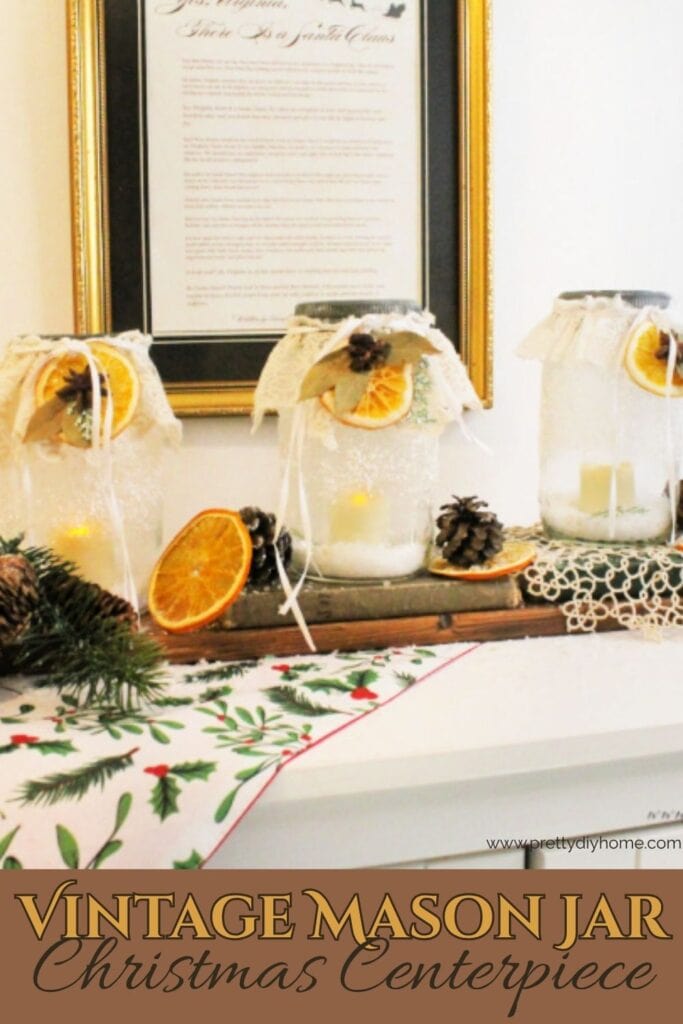
I wanted something that could sit quietly and still feel like Christmas. Using three old mason jars, a little lace, and some ribbon, this easy project turned into a cozy vintage vignette that glows at night and looks beautiful during the day. It’s one of those ideas born from what I had on hand, and the best part is that it costs next to nothing to make.
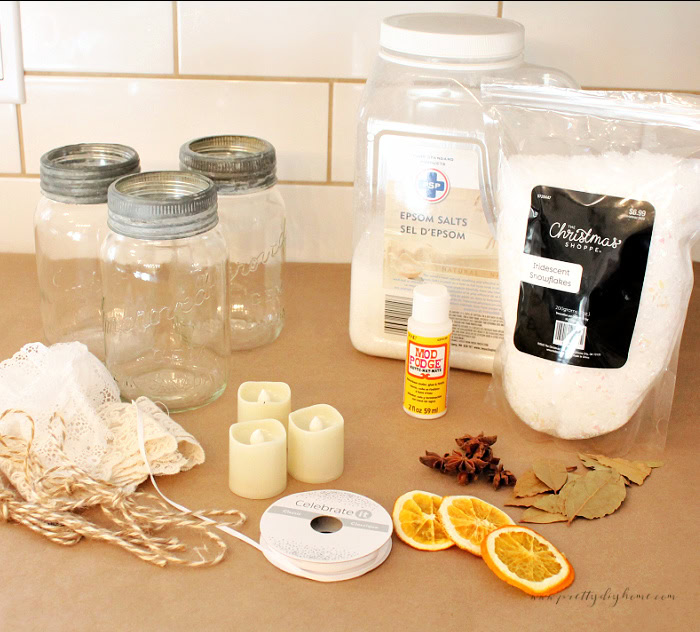
Materials for a Vintage Mason Jar Christmas Centerpiece
- 3 vintage mason jars with tin or galvanized lids
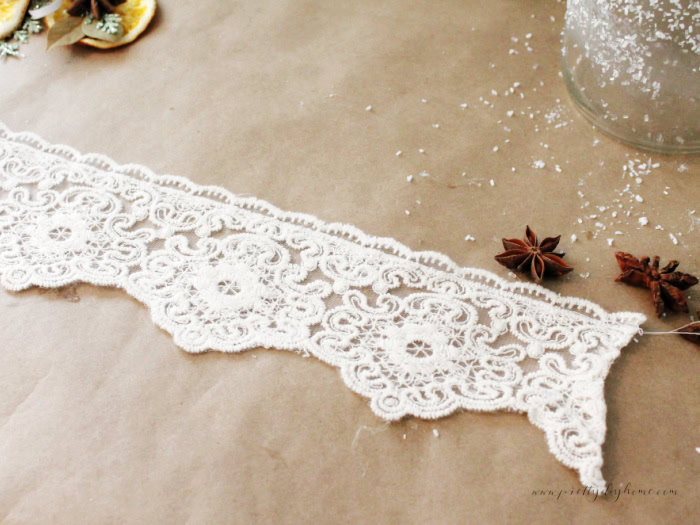
- Assorted lace trims, 2–3 inches wide (mix and match styles)
- Thin white or cream ribbon
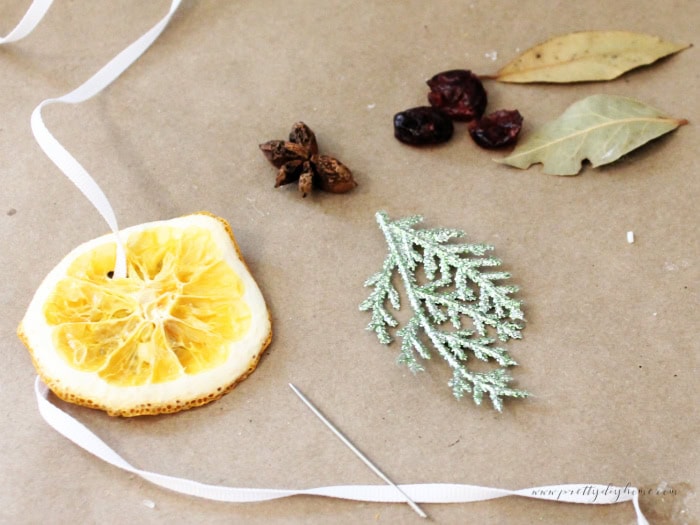
- Dried orange slices
- Whole star anise
- Bay leaves or small faux greenery sprigs
- Dried cranberries
- Small pinecones
- Epsom salt
- Mod Podge or clear craft glue
- Fine glitter or mica flakes
- Faux votive candles or LED tealights
- Faux greenery sprigs (cedar, pine, or fir)
- Wooden or silver tray for display
How to Make a Vintage Mason Jar Christmas Centerpiece
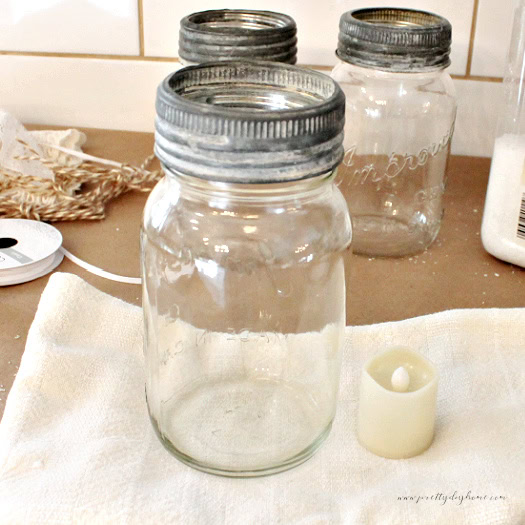
Step 1 – Prepare The Jars
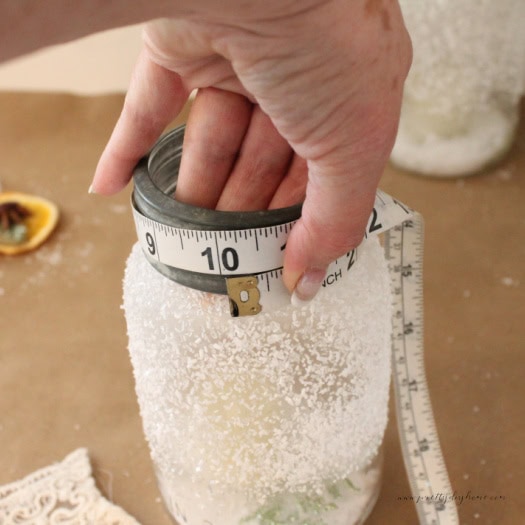
Work on a soft cloth to keep your jars steady and collect any extra Epsom salt later. Choose jars you love; they don’t have to match. I used my favorite vintage mason jars with the tall galvanized rings, the kind that show their age and give that unmistakable vintage charm. It’s not necessary, but if you have old jars with those taller tops, use them. If you’re using regular modern jars, remove the rings before starting.
Clean and dry the glass. Next, place one of your candles beside a jar and picture where it will sit inside. You want your frosted section to end just above where the flame would be. This way, the glow will shine through the clear glass and make the frost sparkle.
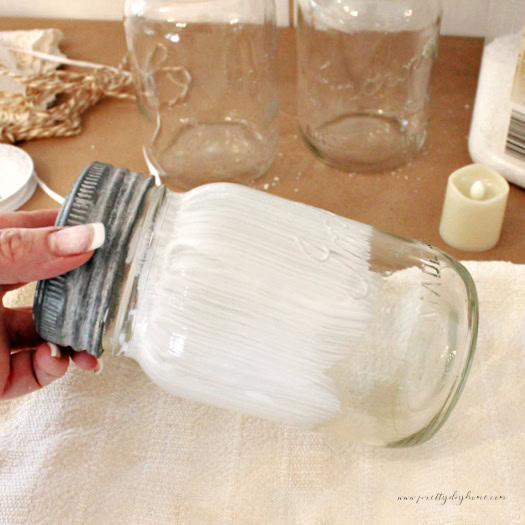
Step 2 – Frost The Glass
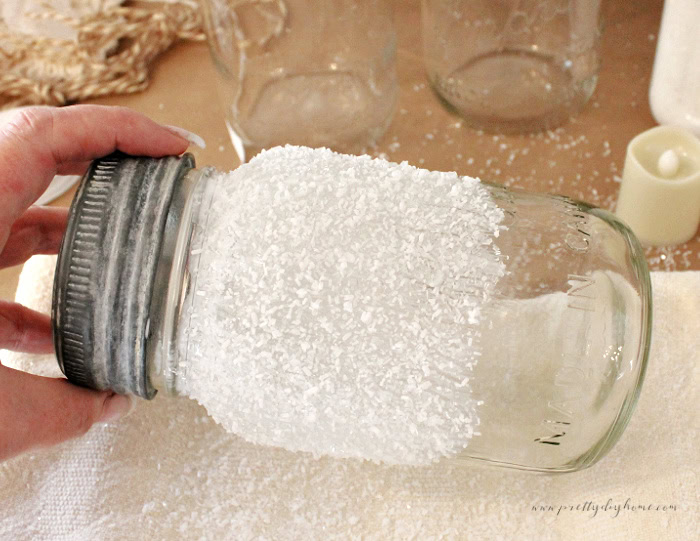
Before you start painting, loosen the metal rings slightly so they don’t get glued in place. Brush a thin, even layer of Mod Podge onto the outside of the jar, starting just below the ring and working down to the height you measured. Hold the jar at a slight angle and turn it as you paint to keep the glue smooth. While the Mod Podge is still wet, sprinkle on Epsom salt until it covers the surface. Set the jars aside to dry.
Once dry, the Epsom salt looks like sugared frost; it catches the candlelight softly and gives the glass that beautiful icy texture that makes mason jar Christmas crafts so special.
Step 3 – Decorate The Dried Oranges
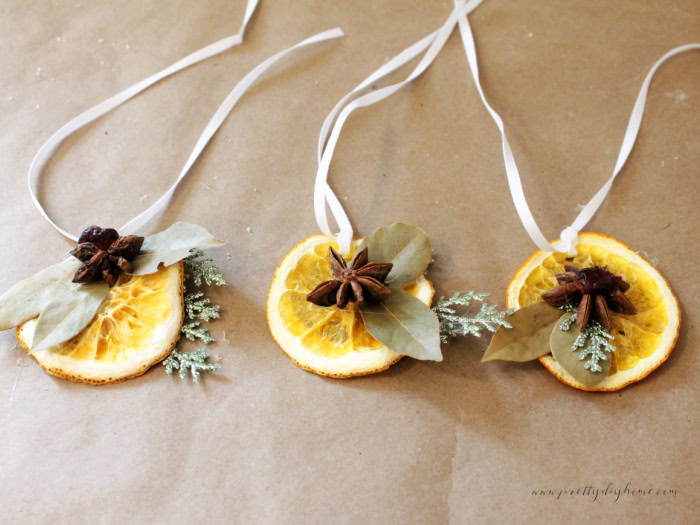
While the jars dry, decorate your orange slices. Use a large-eyed needle to thread each orange with a piece of thin ribbon. Add little details using a glue gun, a bay leaf, a star anise, or a small piece of faux greenery. I made each one a little different for variety: one with anise, one with a cranberry, and one plain. These dried orange slice decorations add natural colour and scent to the vignette.
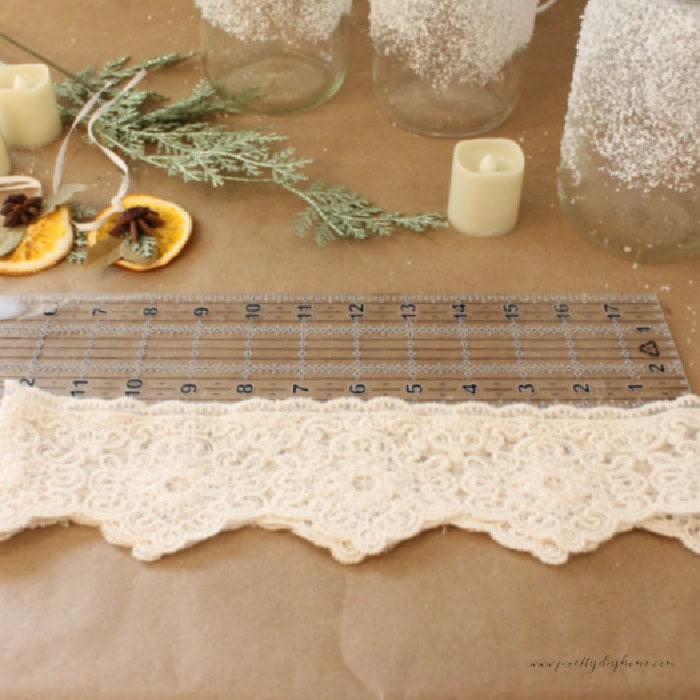
Step 4 – Make And Fit The Lace Collars
Measure around the top of each jar. Cut your lace about one and a half times longer than that measurement, so it can be gathered. With a double-threaded needle, stitch a running line about a quarter inch from the top of your lace. Leave long tails at both ends for gathering.
If the edges of your lace fray, fold them under and glue them, or roll the edge and tack it with a few stitches.
Step 5 – Attach The Lace And Ribbon
Gather the lace until it fits snugly around the jar and tie it near the top, just under the lid ring. Add a small dab of hot glue on the lace itself to hold it securely.
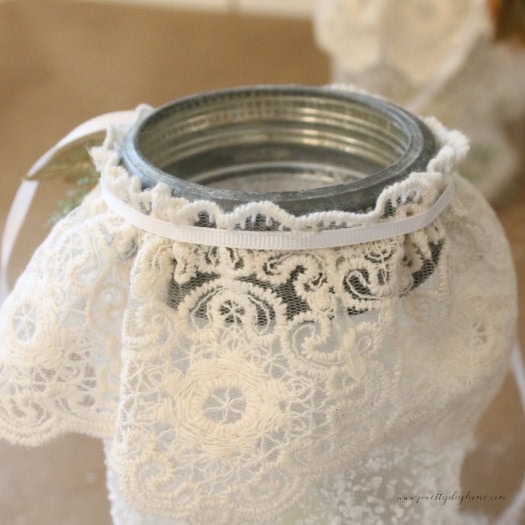
Next, glue a piece of thin white ribbon over the top edge of the lace, starting at the back and working around to the front. When you reach the front, tie a small knot. Slip the ribbon from your decorated orange under this knot and tie another small one to anchor it. Finish with a neat bow in the front so the orange hangs gently.
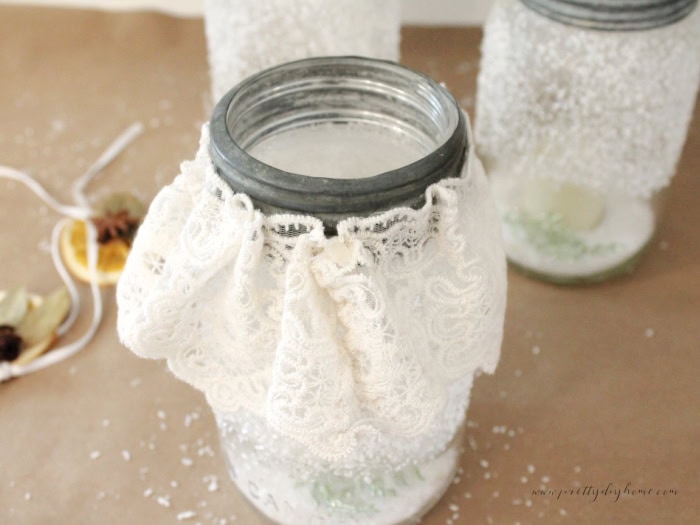
Step 6 – Fill And Finish
Add about one-third of a cup of Epsom salt or faux snow to the bottom of each jar. Place a faux candle inside so the light shines just below the frosted section. Tuck a tiny sprig of greenery beside the candle. Chopsticks work perfectly for arranging things once they’re inside.
Step 7 – Create The Vignette
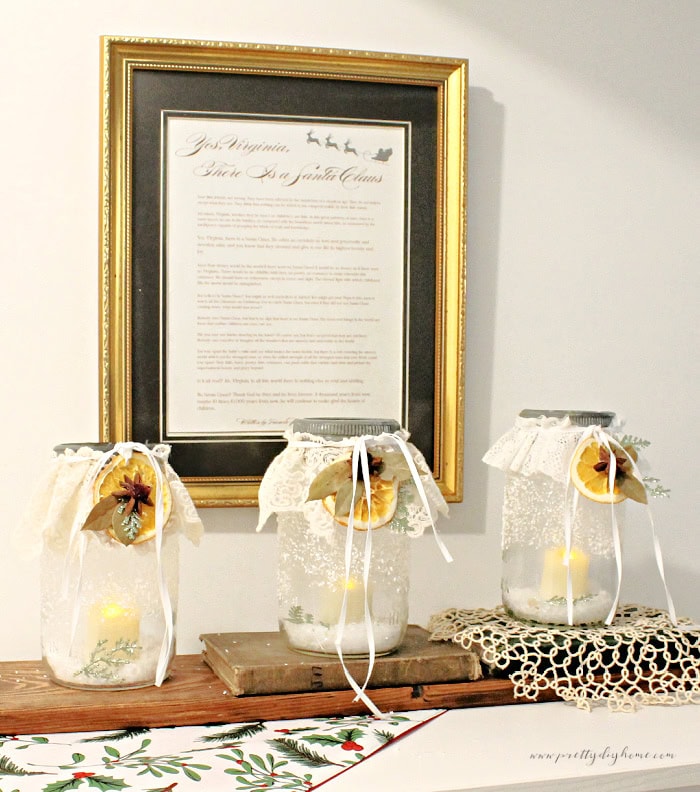
Set your jars on a tray, wooden riser, books, or an old silver tray, whatever you have handy. This is where your vintage Christmas centerpiece ideas can shine. I like mixing textures, so my frosted jars sit on an old wood tray surrounded by pinecones and a little faux snow. You can also layer the jars on books to vary the heights, or add a few sprigs of cedar for a natural base.
Behind the jars, I placed a vintage gold frame holding a reprint of the old newspaper editorial “Yes, Virginia, There Is a Santa Claus.” The soft glow of the candles reflects off the glass and the gold frame, creating a gentle, nostalgic scene that feels right out of an old-fashioned Christmas story.
Why I Chose “Yes, Virginia, There Is a Santa Claus”
This part of my centerpiece has a story. My favorite Christmas movie has always been Prancer, the one from 1989 with Sam Elliott. When it first came out, my boys were nine, eight, and five. They thought it was far too sentimental, but they humoured me and watched it every year anyway. I still watch it every Christmas.
That movie was where I first heard the “Yes, Virginia, There Is a Santa Claus” passage, and it’s stayed with me ever since. The words remind me why I love Christmas so much — the belief, the wonder, and the quiet warmth that handmade things bring into a home.
Framed in gold behind the jars, it adds just the right amount of nostalgia and ties the whole display together in the sweetest way. And now, all these years later, I can still tease my grown sons and ask if they’ve grown up enough to watch it yet.
Where To Display It
I placed mine in our guest room this year. The jars glow softly at night and add a peaceful sparkle to the space. The dried oranges give off a warm, natural scent, and the old gold frame makes the whole display feel like a little Christmas story tucked into a corner.
It would also look beautiful on a coffee table, entryway, or mantel — anywhere that could use a gentle touch of vintage Christmas decor.
If you love soft vintage Christmas decor and easy mason jar crafts, make sure to save this idea for later. You can pin the image below to your Vintage Christmas Decor, Mason Jar Crafts, or Christmas Centerpiece Ideas board so it’s handy when you’re ready to start creating.
This project turned out even lovelier than I imagined. It has that quiet, handmade charm I love at Christmas, frosted glass, lace, and candlelight with a little touch of nostalgia. I also love that it has some sparkle for a dark, gloomy space in our basement.
If you’d like to frame your own version of “Yes, Virginia, There Is a Santa Claus,” I’ve created a free printable you can download and use in your decor. It’s free and in letter size, just download and print.
I hope you get a chance to be creative.
Leanna
Here is the tutorial for the best way to dry orange slices, which I used for these Christmas decorations. It’s easy to do, and they smell very good.