Pretty Fall Front Porch Decor
Fall front porch decor can be a challenge if your on a budget, or your home has a small front porch. Do you have a front porch you love to decorate, even if its a teenie tiny one like mine? I love scouring through Pinterest looking for different small front porch decorating ideas for the season, scoping out new Fall decorations while daydreaming and designing gorgeous porch decor in my head.
If your wanting modern fall porch decor I think the best and eastiest way is to try a non traditional colour. My inspiration this year was the large pink mum plant you see beside the ladder. And pink goes really well with all my neutral white farmhouse decor making it super easy to use for Fall.

After buying the gorgeous chrysanthemums my Fall decor budget was almost gone. I did buy a piece of burlap, white and a soft pink acrylic paints, but everything else had to come from my Fall decor stash. My old dollar store pumpkins were repainted pink and the rustic large wood diy pumpkins I brought down from the garage rafters (eww I was on serious spider lookout.)
Covering Plastic Pots for Fall Front Porch Decor
I used some of my galvanized buckets just as they are, put a block of wood in the bottom and added the flowers in their original flower pots. The other plastic flower pots were hidden in burlap. The burlap ribbon and pot cover are trim pieces from the Fall banner. I cut a two foot square out of burlap gathered it all up towards the center and then tied it together with rope.
Living in Canada real pumpkins aren’t ready for another month or so, for early autumn I am in love with this arrangement, I would have enjoyed some larger faux pumpkings but the small ones work well enough. Once the real pumpkins are out I will redo it by adding some real white pumpkins. Not sure if I will paint them white or leave them natural.
Decorating a Porch for Fall with DIY Fall Banner Ladder
Besides the flower pots and the small pumpking I created a simple to do Fall banner leaner sign.

If you don’t already have a wooden ladder here is a tutorial for the simple DIY ladder we made a couple of years ago for less than $10. Its been so many rooms of our home its time to make a second one.
Besides the ladder you will need the following supplies:
2.5 Yards of burlap (at least 10″ wide)
2. 5 yard iron on interfacing
Pink acrylic paint, small brush
Large eyed needle and twine
DIY Fall Porch Sign Burlap Panels
Begin by measuring the width of the ladder rungs. Write down the size of panel you need to hang across (width) and between (length) each ladder rung. Measure and cut the panel to size for your ladder, decide how much fabric tyou need for each banner, and include enough for a folded hem.
Begin by measuring the width of your ladder rungs, and decide how wide you want your panels to be. I cut my panels 10″ by 20″. This filled the width of the narrowest rung and gave me enough burlap to wrap the burlap around the rung, and make a hem at the bottom.
Cut four panels 10″ by 20″
Wrap the first piece of burlap around the rung, deciding where you want the sewn edge to be. Mark that spot with the tape and a pen. I marked mine Fold.
Measure the distance from the top of your panel to the green tape folding mark ex. 5″. and use that distance to mark all the other panels with tape and pen marked Fold.
Find center on all the panels and mark that using green tape, mark center with a pen.
Remeasure the distance between the runs, fold the hem accordingly, mark the measurement with tape and a pen mark Hem. Mine needs a two inch hem.

Ironing Burlap Panels
Good side down iron the burlap smooth. Iron a good crease for the hem.
Cut the interfacing to cover the back of your panel (10″ by 18″)
Fit the interfacing over the burlap so that its inside the hem. You want the paper side up.

Iron well with a hot iron set to no steam. The interfacing attaches the hem, stiffens the banner, and the weight of the hem makes the panel hang nicely outdoors without curling. Repeat for the remaining panels.
Adding the Sign Letters
There are lots of ways to transfer a letter pattern to burlap. You can print it out and trace using carbon paper. Or place a pattern underneath the burlap and draw on the top with chalk before carefully painting it in. I chose the simplest method, I taped the outline of the letters onto the front to create a stencil and then painted it in. Let me show you the steps for each letter, in total from start to finish the letters took me close to an hour.
The Letter F Burlap Banner Panel
To make the letter F, you will be adding 9 pieces of tape. Its easy to do as you don’t have to measure the exact length of the tape pieces and you follow the lines in the burlap to make them straight. So much easier on burlap.
Lets start at the outside lines.

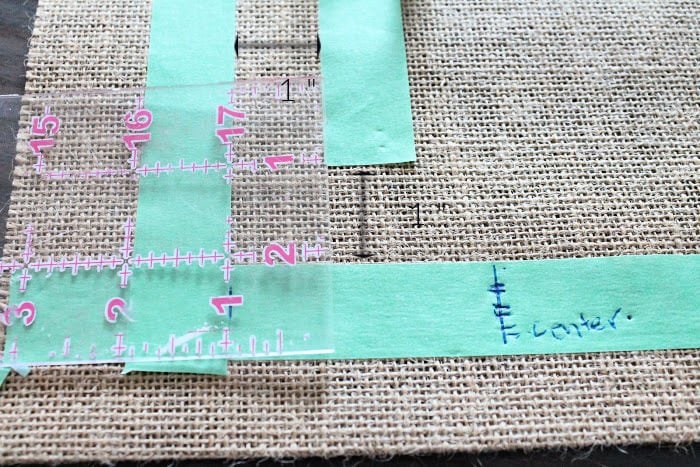
1 Top Line – measure 2″ down from your fold mark. Place a piece a tape evenly across your burlap panel. Using the threads in the burlap as a guide follow the same thread all across your panel. Do the same on the other 3 panels
2 Bottom Line – measure 2″ up from the bottom of the hem. Place a piece across the bottom. Do the same on the other three panels.
3 Left and 4 Right Lines – Measure 2.5″ from center and apply tape square down both lines. A long one to reach the bottom on the left, and a short four inch or so one on the right.
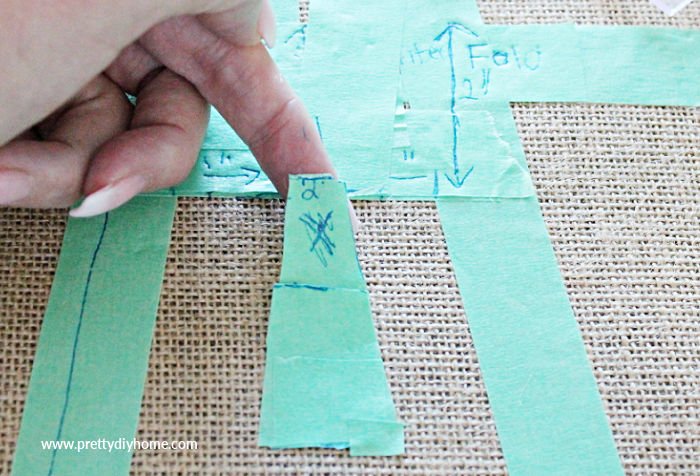
Here is a picture to illustrate the remaining lines.

5 Vertical Line – Start an inch to the left of the line marked 3 and run your tape upwards. Cut the tape off at an inch from the top horizontal line (arrow)
6 Horizontal Line – Start on the edge of line 5 (arrow) and run the tape across until reach line 4.
7 Horizontal Line – Run a twin piece of tape directly below line 6.
8 Horizontal Line -Measure an inch down from line 7, and tape across.
9 Measure 1 1/2 inches from center and place line 9. Then cut out the purple area from line 5.
The Letter A Burlap Banner Panel
Your would think the letter A is the hardest to do, but eureka the letter F is. The A uses Your A panel is already marked for center, and top and bottom.
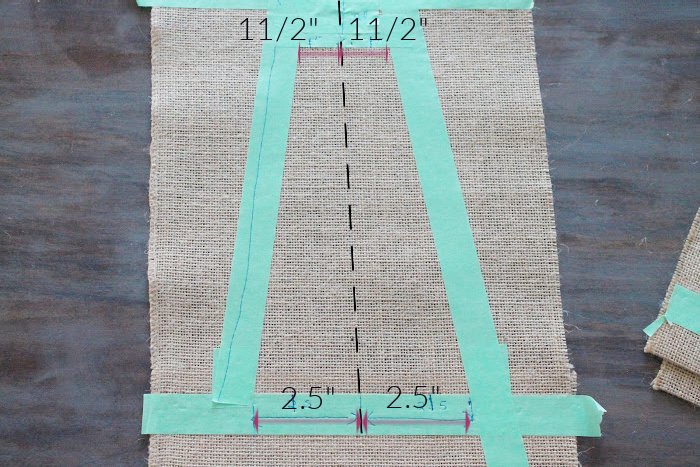
1 Bottom Line – Mark center measure 2.5 inches from center on both sides.
2 Top Line – Mark center and measure 1 1/2 inch from center on both sides
3 Vertical and 4 Vertical – run the inside edge of the tape between the 2.5 inch and the 1″ markings.

Mark an inch in from the two outside horizontal lines on both the top and bottom. You will end up with overlaps as shown below by the purple coloured sections.


Cut out the areas as shown, making sure the central cross piece cut out is one inch thick. Set aside and on to the L which is the easiest.
The Letter L Burlap Banner Panel
The top and the bottom of the letter L will already by done.
Measure an inch on the inside of the vertical line, and an inch on the inside of the horizontal line.

End the horizontal end 2.5″ to the right of center and your done. Repeat for the second letter L.
Painting the DIY Fall Sign for Outdoors
Before painting anything line up all the banners, stand back and see if you need to make any adjustments. Thankfully its easy to visualize your lettering from the stencils. Hopefully you don’t need to tweek anything, but if you do its easier now then starting over once its painted.

Place a piece of cardboard, or a garbage bag on your work surface. When your painting the burlap the paint will leak through to the underside.
ou will need a Pink paint of your choice and a small paint brush.
Dip the brush lightly in the acrylic paint and always start on the green tape. Pull the paint brush towards the center only. You don’t want to paint from the inside towards the green tape, always work from the outside towards the center.
Painting all four letters took less than 15 minutes. Once done take an hours break and let the lettering dry very well.
Remember at the beginning where you marked every piece with the fold. Now you can remove all the remaining tape except for that piece.
Hanging Fall Burlap Banner Panels to the Ladder
Thread a large hole needle with twine. Folding the panel over the ladder rung line up the edge of the burlap to the line. Starting at the front sew in place,
Tie with a pretty bow. Repeat for the other panels.

Happy crafting and I am sure my friends have some other great Fall ideas for you.

Other Ways to Decorate a Front Porch

Fall Front Porch Decor
Here is a roundup post of various gorgeous Fall Front Porch Decor ideas. All sort of pretty one of a kind Fall porches to enjoy.

Halloween DIY Front Porch Sign
This particular post is one of my personal favorites. I had someone create the free Halloween printable, downloaded it as a poster and hung it from my DIY wood plant stand. This Hiss and Scratch sign is perfect for Halloween and not too scary for little kids. They neighbourhood loved it.

Happy fall to you, Leanna!!! It has been an age since we have “talked” over the airwaves… I am sooo glad you came by to link up at Share Your Style a week ago or so. I am happy to feature your cute fall porch at SYS #274 this past Wednesday. Very pretty with all those soft color for this wonderful season. <3
Enjoy your fall and I know it is getting chilly up your way,
Hugs,
Barb 🙂
Your fall sign and pretty pink fall porch is lovely! The unique colors for the fall are so fun and pretty! I’m so glad you shared at Tuesday Turn About… I’ll be featuring you at this week’s party! Pinned!
Oh that’s very exciting Julie. I still remember your beautiful small deck makeover, so I am thrilled you liked my porch.
Fabulous way to upcycle a wooden ladder! I’d love for you to share over at our weekly Wednesday Creative Crafts Linky Party https://creativelybeth.com/creative-crafts-linky-party-8-join-in-the-fun/
Have a great week!
Creatively, Beth
Hi Bath, thank you for commenting, I did not know about your link party. I will pop over.
Pink is my favorite color, and I never thought to use it in a fall arrangement, but yours is sooooo lovely!
Thank you very much Niky. I started with pink pumpkins and then needed to craft some decor that matches it. Glad you like it.
Ahh Leanna, this is all kinds of beautiful. I love a pretty fall ♥
Thank you for sharing your fall porch ideas and DIY project at Create, Bake, Grow & Gather this week. I’m delighted to be featuring this post at tonight’s party. Have already shared to Facebook and Pinterest.
Hugs,
Kerryanne
Beautiful space! Love your burlap fall sign, turned out great!
This is so pretty Leanna. I love your sign and fall color combo! Thank you for linking up on the Farmhouse Friday Link Party. You are one of our features! Hope you link up again!
You changed your outdoor colors! Didn’t it use to be turquoise? The pink is lovely and your Fall porch is so pretty! Pinned to share 🙂 Where did you find the pretty pink Mums, all we could get were yellow.
Hi Marie. I drove around to quite a few places finally finding some at the Home Depot on 50th north side.
My son even commented that he liked the pink Fall stuff, and that Never happens lol
Leanna, this is something I always wanted to do but somehow found it a bit difficult. You totally made the tutorial easy peasy for beginners. it turned out to be beautiful and I also like how you have it staged! Really pretty!
This is such a cute idea for any place. I love that you can customize it to fit your home’s color. You provided such a easy tutorial. Thank you for the inspiration. Love it!
What a pretty idea, and it’s great that a sign can be made in various ways including a burlap ladder!
What a great way to dress up your ladder and porch. It all is perfect for fall
This is great idea and I love soft colors for fall too.
Cindy
What a creative idea! And your fall decorations are so pretty!
Such a cute idea and I love, love, love the pink!
Thank you Tammy. Pink has turned out to be very easy on the budget as it goes well with all my white farmhouse stuff. Glad you love it.