
Small Fall Front Porch Decor Ideas with Pumpkins and Mums
Owning this home, I have learned that small front porches can still be a lot of fun to decorate for fall. Mine is quite tiny, so I like to use a few carefully chosen inexpensive pieces such as mums, pumpkins, and simple DIY decor to make it feel warm and seasonal without overcrowding the porch or turning it into a tripping hazard.
This year, the large pink mum beside the ladder became my inspiration. Pink is not a typical fall colour, which is exactly why I liked it. It gave the porch a softer, more unexpected look and helped me create something a little different from the usual orange, rust, and deep red fall decor.
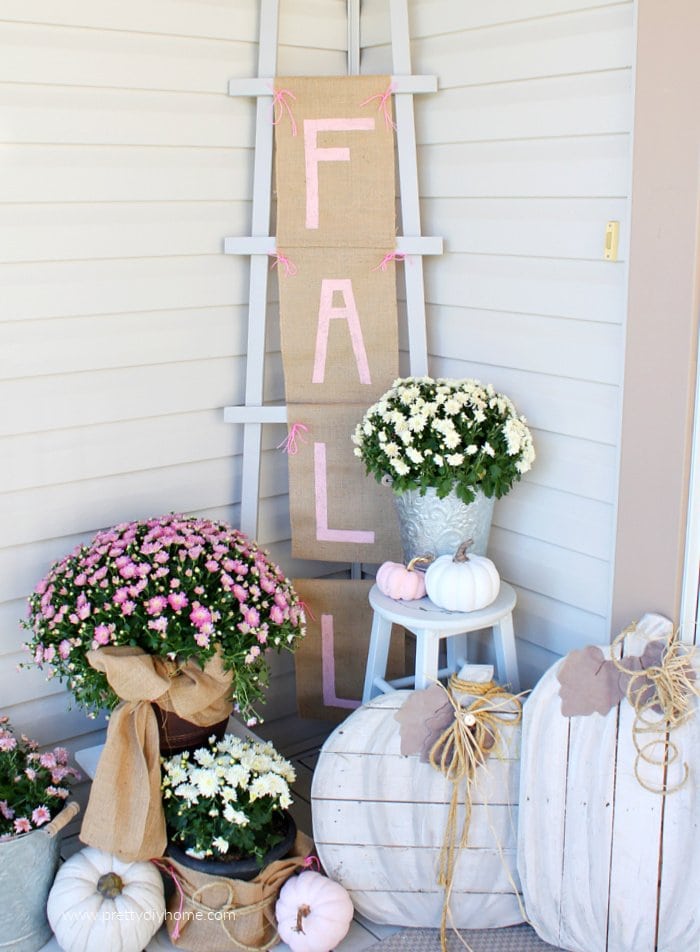
After buying the chrysanthemums, most of my fall decorating budget was gone, so I shopped my own decor stash for the rest. I repainted some old dollar store pumpkins, brought out my rustic wood pumpkins, and used burlap to pull everything together. The result is a simple small fall front porch that feels pretty, welcoming, and easy to recreate on a budget.
Covering Plastic Pots for Fall Front Porch Decor
I used some of my galvanized buckets just as they are, putting a block of wood in the bottom and adding the flowers in their original flower pots. The other plastic flower pots were hidden in burlap.
The burlap ribbon and pot cover were leftover pieces from the fall banner project. I cut a two foot square out of burlap, gathered it all up towards the center, and then tied it together with rope.
Living in Canada, real pumpkins are not always available when I first start decorating for fall, so I used what I could find, and the small faux pumpkins worked well enough. If you have access to real pumpkins, I would use them instead, choosing white pumpkins or painting orange pumpkins to work with your colour scheme.
Decorating a Small Fall Front Porch with a DIY Ladder Banner
Besides the flower pots and small pumpkins, I added a simple DIY fall banner to a leaning ladder. The ladder gives the display some height while using very little porch floor space, which makes it a good decorating idea for a small front porch.
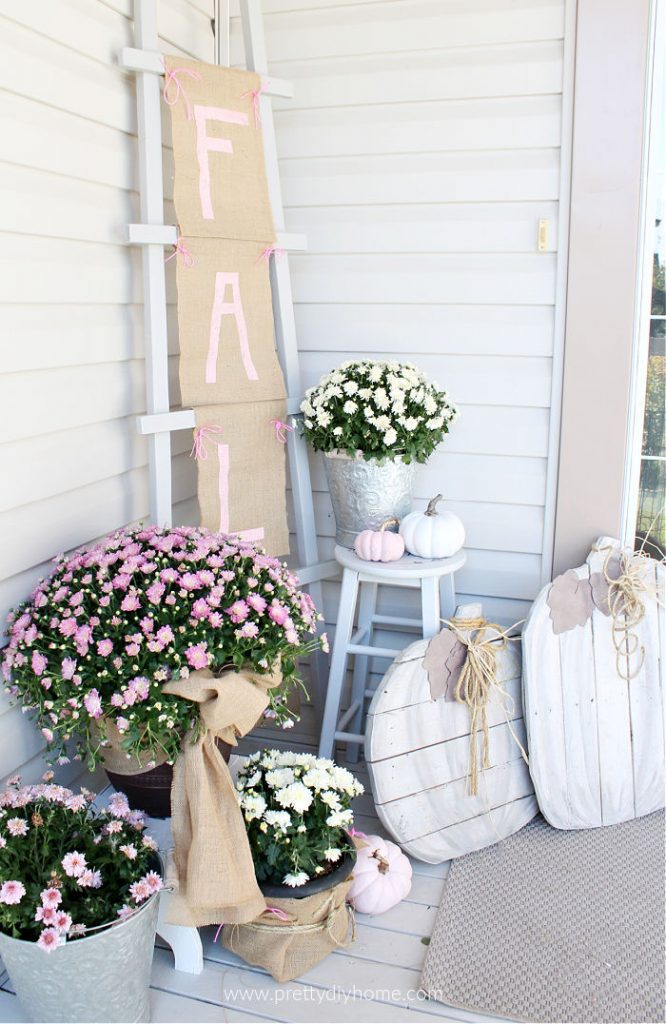
If you don’t already have a wooden ladder, you can make a simple one for less than $10 using this DIY ladder tutorial. I made mine a couple of years ago, and it has been used in several rooms around the house before becoming part of this fall porch display.
DIY Fall Burlap Banner for a Small Front Porch
Besides the ladder, you will need the following supplies to make the fall burlap banner:
- 2.5 Yards of burlap (at least 10″ wide)
- 5-yard iron-on interfacing
- Pink acrylic paint, small brush
- Large-eyed needle and twine
DIY Fall Porch Sign Burlap Panels
As every ladder is different, begin by measuring the width of your ladder rungs. Write down the size you need for each burlap panel, including the width across the rung and the length between the rungs. Be sure to allow enough extra burlap at the top to wrap around the rung and at the bottom for a folded hem.
I cut my panels 10 inches wide by 20 inches long. This filled the width of the narrowest rung and gave me enough burlap to wrap around the ladder rung and make a hem at the bottom.
Cut four burlap panels, each 10 by 20 inches.
Wrap the first piece of burlap around the rung and decide where you want the sewn edge to sit. Mark that spot with a small piece of tape and write “Fold” on it.
Measure the distance from the top of the panel to your fold mark, for example, 5 inches. Write down that measurement, then use it to mark the fold line on the other three panels.
Find the center on all the panels and mark that using green tape; mark the center with a pen.
Remeasure the distance between the ladder rungs, then fold the hem accordingly. Mark the measurement with green tape and write “Hem” on it. Mine needed a two-inch hem.

Ironing Burlap Panels
Good side down, iron the burlap smooth and press a good crease along the hem.
Cut the interfacing to cover the back of your panel. Mine measured 10 by 18 inches.
Fit the interfacing over the burlap so that it sits inside the hem, with the paper side facing up.

Iron well with a hot iron set to no steam. The interfacing attaches the hem, stiffens the banner, and adds enough weight to help the panel hang nicely outdoors without curling. Repeat for the remaining panels.
Adding the Sign Letters
There are lots of ways to transfer a letter pattern to burlap. You can print out the letters and trace them using carbon paper, or place a pattern underneath the burlap and draw the outline on top with chalk before carefully painting it in.
I chose the simplest method. I used painter’s tape to outline each letter directly on the burlap, creating a stencil for the paint. The detailed photos below show exactly where to place the tape for each letter.
From start to finish, creating all four letter stencils took me close to an hour.
The Letter F Burlap Banner Panel
To make the letter F, you will be adding nine pieces of painter’s tape. It is easy to do because you do not have to measure the exact length of each piece, and you can follow the lines in the burlap to keep everything straight.
Start with the outside lines.

1. Top Line
Measure 2 inches down from your Fold mark. Place a piece of tape evenly across the burlap panel. Use the threads in the burlap as a guide to keep the tape straight. Repeat on the other three panels.
2. Bottom Line
Measure 2 inches up from the bottom of the hem. Place a piece of tape across the panel. Repeat on the other three panels.
3. Left and 4 Right Lines
Measure 2.5 inches from the center mark and apply the tape straight down both lines. Use a longer piece on the left to reach the bottom and a shorter piece, about 4 inches long, on the right.
The photo below shows the placement for the remaining lines.

5. Vertical Line
Start 1 inch to the left of the line marked 3 and run the tape upward. Cut the tape off 1 inch below the top horizontal line, as shown by the arrow in the photo.
6. Horizontal Line
Start at the edge of line 5, as shown by the arrow, and run the tape across until it reaches line 4.
7. Horizontal Line
Place a second piece of tape directly below line 6.
8. Horizontal Line
Measure an inch down from line 7, and tape across.
9. Vertical Line
Measure 1 1/2 inches from the center mark and place line 9. Then cut out the purple area shown in the photo from line 5.
The Letter A Burlap Banner Panel
You would think the letter A would be the hardest to do, but it is actually easier than the F, so the most complicated part is done. Your A panel is already marked for the center, top, and bottom.
1. Bottom Line
Mark the center, then measure 2.5 inches from the center on both sides.
2. Top Line
Mark the center, then measure 1 1/2 inches from the center on both sides.
3. Vertical Line and 4. Vertical Line
Run the inside edge of the tape between the 2 1/2-inch marks at the bottom and the 1 1/2-inch marks at the top.
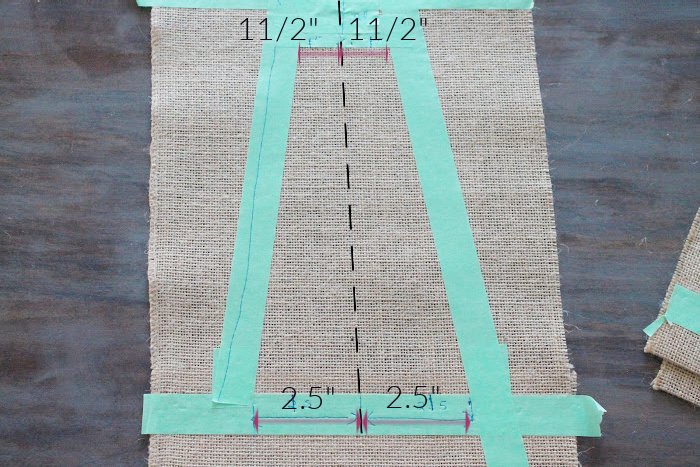
Mark 1 inch in from the two outside horizontal lines at both the top and bottom. You will end up with overlaps, as shown by the purple sections in the photo.

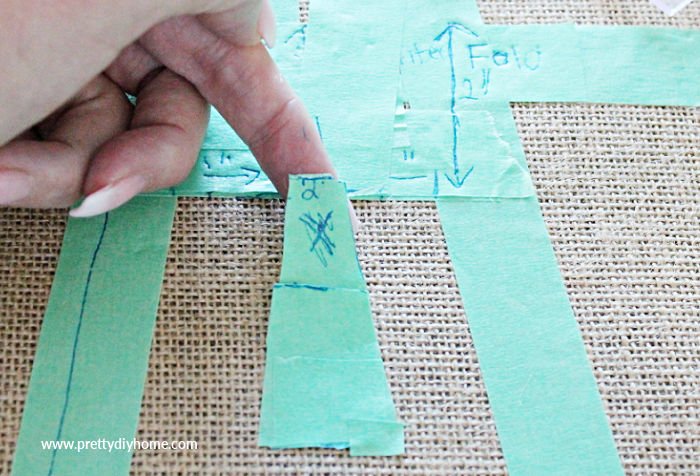
Cut out the areas shown, making sure the center crosspiece is 1 inch thick. Set the A panel aside and move on to the letter L, which is the easiest one.
The Letter L Burlap Banner Panel
The top and bottom of the letter L are already marked, so this one is much simpler.
1. Vertical Line
Measure 1 inch on the inside of the vertical line, and 1 inch on the inside of the horizontal line.
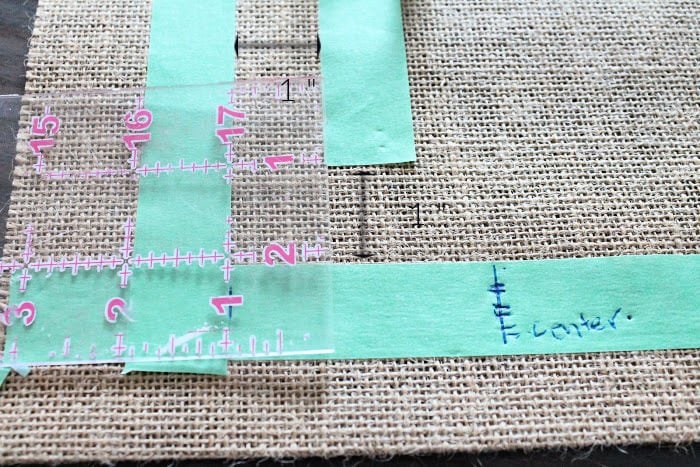
2. Horizontal Line
End the horizontal line 2 1/2 inches to the right of center, and you’re done. Repeat for the second L.
Painting the DIY Fall Sign for Outdoors
Before painting, line up all four burlap panels and check that the taped letter stencils look even and consistent. This is the easiest time to make any small adjustments before the paint goes on.

Place a piece of cardboard or a garbage bag on your work surface because the paint can seep through the burlap to the underside.
You will need pink acrylic paint and a small paintbrush.
Dip the brush lightly into the paint and always start on the painter’s tape, brushing toward the center of the letter. Do not brush from the inside toward the tape because that can push paint underneath the edge and make the stencil lines less crisp.
Painting all four letters took less than 15 minutes. Once they are painted, let the lettering dry well for about an hour before removing the tape.
Remember the Fold mark you added earlier. Leave that piece of tape in place and remove the rest of the painter’s tape from the panels.
Hanging Fall Burlap Banner Panels to the Ladder
Thread a large-eyed needle with twine. Fold the panel over the ladder rung, lining up the edge of the burlap with the Fold mark.
Starting at the front, sew the panel in place with the twine.
Tie the twine into a pretty bow and repeat with the remaining panels.
Love this small fall front porch idea? Save it to your favorite Fall decorating or DIY porch board on Pinterest so you can find it again when you are ready to decorate your own porch.

Other Ways to Decorate a Front Porch
If you are looking for more ideas, here are a couple of other front porch projects you may enjoy.

Fall Front Porch Decor
Here is a roundup post of Fall Front Porch Decor ideas with different colours, styles, and seasonal details you can use for inspiration on your own porch.
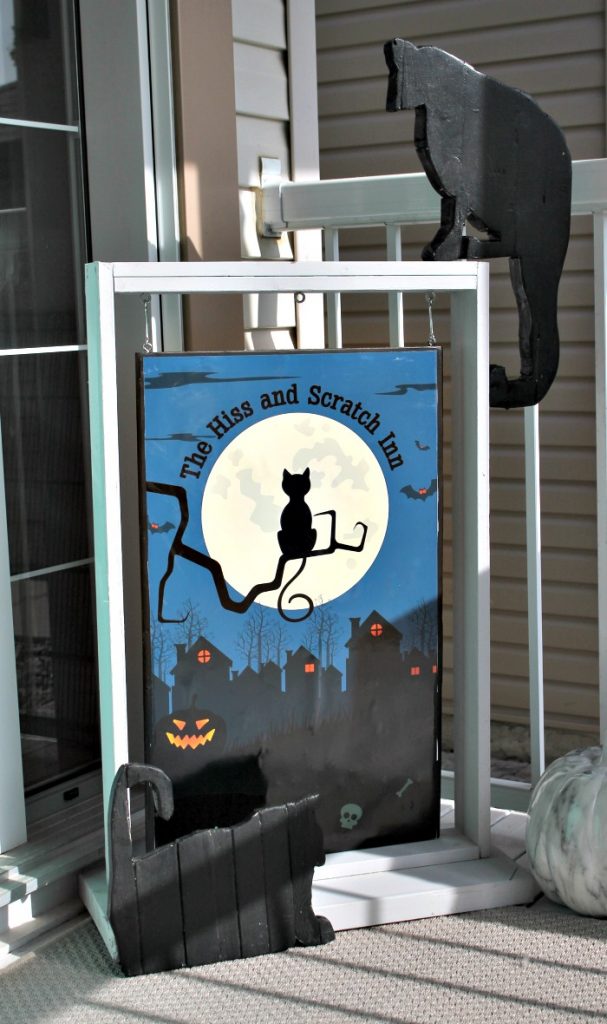
Halloween DIY Front Porch Sign
This Halloween DIY front porch sign is one of my personal favourites. I used a printable poster and hung it from a DIY wood plant stand to create a fun Halloween display that is spooky without being too scary for little kids. The neighbourhood loved it.
Happy fall to you, Leanna!!! It has been an age since we have “talked” over the airwaves… I am sooo glad you came by to link up at Share Your Style a week ago or so. I am happy to feature your cute fall porch at SYS #274 this past Wednesday. Very pretty with all those soft color for this wonderful season. <3
Enjoy your fall and I know it is getting chilly up your way,
Hugs,
Barb 🙂
Your fall sign and pretty pink fall porch is lovely! The unique colors for the fall are so fun and pretty! I’m so glad you shared at Tuesday Turn About… I’ll be featuring you at this week’s party! Pinned!
Oh that’s very exciting Julie. I still remember your beautiful small deck makeover, so I am thrilled you liked my porch.
Fabulous way to upcycle a wooden ladder! I’d love for you to share over at our weekly Wednesday Creative Crafts Linky Party https://creativelybeth.com/creative-crafts-linky-party-8-join-in-the-fun/
Have a great week!
Creatively, Beth
Hi Bath, thank you for commenting, I did not know about your link party. I will pop over.
Pink is my favorite color, and I never thought to use it in a fall arrangement, but yours is sooooo lovely!
Thank you very much Niky. I started with pink pumpkins and then needed to craft some decor that matches it. Glad you like it.
Ahh Leanna, this is all kinds of beautiful. I love a pretty fall ♥
Thank you for sharing your fall porch ideas and DIY project at Create, Bake, Grow & Gather this week. I’m delighted to be featuring this post at tonight’s party. Have already shared to Facebook and Pinterest.
Hugs,
Kerryanne
Beautiful space! Love your burlap fall sign, turned out great!
This is so pretty Leanna. I love your sign and fall color combo! Thank you for linking up on the Farmhouse Friday Link Party. You are one of our features! Hope you link up again!
You changed your outdoor colors! Didn’t it use to be turquoise? The pink is lovely and your Fall porch is so pretty! Pinned to share 🙂 Where did you find the pretty pink Mums, all we could get were yellow.
Hi Marie. I drove around to quite a few places finally finding some at the Home Depot on 50th north side.
My son even commented that he liked the pink Fall stuff, and that Never happens lol
Leanna, this is something I always wanted to do but somehow found it a bit difficult. You totally made the tutorial easy peasy for beginners. it turned out to be beautiful and I also like how you have it staged! Really pretty!
This is such a cute idea for any place. I love that you can customize it to fit your home’s color. You provided such a easy tutorial. Thank you for the inspiration. Love it!
What a pretty idea, and it’s great that a sign can be made in various ways including a burlap ladder!
What a great way to dress up your ladder and porch. It all is perfect for fall
This is great idea and I love soft colors for fall too.
Cindy
What a creative idea! And your fall decorations are so pretty!
Such a cute idea and I love, love, love the pink!
Thank you Tammy. Pink has turned out to be very easy on the budget as it goes well with all my white farmhouse stuff. Glad you love it.