How to Create a Beautiful Indoor DIY Fairy Garden
Easy DIY Fairy Garden Pond for Indoors
Today I am sharing an easy-to-make mini garden for fairies. It’s time for this month’s Farmhouse Hens collaboration. My contribution is an easy DIY fairy garden pond centerpiece, my friend’s wonderful posts are located after mine.
All kinds of beautiful indoor fairy gardens fit into small spaces, but I have never seen a small indoor fairy garden with faux accessories and a water pond.
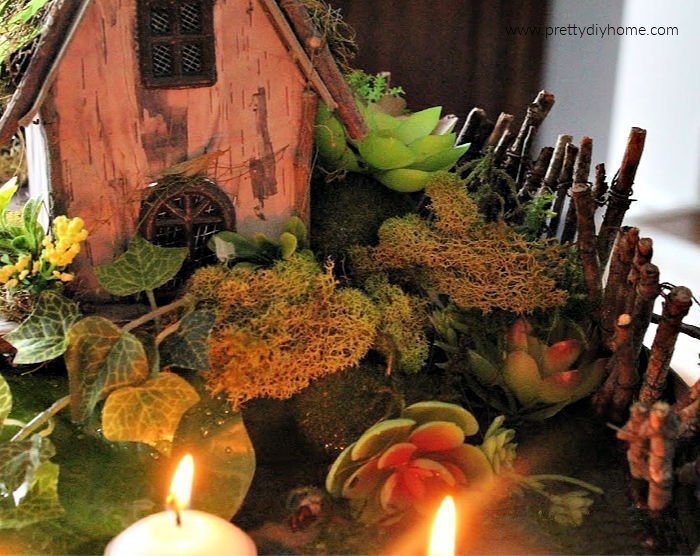
This miniature fairy garden pond is made with extra precautions because I added floating candles. This whimsical fairy garden sits inside a waterproof galvanized container and it’s the perfect size for an end table, or as a special dining room centerpiece. This indoor little garden has faux plants, sheet moss, and miniature accessories. I find it very special, with the pond, even up close you can’t tell whether or not it’s an actual garden.
If you don’t plan on having floating candles it will still be pretty, but not quite as dramatic. You could swap out the candles in your mini fairy garden design for some battery-operated fairy lights.

Supplies for Making an Easy Fairy Garden Pond
To make your own fairy garden with a water feature you need to purchase or make some fairy accessories. I purchased mine except for a little wood branch picket fence. Here is the list of supplies.
I began by purchasing the smallest floating candles I could find and ran a test to see how high the water had to be for them to float. Two inches was enough, with that knowledge in hand I went back to the store and bought a large galvanized container taller than 2 inches high, mine is 16 inches wide.

- Miniature Fairy Hut
- Large round container
- Assorted faux greenery, succulents
- Faux natural elements like rock embellishments with moss
- Large tin can
- Green electrical tape and florist wire
- Tin snips
- Hot glue gun
- One large faux leaf
- Twig fairy fence
- Small twigs
- floating candles or fairy lights
Check out some thrift stores for a waterproof container like a decorative bowl or a small pot without drainage holes, fairy figurines, or miniature houses. The dollar tree is another great place to look for fairy garden supplies. Look for their wooden bird house blanks that you can easily paint in earthen colors, or decorate it with natural elements like their birch bark accessories, and small rocks. You can find Spanish moss and a large terra cotta pot as well. The Dollar Tree sells fairy accessories, but in our neighborhood, they are often sold out. It’s always worth checking out before heading to the more expensive craft store. I did find larger fairy garden houses at Michael’s in Canada
Indoor Fairy Garden Tutorial
The floating candles make for a very magical garden, especially at night.
You need to plan the placement of your plants, moss, and fairy hut. Keep them at a higher elevation and towards the back of your fairy garden. You can use whatever you have handy to add height as long as it is non-flammable. I used an empty and cleaned large tin can.
To prepare the large tin can remove the label and wash it thoroughly. Place it in your container and make a mark as shown below. This will ensure the can is higher than the container, and distanced from the candles.

Wear gloves and carefully use tin snips to cut the metal can to the right height. Be cautious, and don’t get cut.

Once cut, wrap a bit of electrical tape around the bottom of the can to cover the sharp edge.
Attach the end of a piece of green florist tape to the bottom of the can using hot glue, then wrap the florist tape around the can until it’s covered. Alternatively, paint the tin can green and let it dry.

Place the covered can towards the back side of the galvanized container, then using a hot glue gun take one large faux lilypad leaf and glue along the bottom of the container where the remaining back portion is. Doing this creates a barrier to prevent the candles from floating right against the fairy house. Using hot glue attach the sides of the large leaf to the front of the tin can and the side of the base container.

Next balance your fairy house towards the back of the container. Apply lots of hot glue to the top of the tin can before placing the fairy hut on top and press down firmly. Hold until the glue cools and the fairy hut stays in place.

On the other side of the fairy hut, fill in the tiny garden with faux succulents, start by gluing one to the tin can and to the galvanized base edging. You need to glue them in place with a bit of glue as the small succulents are light enough to float on the water.
I added a twig fence I made a couple of years ago. To make the fence, gather small twigs, and cut each twig into two-inch lengths. Cut two longer twigs for cross pieces and using florist wire wrap each small twig to the larger cross-piece branches. Don’t worry if it’s haphazard looking, that just adds to the charm.

Take something a little bit taller than the underside of your galvanized tin and use it to tilt your container a little bit away from the fairy hut. I used some florist foam for mine.
You don’t need to use the florists’ foam if you’re not using candles.
Finish the arrangement by adding some little bits of greenery and moss-covered decorative rocks to cover any areas that have metal or bare wood showing.

The heat of the burning candles does make them move around a little bit. Its pretty to sit and watch the candles, which I did for about half an hour. Because the fairy pond is tilted away from the fairy hut the candles never got near my fairy house. Under no circumstances would I leave it unattended. Like any real candle, it’s never a good idea to walk away and leave them.

The Farmhouse Hens Centerpiece Ideas

Peony Table Centerpiece with my Grandma’s Buttons by Grandmas House DIY

Serving Centerpiece with Teacups by Chas Crazy Creations

Quick And Easy Farmhouse Style Spring Centerpiece by Our Crafty Mom

How To Use Farmhouse Thrifted Finds As A Table Centerpiece by Raggedy Bits
I love it. My only suggestion would be to paint the base something forestry so it blends in with the rest of it. So much detail goes into the fairy house and pond that little step would enhance it. Otherwise I can’t wait to try making one.
Love this Leanna!
Thank you Deborah
That is so cute! I love it. Definitely a conversation starter
Fairy gardens are a Spring tradition, my granddaughters started me on. I love all the green on Spring so this helps while I wait for it to finally arrive.
Leanna, this fairy pond is truly magical! The floating candles was such a great idea! Your creativity amazes me!
Awwwwww, you know how much I love fairy crafts Leanna, and this has to be one of the most beautiful I’ve ever seen. It’s magical
Thank you Michelle. The entire time I was making this I was thinking of you. It reminded me of something you would create in that beautiful garden of yours.
My favorite is definitely your Fairy House Centerpiece, Leanna! I love the rustic look of the little house and the twig fence and the greenery, especially the faux succulents. And the floating candles make it look really magical. It’s just so unique and appealing. I’m tempted to make my own! I love little houses so I might even attempt to craft the house myself.
Thanks for the tutorial and the inspiration!
Your so welcome Naomi. I am glad you love it. I think it could be done on a larger scale, and I may consider that if I find a washtub at the right price.
Your Fairy Pond Centerpiece is adorable. What a great idea!
Thank you Kristie. It brings the outdoors in for a little bit until it eventually warms up here.
OMG Leanna this is just so sweet and adorable, I totally want one!
You’re fairy center piece is amazing Leanna! I absolutely love it and it’s so very magical. Great job and you have inspired me!
Thank you Chas. That means lots to me, because I never read a Chas’s Crazy Creations post without thinking the same thing lol
This fairy centerpeice is just SO cute, Leanna! I love how you’ve added the water and floating candles! It adds such a beautiful calming touch! I bet the fairies are super happy with there new home!
Thank you Sam. I would love to place it outside on a covered porch. Hubs even commented on liking it in the evenings when I lit it up.