A Hanging Fabric Heart Bag for Valentine Decor
Pink is one of my favorite colours, but looking through Valentine crafts on Pinterest there are many Valentine crafts in either pink or red. So today I decided to make a pretty Valentine’s craft in soft, neutral colours.

This easy home Valentine decoration is made using my Cricut Maker, but if you don’t have a Cricut, I created a paper pattern just for you. Just cut it out and trace it yourself.
Valentine Craft Idea Supplies
The supplies you need are a bit different depending on which method you choose. Let’s start by describing what you need to use the Cricut. The other template method for creating the Valentine pattern is further down the post.
Cricut Valentine Supplies
Besides a Cricut Maker you will need the following supplies:
- Infusible Ink Pens – I used the basic 0.4 set with Black, Ultraviolet (purple), Green, Cardinal (bright pink), Tawny (brown)
- Cricut design – Flower Border #M44A51408
- Cricut rotary blade
- 2- 12 by 12 pieces of cream linen, cotton, dropcloth, or duckcloth fabric
- Heavy iron on interfusing, glued on one side
- Iron and Sewing Machine
- Dark embroidery thread (optional) and needle
- Wide-eyed needle
- Thin dark blue ribbon or twine.
Prepare Fabric for Valentine Craft
Do this for both Cricut and paper pattern methods.
Cut two pieces of fabric 12 x 12 inches, and two pieces of heavy interfacing, 12 x 12 inches. The edging does not have to be perfect. It just needs to fit on the Cricut mat.
Iron the fabric smooth. Place the fabric right side down, cover with the heavy interfacing glue side down, and iron according to the interfacing instructions. Repeat with the second piece and let cool.

Valentine Design in Cricut Design Maker
I have a step-by-step video of the design process included below. Here are the steps covered.
- Upload the flower border or any design you prefer. Size it to 4 inches wide, and then change the cut file layers to pen layers. Choose colours.
- Use the free heart shape on the shape panel, resize to 7 x 11 inches.
- Layer and place the flower border where you want it vertically. Use the horizontal center tool to arrange. Highlight both and attach.
- Create the project and then choose fabric settings. For my Valentine, I used the duck cloth setting.
Print and Cut Valentine on Cricut
Place your fabric on the pink fabric cutting mat, and flatten it with a brayer or rolling pin to make sure it adheres well.

Once your design is finished, load the fabric cutting mat into the Cricut Maker. Add the cutting blade and first pen as suggested by your Cricut machine. Follow the instructions in Cricut Design Space. Mine did the purple flower first, then the center, and finally the cursive sides. Once drawn, the machine cut out the fabric.
Print and Cut Valentine with Paper Pattern
If making the farmhouse Valentine without the Cricut, here is your list of supplies.
- Fine Tip Fabric Pens – black, purple/blue, green.
- Free downloadable paper pattern
- 2- 12 by 12 pieces of cream linen, cotton, dropcloth or duckcloth fabric
- Heavy iron on interfusing, glued on one side
- Sewing machine
- Dark blue embroidery thread (optional) and needle
- Thin dark blue ribbon
- Iron
Once the fabric is prepared, lay one piece of the fabric with the interfacing side down. Cover with a piece of carbon paper, and then place the heart pattern on top.

Trace the heart and the flowers using a pencil. You will notice the small end of the Valentine isn’t on the pattern. It was a bit bigger than the paper, so just sketch that portion in.

Repeat with the second Valentine shape, but skip tracing the flower border on the second piece of fabric.
Cut out both Valentines. Using the fabric pens, colour in or trace the flower border the way you like.
Assemble the Fabric Heart Bag
From here on, regardless of the method used, you end up with a fabric DIY Valentine heart that is cut and just needs sewing and final details. So let’s do that part now.
Place the two fabric Valentines with the interfacing facing inward, between each other. Pin if needed.
We will sew around the bottom edges of the Valentine and leave a space at the top open.

Sew the first seam about 1/8 inch from the edge. This is to seal the edge of the fabric so that it is able to fray a tiny bit, and it holds the two separate hearts together. Run the edge of the foot where the first red line is along the edge of the fabric.

Once you’re done sewing the first seam, repeat by sewing a second seam. This time, sew the second seam about 1/4 inch from the edge. This second seam reinforces the very narrow outer seam, and we will use it as a guide for the embroidery.

The top of the Valentine stays open.
Adding the Valentine’s Blue Embroidery
This is optional. I love the look of the Valentine with the dark, contrasting embroidery, but your time is your own, and you can skip this if you like.

Start from inside the heart and sew a neat row of running stitch embroidery around the edge of the heart. I stitched this using all six threads of dark blue embroidery cotton. Start at the top where the sewn seam starts, and work your way down using the inner seam as a placement guide. Sew a simple length of running stitch around the bottom of the heart and up to the other side.
( An easy way to describe a running stitch is to sew a dashed line of equal size stitches. Each stitch and each space is relatively the same size. I like to place a pen mark on the edge of my finger as a guide.
Note: Try and make the embroidery as neat and straight as you can. BUT don’t worry about little inconsistencies in your stitch; the inconsistencies make it look homemade. We are making home Valentine decor, and I think the stitching looks fantastic with tiny inconsistencies.
Start sewing from the inside of the heart so that your knot doesn’t show.
Once you finish both bottom pieces, finish the open sides of the Valentine by sewing a narrow running stitch along the front of the Valentine. Repeat for the back Valentine. This finishes the heart-shaped border and, as a bonus, helps reinforce the interfacing.
Finishing and Hanging Valentine Craft
Adding a hanging piece of twine to your Valentine is much easier to do if you have a large-eyed needle. If you don’t have one, I recommend getting one when you can. They are fabulous for stringing anything, and in this Valentine craft, you can use one for either hanging the Valentine with ribbon or with string.

Thread the large-eyed needle with either ribbon or twine. Then push it through the first layer, and then the second layer. If you have difficulty pushing the needle through, twist it in a large circle pattern to make the hole a little bit larger. It will eventually work its way through.

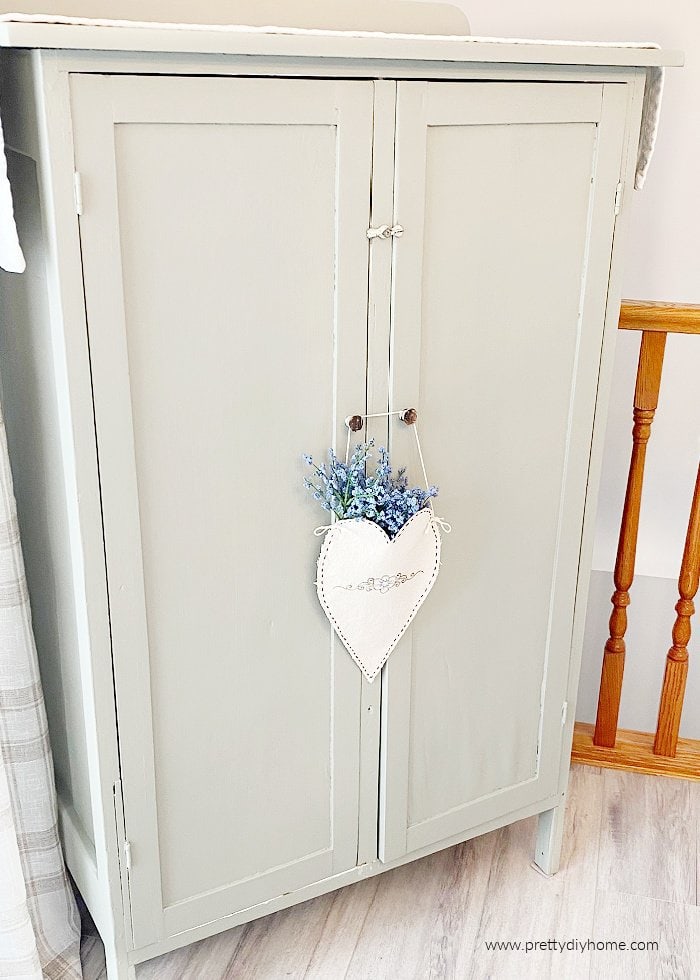
I bought some faux lavender to set off my little fabric Valentine craft. It looks very nice just on its own as well. I really enjoyed making this Valentine. Let me know if you make one as well.
Want to give this craft a try? Pin It for Later!

Other Home Valentine Decoration Crafts

DIY Wood Valentine Gift
If you enjoy handmade Valentine decor, this DIY wood heart hanger began as a thrift store find and is another simple project that works as both a gift and home decoration.

A DIY Valentine’s Gift Heating Pad
If you enjoy sewing easy Valentine projects, this heart-shaped Valentine heating pad is another cozy, handmade gift idea that is practical and thoughtful. I think Gramas or anyone who is always cold can really appreciate this thoughtful gift.
This is so pretty Leanna, perfect as a valentine decoration but pretty enough to be used all year round. I can imagine switching up the flowers every month or so to make it seasonal, lovely! This is a feature over at Handmade Monday this week 🙂
Thank you for featuring the Valentine decoration Julie. I am excited to know it.
I love your Valentine craft, Leanna! I’ve been thinking of getting my sewing machine out to do more crafting like this. Your heart turned out so pretty with the contrasting thread too. Pinning!
Thank you so much for the pin Crissy. My sewing machine is a very basic model and I love having it for crafting. I hope you spoil yourself with one.
Such a pretty Valentine crafts, Leanna… and I think it could be used throughout spring! I’ll be featuring your post at Tuesday Turn About this week! Pinned!
Right on Julie, I am honoured. I finally found sometime to start linking again and being featured really boosts my energy. Thank you so much.
I’m not a big fan of pinks, but blue I can do anytime. Pinned
Hi Michelle. I love pink but for whatever reason this year I just am not into it. I guess I just wanted something different and that I could use any time of year.
GORGEOUS Farmhouse Heart, Leanna!
Followed and Pinned!
Creatively, Beth
Thank you Beth. I am happy you reached out and like the Valentine.