DIY Large Wooden Easter Bunny for the Front Porch
This time of year, when it is still minus 20 outside and winter feels like it will never end, I start craving a little spring on the porch. That is exactly how this wooden Easter bunny diy began. I wanted something cheerful and welcoming by the front door, even if it had to be built on the foyer floor.
You can make this large bunny using scrap wood or two simple 1 by 6 boards glued together. It is a great way to use leftover lumber, and it does not require many tools.
All you really need is a jigsaw and access to a printer for the pattern. I created a sketch style template that prints on letter size paper and tapes together easily at home.
This four foot bunny is simple to build, sturdy enough for outdoor decor, and such a fun way to welcome spring.
How to Make a Porch Size Wooden Easter Bunny
Supplies to Make a Wooden Bunny
This may look like a long list, but most of the supplies are simple and easy to find. Before buying anything new, check what you already have on hand. The only item we purchased was the dark wood stain. Many of the smaller items can easily be found at the dollar store.
- wo pieces of 1 by 6 lumber, or scrap wood, large enough to create a panel about 22 by 45 inches once glued
- Small pieces of plywood or paint sticks for back supports
- Wood glue
- Jigsaw
- Drill
- Clamps
- Brown paper or wrapping paper with a grid
- 3/4 inch nails and small screws
- 2 ” L brackets
- Dark walnut or chocolate wood stain
- Foam brush and clean rags
- Florist wire
- Hot glue
- Black Sharpie marker
- Pink acrylic paint
- White acrylic paint
- 120 grit sandpaper
- Free Easter Bunny templates
Step 1: Glue the Wood Boards Together
Cut your wood into 4 foot lengths. Run a line of wood glue along one edge, adding a small dab every couple of inches. Press the boards together so the edges sit snug and even.
Clamp the boards tightly and allow the glue to dry completely before moving on.
If You Do Not Have Clamps
If you do not have clamps, place the boards against a wall and use heavy items like books or storage bins to apply steady pressure. The goal is simply to keep the boards firmly pressed together while the glue sets.
Step 2: Make the Bunny Template
You can choose the height of your wooden bunny. I made mine four feet tall, but if you prefer a shorter version, simply trim a couple of inches from the bottom of the pattern. This makes it easy to work with smaller pieces of scrap wood.
There are two simple ways to create your bunny template.
Option 1: Draw Your Own Bunny
If you enjoy sketching, you can draw your own pattern.
Use a piece of wrapping paper with a one-inch grid on the back. Make sure the paper is larger than your wood panel.

Find the center and draw a straight line down the middle. Then divide the bunny into four sections starting at the bottom to help keep both sides even.
Sketch your bunny shape. When you are happy with it, fold the paper in half and cut out the half you like best. Unfold the paper to reveal a symmetrical bunny shape, then trace it onto your wood.
If you would like more guidance, I share the drawing process in the video tutorial.
Option 2: Use the Free Printable Template
Download and print the bunny template pages on letter-size paper. Tape them together and cut out the outline.
Next, take a large piece of wrapping paper the size of your lumber and fold it in half. Place the printed template along the folded edge and trace around it. Cut out the half shape and unfold the paper to reveal your full bunny.
Make any small adjustments if needed, then trace the final shape onto your wood panel.
Step 3: Cut Out the Wooden Easter Bunny
Cut the bunny out using a jigsaw. This wooden Easter bunny diy is too large for a scroll saw, but the outline is simple and has no tight corners.
Place the wood panel on a flat, stable surface before cutting. Hubs cut ours out in just a few minutes because the shape is smooth and easy to follow.

Once the bunny is cut out, reinforce the back by attaching thin wood strips across the seams. Use small nails under one inch long so they do not pop through the front.
Place the support strips directly across the seams where the boards meet. This helps the two pieces act as one solid panel.

Step 4: Add a Stand to the Wooden Easter Bunny
The top portion of your cutout will leave a large scrap piece behind. Use this leftover wood to create the stand.
Center the bunny on the scrap piece and mark where to trim one end so it sits neatly beneath the bunny.

Once trimmed, attach the bunny to the stand using two L brackets on the back. Secure them with small screws so everything sits firmly in place.

Step 5: Stain and Finish the Wooden Easter Bunny
You do not need to sand the bunny before staining. We will sand the edges after it is stained.
Apply one coat of dark walnut or chocolate stain using a foam brush, then wipe off the excess with a rag. Let it dry completely before turning it over to stain the other side.

Once the stain is dry, use sandpaper to smooth the outer edges by hand. After the edges feel smooth, continue sanding lightly around the entire shape. This softens the finish and creates a subtle worn outline that highlights the bunny’s shape.
You can see this softened edge in the close-up image of the bunny’s face.
Step 6: Add the Bunny Face and Ear Details
Start with the nose. Draw a small triangle about one inch wide and paint it a soft pink. Let it dry completely. Mine took three light coats before the color looked solid enough.

For the whiskers, cut two pieces of fine black wire in half so you have four pieces about eight inches long. Twist them together at the center to form the whiskers.
I tried stapling them in place, but it split the wood. Instead, add a small dab of hot glue to the center of the wire and attach it to the back of the nose. Once the glue cools, secure the nose and whiskers to the bunny’s face.
To finish the ears, lightly sketch the inner ear shape with a pencil. Fill it in using a soft mix of pink and white paint.
The eyes are simply two long, narrow oval shapes drawn in with a black Sharpie.
Note: If you would like to see the details more closely, the full video tutorial is located at the end of this post.
Decorating Ideas for Your Wooden Easter Bunny
There are many ways to decorate this wooden Easter bunny diy. I considered adding an Easter sign or even wooden bunny feet, but in the end I kept it simple.
I made carrots by cutting long, narrow triangles and painting them orange. For the carrot tops, I untwisted dollar store rope and glued it in place. I also found a few cheerful Easter eggs at the dollar store, including a larger one that says welcome.
Originally, I planned to place everything outside in a large fern planter, but with the cold weather I styled the bunny indoors beside the front door instead.
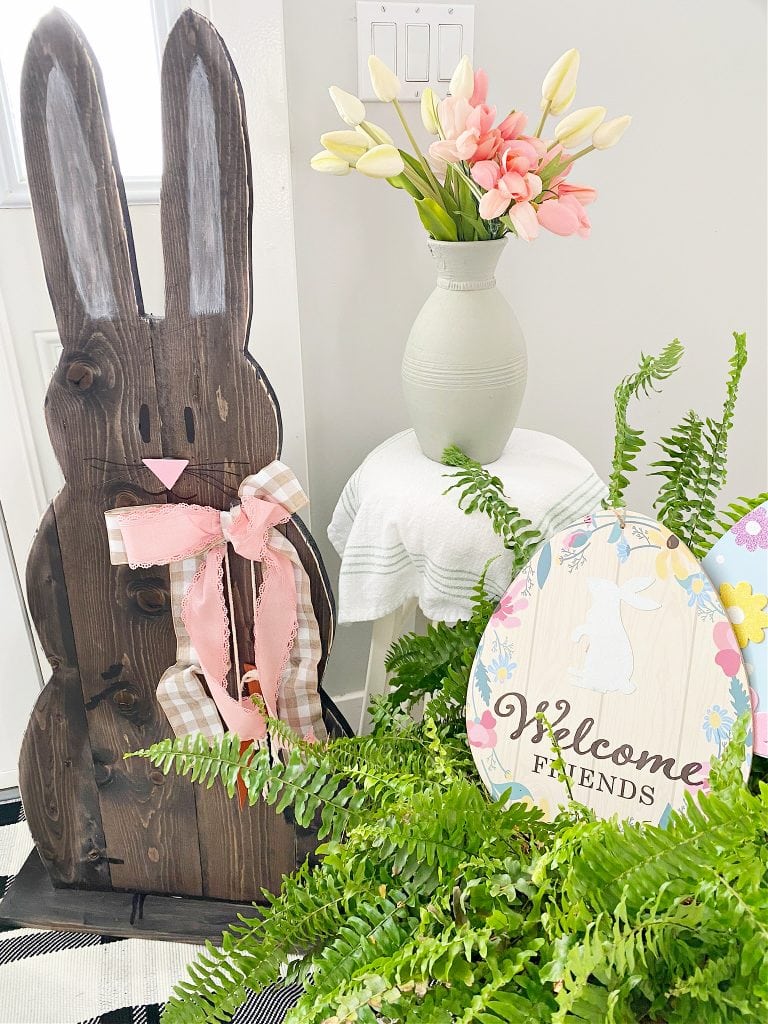
The final touch was a large bow tied around the bunny. I folded the tails where I wanted them and secured them with a small dab of hot glue so they would stay in place.
The latest on Youtube:
Don’t forget to pin this for later!

Other Easter Bunny DIY Ideas
Easter bunnies are my favorite part of Spring decor, I love them whether they are vintage inspired, wood, or purchased and snuggled into a Spring display.
Dollar Tree Easter Bunny Craft
You can make these jumping Easter Bunny Topiaries using Dollar Store supplies. They work very well for adding height to arrangements for Spring.
Vintage Bunny Art on a Budget
If you have a Cricut I designed a way to use the drawing function to create this vintage rabbit on fabric. Then you can mount the fabric to any background you like.