Easy DIY Pink Christmas Garland for a Little Girl’s Room
Decorating a little girl’s room for Christmas is such a joyous project, and adding handmade Christmas decorations to my granddaughter’s bedroom made it feel even more magical. Seeing their excitement over having their very own Christmas tree was worth every minute of crafting.
Because it’s not a main room that everyone will see, I wanted the Christmas decorations to be very low-cost while still creating something special just for them. This easy DIY pink Christmas garland was one of the first projects I made, and it instantly added the sweetest cozy touch to their little tree.
Made from simple fabric strips, this Christmas garland DIY is as cheap as can be and so easy to make. Best of all, children can help tie the strips, making it a fun and memorable part of the holiday decorating.

Why You’ll Love This Garland
Supplies Needed
- Leftover flannel scraps – a great way to use what you already have on hand.
- Dollar Tree felt or flannel fabric – affordable and easy to find.
- Fabric quarters or thrifted flannel nightgowns – another inexpensive source of fabric in fun patterns and colors.
- Lace or bits of faux fur – optional, but they add texture and a touch of whimsy.
- Twine, string, or ribbon – this will be the base for tying on the fabric strips.
- Scissors or rotary cutter – for cutting your fabric into strips.
- Ruler or measuring tape – helps keep the fabric strips roughly the same size.
Homemade Christmas garlands are so much easier to coordinate than traipsing around town trying to find something that matches just right. Plaid is such a strong pattern that I only added little tidbits of it to the tree, balancing it with softer felt fabrics. Cutting all the strips took me about an hour of concentrated effort. The actual tying of the DIY Christmas garland stretched across three Christmas movies. It’s very easy, but it can get repetitive, so if you have munchkins nearby, invite them to help. Otherwise, pour yourself something yummy and put on a favorite distraction while you tie away.
How to Make a DIY Pink Christmas Garland
Step 1 – Cut the Fabric
For my garland, I used five different types of fabric, two plaids and three felt fabrics. Cut your fabric into small strips about 1 inch wide and 3 inches long. You can use regular scissors, but I found the easiest and fastest way was with a cutting wheel. The strips do not need to be exact, so this part goes quickly.
If you are going to sit down and make the garland in one go, it helps to place all your little strips into separate piles as you work. If you are making it as a family project over several days, try sorting the strips into a divided container or a few small containers and leave them out. That way, everyone can add to the garland whenever they have a few minutes.
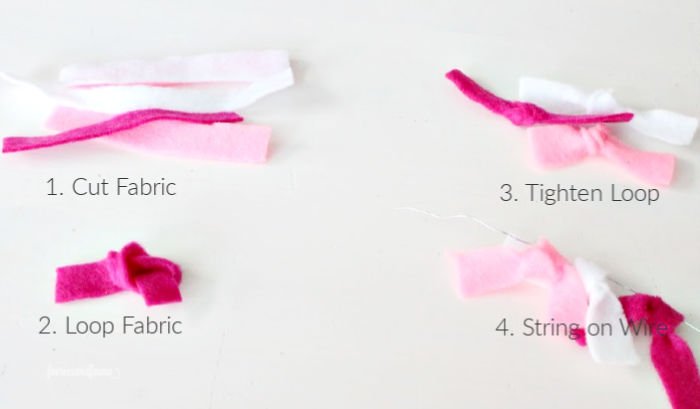
Step 2 – Loop the Fabric
After all your fabric is cut, take one strip and fold it into a loop. Pull the ends through the loop to tighten.
Step 3 – Add to the Wire
Once the loop is snug, slide it onto the wire garland by pushing the wire through the center of the loop. You can do this one strip at a time or make up several loops first and then slide them on in batches, whichever feels easiest. This method is much quicker than tying each strip on individually.
Step 4 – Create a Pattern
Continue adding fabric strips, arranging them in a repeating pattern of colors and textures. For my garland, I used white felt, soft pink plaid, dark pink felt, dark pink plaid, and another dark pink felt.

Step 5 – Finish and Fluff
Once all the fabric strips are strung onto the wire, slide them close together until the garland looks full. Step back and check for any empty spaces, then adjust as needed. Use your fingers to fluff the strips so the different colors and textures show evenly.
This little garland is easy to change up depending on your style. For a girly bedroom look, you can add lace or bits of faux fur, or keep it all in pastels for a soft and whimsical effect. If you prefer a snowy winter look, try using all white fabric strips. For something more traditional, bright flannel patterns work beautifully and give a cozy farmhouse feel.

When Christmas is over, gently fold the garland into a box or bag and store it with your other decorations. That way, it will be ready to enjoy again next year.
This pink fabric garland was such a simple project, but it made a big difference in how the bedroom tree looked. It tied the whole room together and gave my granddaughters their very own bit of Christmas magic. I created the entire room as a gift for them, and even though it wasn’t planned for the blog at the time, I love being able to share the little handmade touches with you now.
Other DIYs for a Little Girl’s Pink Bedroom at Christmas
If you are decorating a child’s bedroom for Christmas, adding a few inexpensive handmade decorations makes the room feel extra special. This pink Christmas tree garland, along with a matching scroll sign, fabric-covered ornaments, and twinkling lights, creates a soft and girly holiday theme that feels cozy and festive without spending much.

Pink Christmas Scroll Sign for a Little Girl’s Room
Make this Santa is Coming to Town scroll sign for under five dollars. The tutorial includes a printable pattern for the wording and it is made with easy-to-find Dollar Tree supplies. Add soft pink ribbon and stars, and it becomes a sweet child-themed Christmas sign for above the bed.
I hear you on the tediousness of making any rag project. I’m working on a wreath right now that has me catching up on Hallmark Christmas movies. Love the idea of a rag garland and it’s so pretty in pink and plaid. Such a gorgeous tree you’ve created for your granddaughters. I bet they always look forward to their stay at Grandma’s during the holidays. Pinned
Oh lordie Marie. I made a farmhouse rag wreath a couple of months ago and I absolutely love it. Pour the coffee and turn on netflix. lol