Fall Leaf Garland Book Page Craft
A Book Page Fall Leaf Garland Craft using a Cricut
This cricut book page fall garland is one of the fall decor ideas I have been wanting to make forever. I have seen several beautiful fall mantels made with book pages before, but none of them had beautiful oak leaves. There was zero percent change that I would or I doubt anyone else would take the time to hand cut out a couple hundred oak leave patterns by hang regardless of how many helpers you had. The hard part of making a book page craft of any type is the time it takes to create and cut out all the leaves. Oak leaves make it even worse because of the intridate leaf patterns.
How Many Book Page Leaves Do You Need for a Fall Garland?
The short answer is lots, and then a little bit more. To estimate how many you need for my 74 inch mantel plus 2 foot drop I used 180 leaves. Smaller leave you will need more.
I cut 200 leaves before starting to assemble the fall garland. Book pages are pretty much free afterall and I refused to be going back and starting over again to cut more leaves.
Cricut Book Page Fall Garland Supplies
If you have a new cricut like I do and want to practice making with it, this is a fabulous beginners craft to get you started. Book pages are pretty much free or you can grab an old book for a quarter. Other than cricut supplies and dollar tree twine and florists wire your good to go.
- Cricut medium (green) 12 by 24 inch mat
- 200 plus old book pages in different shades of aging and type set colours.
- Ruler to measure book pages and chose size of leaf cuts.
- Cricut scraper tool to flatten book pages
- Cricut Design Oak Leaf Silhouette (#M4D39291A) cut file.
- Florist wire, scissors
- hot glue
- Dollar tree twine wrapped wire
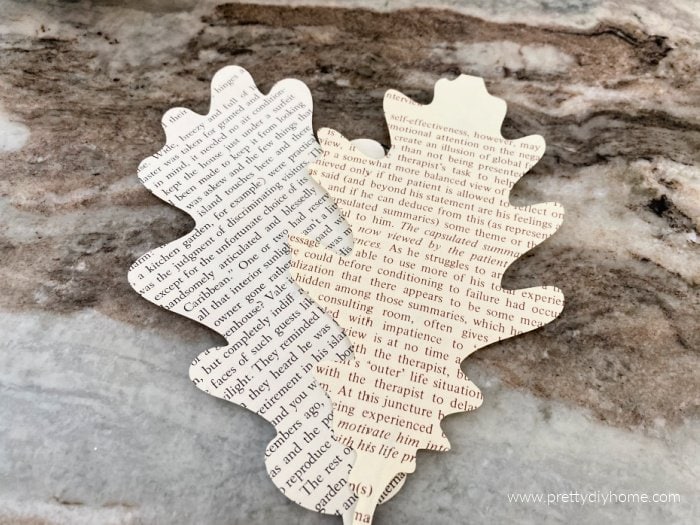
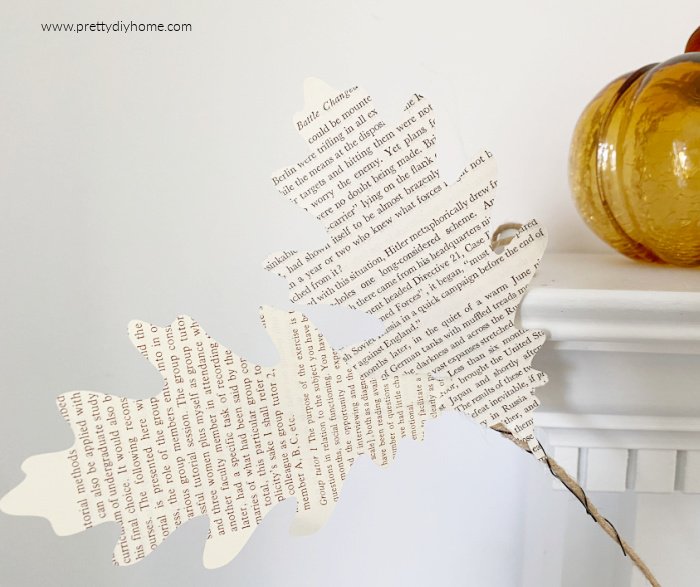
Here are the book page leaves cut out on the two different page styles, one of more cool with greys and whites, whereas the other is warm warm toned with creams and browns. I chose the two tones for extra interest, instead of stamping or staining any of them.
Sizing the Leaves
Before we can design the leaves we need to know how big to make the design which totally depends on the size of your book pages. For example my smaller book page was 5.24″ by 8.75 “. So at the most I could fit 3 book pages down each side of my 24” Cricut mat. Therefore 6 leaves for each cut.
How to Cut Book Page Leaves with a Cricut Machine?
There are a few steps to cutting leaves using the cricut, let me walk you through them.
Designing the Cricut Leaf Cut File
I used the Cricut Design Oak Leaf Silhouette (#M4D39291A) cut file, duplicated it to give me 6 leaves each about 7 inches long.
Then design the cut file so your leaves are separated and even. I did mine aligned along the outer edge of the design mat, then attached them so they didn’t move when I clicked the Make It button.
Unfortunately I got an error that my file was longer than the 24 inch mat. I pulled one corner of the design in until they all fit within the mat. The error disappeared and my leaves were as big as possible.
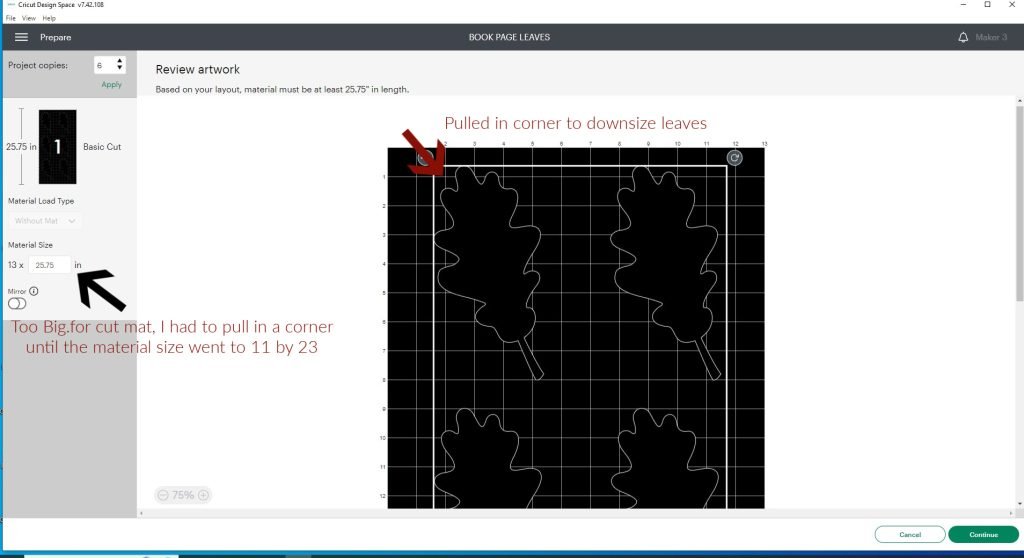
After resizing I went continue and then Make it and no error. Next you will need to know the cut file settings.
What are the Cut File Setting the Book Pages Crafts?
The strangest part of cutting the leaves was I found the Oak Leaf Silhouette file very easily, but no where could I find cut settings for book pages.
Drum roll please: I figured out the following cut setting and it worked pretty much perfectly for 200 leaves.

I lined up my book pages along the edge of both sides of the 12 by 24 inch medium stick mat. As seen in the picture. The bottom page has a little bit of overlap, with the lower page placed overtop of the one above it. I did that after the first test cut when it cut the lower leaf off a little bit.
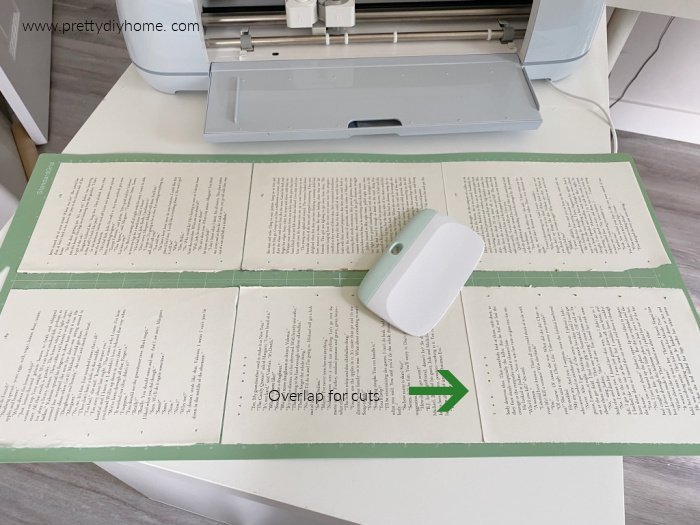
For the remaining cuts, I quickly placed the book pages so there was no spaces between them with the lower one overlapped. It worked perfect about 95% of the time. Sometimes the pages were exactly right, but I didn’t much worry about the odd little bit of the tip of the leaf being cut off.
Grab a coffee and a book because it takes awhile to cut the leaves, six at a time. I spent some happy time on Pinterest while cutting.
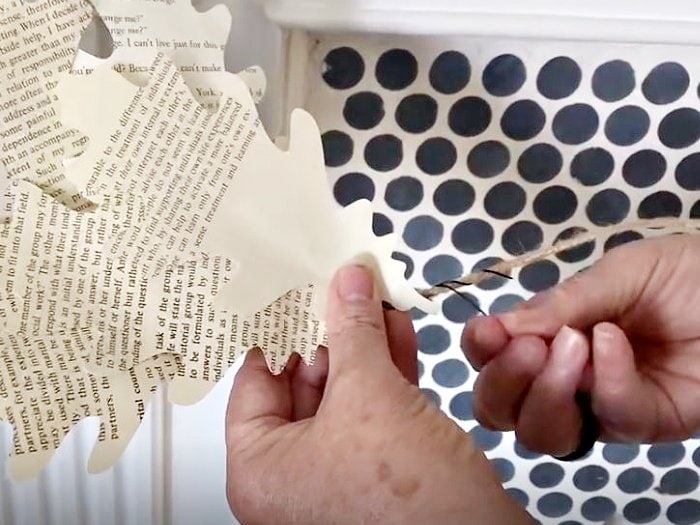
Attaching Wires to the Book Page Craft Leaves
My florist wire in my stash was about 18 inches long so I folded and cut them in half with my old utility scissors.
Working on a heat safe mat, place the leaf down, cover it with the wire and put lots of hot glue on in in four spots. Set it aside to cool and repeat for the next one.

This only took about an hour to do all of them. Much Much faster than the actual book page craft cutting was
I placed all the leaves in a pretty basket and started to decorate the mantel.
How to Design a Book Page Craft Fall Garland
If your confident and want to just put the leaves on the wire until it looks good by all means. But I needed a plan to keep the book leaf garland balanced, see what I was doing, and how many leaves I still had left to work with. I did mine in steps.
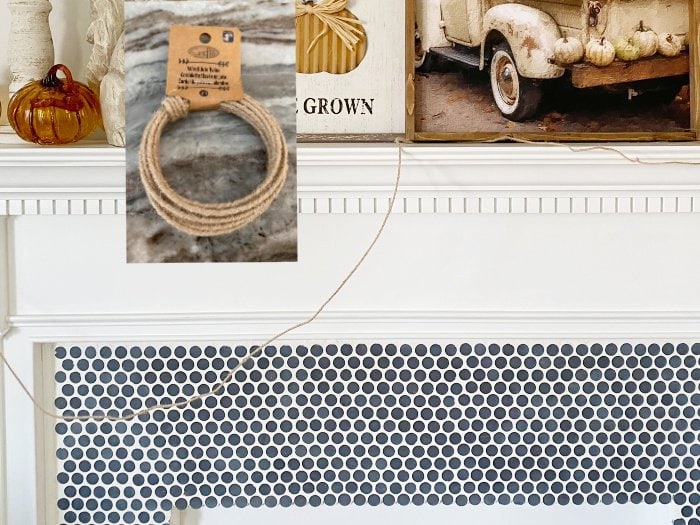
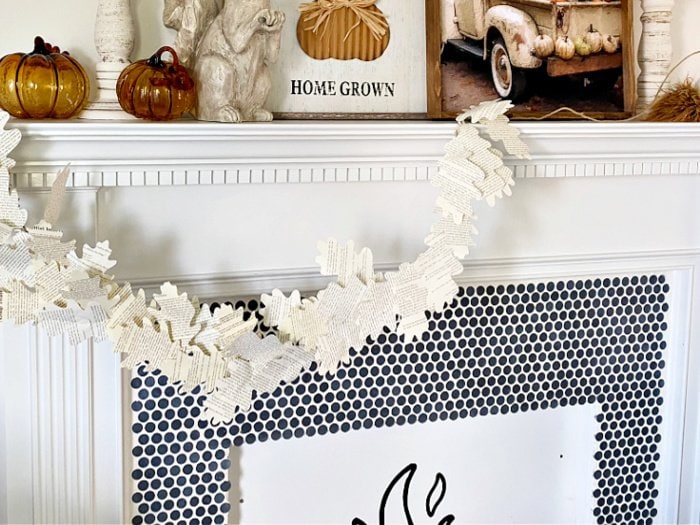
To create the actual garland I began by stringing out the twisted twine about where I wanted it to be on the mantel, securing the ends. It has a longer drop on the left hand side than the right side.
First Row of Leaves
Next starting with ten leaves at a time and keeping track of how many were left I worked from left to right overlapping two leaves at a time as shown.
Each leaf wire was wrapped tightly around the twine covered wire.
I cannot say how long it would take because I happily puttered at it while doing everything else around here. I just popped a few on over the day whenever I felt like it. Until I had the entire garland covered with leaves all laying the same way from left to right. Then I took ten leaves at a time so I knew how many I had remaining. Placed each bath on the wirte by wrapping the wire around the burlap wrapped wire. I place two side by side the entirey of the garland length. Ten at a time. It took me a couple of days to finish it because I just put ten more on whenever I happened to walk by.
Next I went and put leaves going the opposite way, working from right to left. Sometimes I would put in one, other times two. It kind of depended on what part I was working on, I wanted less leaves where the curves were near the pictures on the mantel.
Once I had all those leaves on I started crafting in earnest. Over the next hour I finished the garland by adding more leaves wherever I could see wire and where I wanted it to be thicker and fluffier. I am hopeful you can see the subtle difference between each image. The leaves work really really well with the wires, they stayed attached, the wires held, I could adjust the leaves in any direction, crumple and folded to my hearts content.
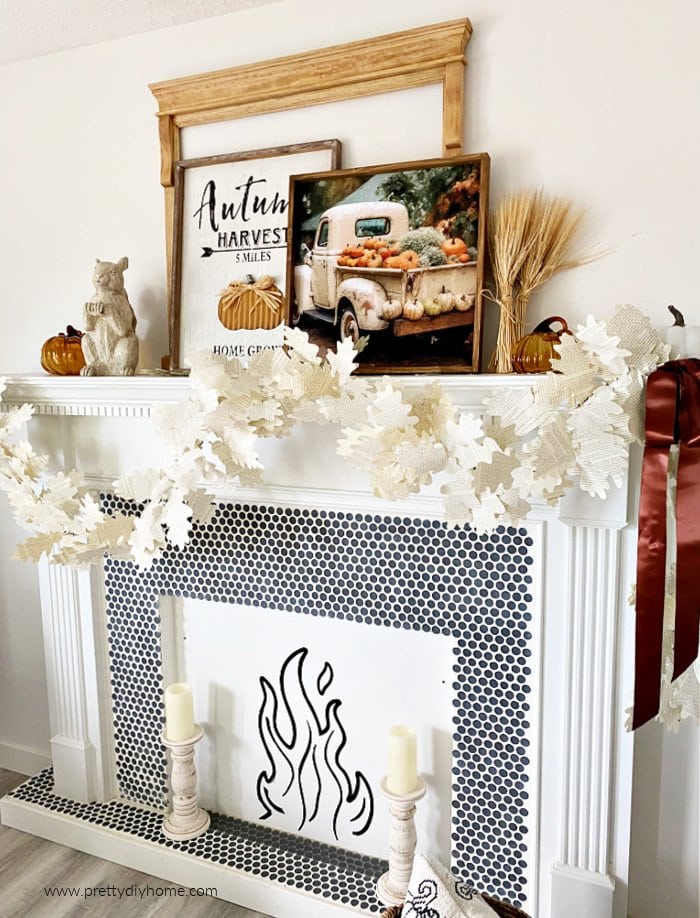
I very much wanted to create a super dramatic asymmetrical garland and I am thrilled with the final result. As a final pop of drama I went into my Christmas wrap and took out a satin ribbon and tied it on the end.

My Fall mantel decor includes a antique mirror frame I stripped and fixed this summer, and that white vintage truck image that was this Falls decor splurge and its beautiful. Everything else on my mantel is from my stash, and of course my almost free book page leaf banner. The pumpkins are 10+ years old now, their Pier One store doesn’t exist anymore. If I had purchased the banner I wouldn’t have been able to buy the artwork. I hope you appreciate the budget conscious craft ideas. Happy Fall.


Other Fall Craft Decor Ideas
Here are some other easy DIY Fall decor ideas you may enjoy for Fall Decorating. If you don’t have a fireplace mantel to decorate, here is the tutorial on how we built one for our home.

How to Build a Fake Fireplace and Mantel
How to build a fake fireplace and mantel for home decor. Here is our fireplace when we first finished it last fall. It gives the room a focal point that we really have enjoyed having.
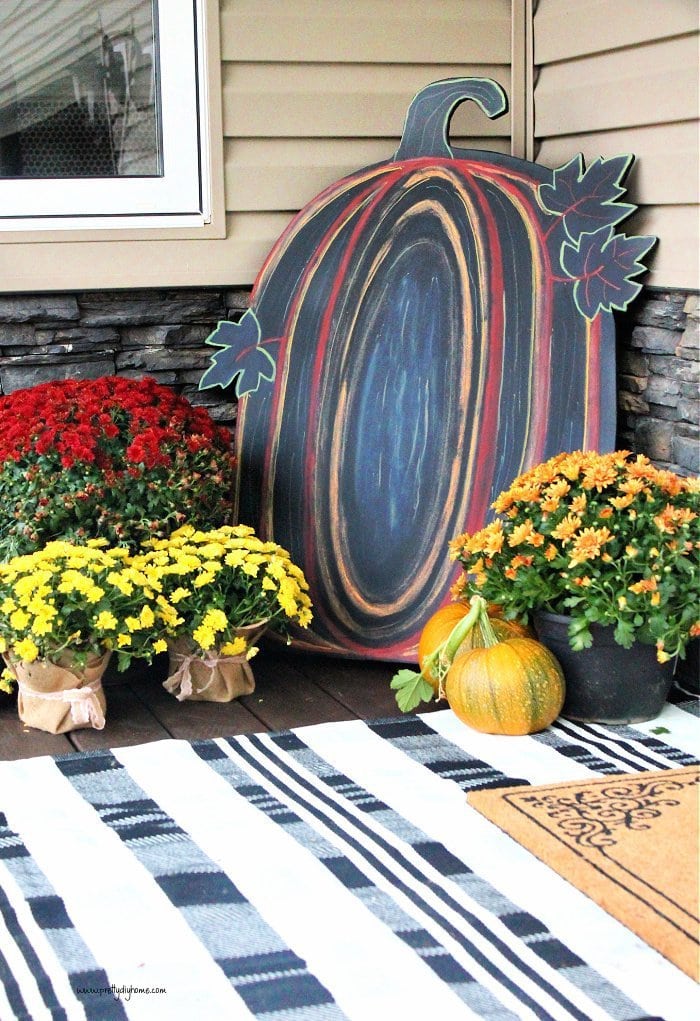
Outdoor Wooden Pumpkin for Fall Decor
This large outdoor wooden pumpkin decoration for fall is actually a chalkboard, you can decorate it in any colour your like, and change it every year.
Such a creative fall craft! I love this, Leanna, and am happy to be featuring your post at Tuesday Turn About!
Thats fantastic news Lynne. I appreciate the compliment. I am tardy linking up every week, but I love your Link Party.
Absolutely gorgeous. Definitely time consuming, but the results are amazing. You craft like me…a little here and there…lol.
I Lllllove the garland so much and everything about your Fall mantle. (draw out the “L’s” southern style-so pretty!
I’ve been threatening for the longest time to spoil myself with a Cricut. They’re so expensive here in South Africa, but you’ve just made me go out and get on. This is so beautiful. I love how full it is and there’s just no ways I would cut all those leaves by hand.