How to Make a DIY Rag Wreath for Anytime of Year
Rag Wreath DIY Ideas
Hello, I am excited about today’s post. When I was last in the USA I found some ticking fabric at Hobby Lobby, I bought the last 2 yards in stock and have been excitedly hoarding it until today. I finally decided to make a large neutral DIY rag wreath that can be used year-round. Ticking is such a pretty and neutral fabric, and paired with light cream dropcloth I cannot wait to show you all the ways I was able to quickly update it for different holidays.
DIY Fabric Rag Wreath Tutorial
Rag Wreath Supplies
This wreath is large, made with an 18″ wire wreath form, which I had on hand. To make the identical large 18-inch neutral rag wreath you will need 2 yards of drop cloth and 2 yards of neutral-colored ticking.
If you want to use a smaller wire wreath form, you don’t need as much fabric. Feel free to use fabric scraps, fat quarters, or dollar tree fabric bundles for the rag wreath. But, if you want to decorate it for different seasons like I did, I recommend using neutral-colored fabrics.
- 18-inch wire wreath form
- 2 yards of fabric in a solid color (drop cloth, duck cloth, muslin)
- 2 yards ticking
Step 1 – Cut the Ticking and Dropcloth Fabric Strips
With a Rotary Cutter
Start by cutting hundreds of little strips of fabric, half of the fabric strips in drop cloth the other half in ticking. For this large wreath, I cut 550 strips. I used a rotary cutter and ruler to cut mine.
Cut your first strip 8″ wide and the entire width of your fabric. Then cut the strip of fabric into 1 1/2 inch strips so you end up with 1 1/2 wide strips of fabric each 8 inches long. I guess it took me 3 hours to do all the cutting, I would do some cutting, go about my day, and then do some more.
With Fabric Scissors
If you don’t have a rotary cutter, make little snips in the fabric and carefully rip the fabric into long 1 1/2-inch strips. Once cut iron the long strips (ripping curls them) and then cut into 8-inch lengths. When you rip the fabric, the edge of the fabric will have more loose threads, but there is no way I can suggest cutting all those strips by hand with scissors.
A great way to keep track of how many strips you need to cut is to lay them together in groupings of 10. If you plan on doing your pretty wreath over a few days, wrap the bundles with an elastic band, and grab a few every time you turn the TV on. This is the perfect project for keeping your hands busy while you concentrate on something else.

Step 2 – Tying the Fabric to the Wreath Form
This is my wreath frame, it has 9 sections and four rings. I chose to tie the fabric strips over one wire, resulting in a thicker wreath with more fabric ties.
Note: If you want a less full wreath using less fabric, you can tie the fabric strips around two wires instead of one.

Attach the fabric strips to the wreath form a section at a time. So all the sections are even (with the same fullness) divide the total number of fabric strips by the number of sections your wreath form has. For example, I divided my strips into 9 equal piles of strips, with 30 drop cloth strips and 30 ticking strips.
There are four wires in each section so I used 13 strips on the innermost ring, 15 on the two center rings, and 17 on the outer rings.
To attach the strips loop them around the wire, so the fold is at the underside. Make sure the two ends are even on the top side and tie it into a simple knot.

You may find some of the strips’ tails turn and go to the back side as you craft. Once you’re done with the section, check the back side of your wreath to make sure all the rag ends are orientated toward the front before continuing to the next section.

If there are any strip ends on the back side of your wreath, push them through to the front side, and then pull them straight on the front side.
Continue until you have a complete beautiful wreath wreath. Once you have the wreath done, trim off any obviously uneven strips, and any obvious loose threads.
Plain Ticking and Dropcloth Fabric Wreath
The finished wreath is fabulous all on its own, I love it, it’s so neutral and shabby and farmhouse and dare I say cute. It’s well worth having an abundance of fabric strips to make it so thick and fluffy.

The ticking and dropcloth are both neutral allowing for easy updates for seasonal decor ideas. To make these three different seasonal wreaths I grabbed a few simple items from my craft room and took less than five minutes on each update to show you some quick examples. I am so happy with how it turned out, it was well worth saving my ticking fabric.
Different Seasonal Rag Wreath Ideas
This large rag wreath can used any time of year and updated in various ways with accessories. You can take a wreath from last year, accessorize it differently, and hang it on your door.
Or you can make several wreaths for different seasons by swapping out different fabric choices in new fabric colors. Green sparkling fabric for St Patrick’s Day, red or pink fabric on a heart wreath form for Valentine’s, pretty plaids for a Fall wreath or Christmas. The wreaths are easy to store, just place them in a plastic bag to keep them clean. Once you’re ready to use them fluff it out and reuse.
The Farmhouse Rag Wreath
A simple twine and black macrame cord ribbon and simple galvanized cow make the wreath obviously farmhouse and fun.

A Halloween Rag Wreath
To update the wreath I kept the same ribbon as the farmhouse wreath and added a haunted house and some sparkly black branches.

The items are very easy to attach using wire as the fabric strips easily camouflage the wires, and the little house is well balanced by the width of the wreath.

A Christmas Rag Wreath
Every time I updated the wreath, I would love it more than the last version. For the Christmas wreath, I took two dollar store sprigs of red berries, some buffalo check ribbon, and two of the red cardinals I have for our Christmas tree.

I cannot wait to pop this wreath in front of a shiplap backdrop or hang it on a chalkboard maybe. I love it every bit as much as I was hoping to. Hope you love it as well.
Hanging The Rag Wreath
To hang the rag wreath you can either loop the outer wires on a nail, or you can make a simple wreath hanger by twisting a pipe cleaner to the back of the wreath. To make the hanger extra secure add a bit of hot glue to the twists in the pipe wire hanger.
This turned out to be a beautiful fabric wreath in its neutral colors and large size. It’s perfect just as is hanging over our guest bed.
I love it every bit as much as I was hoping to. Hope you love it as well.
Happy Crafting, Leanna
Pin for Later

Other Wreath Crafts

Easy Valentine’s Day Wreath
A large Valentine’s Day Wreath craft, in soft pink wool. The grain stripe fabric ribbon is all the embellishment I thought this simple wreath needed.
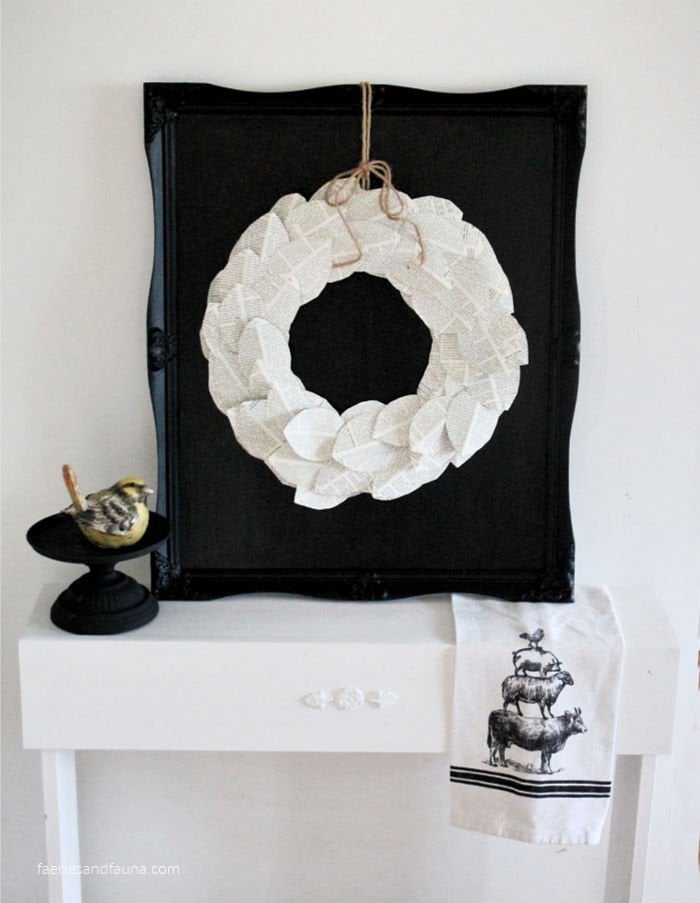
Affordable Book Page Wreath
You can make this Affordable Book Page Wreath using old book pages and a cardboard backing. I hung mine on a large black chalkboard for contrast, but that isn’t at all necessary.
I know this is probably a really dumb question, but I’m asking it anyway. Lol. Do you tie each color separately?
I love the version with the spooky house, Leanna! But I also love that tin cow. Where did you find it?
Love that you can change this out for the seasons. Dropcloth and ticking look so lovely together.
Love this Leanna! I love how it can be used . year round.
I love this Leanna! So versatile. But I love the farmhouse wreath with the cow, it’s my favorite!
Your rag wreath is fabulous, Leanna, so nice a full! Well worth the extra time to cut all those fabric strips. I love how it can be changed for the seasons. ADORABLE Halloween display and so pretty with the red berries for Christmas. Pinned 🙂
Beautiful Leanna and well worth the effort of cutting all the strips. The fullness of the wreath and the color scheme together make it look “lush” and oh, so expensive.
Love this wreath! I love drop cloth and ticking fabric and the galvanized cow brought me back to my grandparents’ farm! I adore galvanized anything! Even better are your takes on how to change it to Halloween/Oct and then Christmas. Will be making one of these!!! Thanks so much for your inspiration! Know that we readers are appreciating you.
This wreath is adorable. I like how you can change it up